
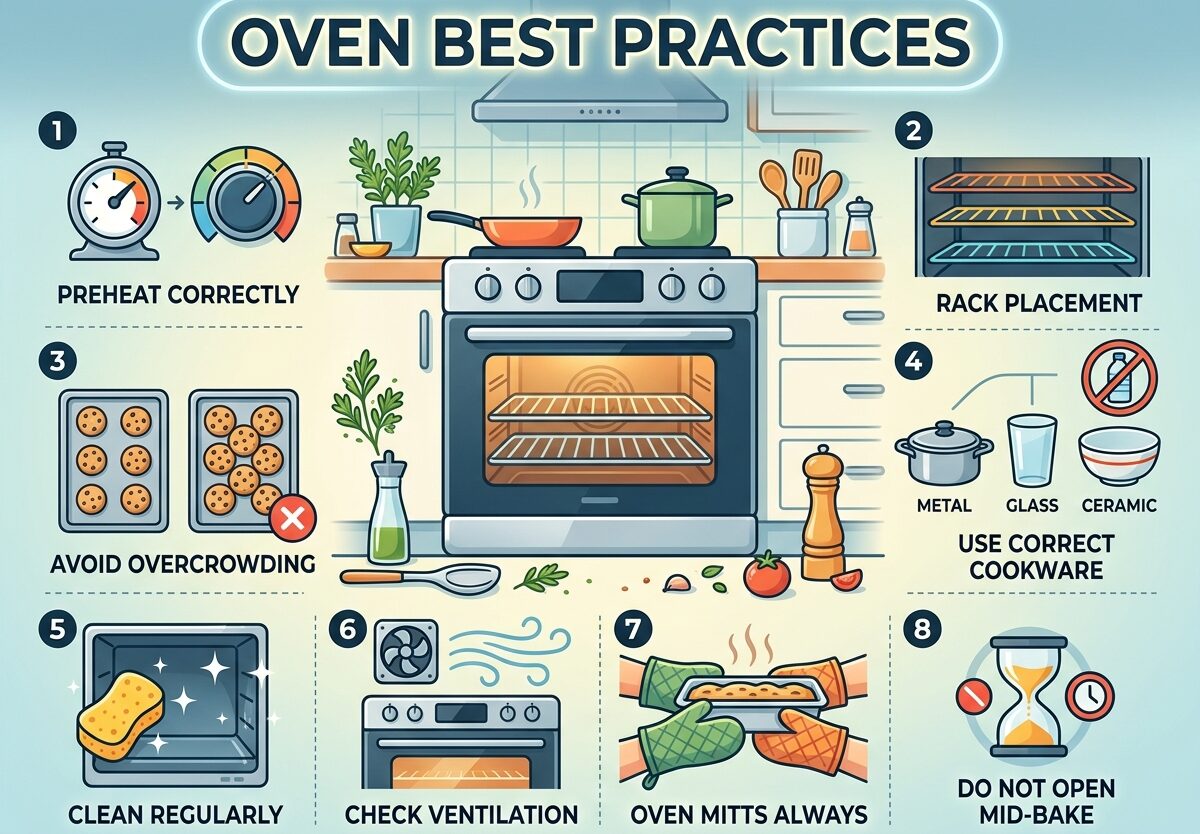
Whether you’re a complete beginner learning to cook for the first time or an experienced home cook looking to improve your results, understanding oven best practices can transform your cooking. I’ve spent years working with various oven types, and I’ve learned that proper technique matters more than fancy recipes or expensive equipment.
Your oven is one of the most versatile appliances in your kitchen, capable of everything from delicate pastries to roasting a perfect turkey. Yet many home cooks struggle with inconsistent results, undercooked centers, or burnt edges. These problems often stem from not understanding how to use an oven properly.
In this comprehensive guide to oven best practices, I’ll share everything you need to know about using your oven safely and effectively. You’ll learn the science behind how ovens work, practical techniques for consistent results, and professional tips that most home cooks never discover.
Understanding Your Oven Type
The first step in mastering oven best practices is understanding what type of oven you have. Different ovens operate differently, and knowing your oven’s characteristics helps you adjust your cooking techniques accordingly.
Conventional vs Convection Ovens
Conventional ovens use heating elements at the top and bottom to generate radiant heat. Heat naturally rises, creating temperature variations where the top of the oven is hotter than the bottom. This is why conventional ovens often have hot spots that can cause uneven cooking.
Convection ovens include a fan that circulates hot air throughout the oven cavity. This circulation eliminates most hot spots and creates more consistent temperatures. I’ve found that convection cooking typically reduces cooking time by 20-25% and can improve browning and crisping significantly.
When using convection settings, reduce your recipe temperature by 25°F and start checking for doneness earlier than the recipe suggests. The circulating air cooks food more efficiently, which is why convection is excellent for roasting meats and baking cookies.
Gas vs Electric Ovens
Gas ovens use a burner at the bottom of the oven cavity to generate heat. They tend to have more humidity because combustion produces water vapor, which can actually be beneficial for bread baking. However, gas ovens often have more temperature fluctuations and may have a pronounced hot spot near the burner.
Electric ovens use heating elements that provide more consistent temperatures and drier heat. They’re typically better for precise baking tasks where exact temperatures matter. Electric ovens also tend to hold heat more steadily, which helps with delicate baked goods.
I recommend using an oven thermometer regardless of your oven type. Built-in thermostats can be inaccurate by 25 degrees or more, and an independent thermometer is the only way to know your true oven temperature.
Oven Symbols and Settings Explained
Modern ovens come with numerous symbols and settings that can be confusing. Here are the most common ones you’ll encounter:
- Single horizontal line – Bottom heating only (great for pizza crusts)
- Double horizontal lines – Traditional bake from top and bottom elements
- Single wavy line – Full grill or broil from top element
- Double wavy lines – Dual grill from top and bottom
- Fan symbol – Convection mode with circulating air
- Fan with line – Convection bake (bottom heat plus fan)
- Snowflake symbol – Defrost setting (fan without heat)
- Droplet symbol – Steam cooking (on premium models)
Understanding these symbols helps you select the right mode for your cooking task. When in doubt, the traditional double-line bake setting works for most general cooking needs.
Preheating Best Practices and Temperature Accuracy
Proper preheating is one of the most critical oven best practices, especially for baking. I’ve tested this extensively, and the difference between a properly preheated oven and a cold oven is dramatic.
How to Preheat Properly
Preheating means bringing your entire oven to the desired temperature before putting food inside. This isn’t just about the air temperature – the oven walls, racks, and cooking surfaces all need to reach temperature for consistent results.
Here’s the proper preheating procedure I recommend:
- Remove any items from the oven before heating
- Set your desired temperature using the oven controls
- Wait for the preheat indicator light or signal (usually 15-20 minutes)
- Give it an additional 5-10 minutes after the signal for full heat saturation
- Use an oven thermometer to verify actual temperature
I’ve found that most oven preheat signals go off when the air reaches temperature, but the oven interior mass hasn’t fully absorbed the heat yet. That extra 5-10 minutes makes a significant difference, especially for baking.
Preheating Time Guidelines
How long does it take to preheat an oven? This varies by oven type and temperature setting:
- 350°F (175°C) – 15-20 minutes for most ovens
- 400°F (200°C) – 20-25 minutes
- 450°F (230°C) – 25-30 minutes
- 500°F (260°C) – 30+ minutes (if your oven goes this high)
Convection ovens typically preheat faster because the fan circulates air more efficiently. Gas ovens may take slightly longer than electric models to reach full temperature.
For the best results, I recommend always preheating for baking. For roasting meats and vegetables, you can sometimes start with a cold oven, but you’ll need to extend cooking time significantly.
Using an Oven Thermometer
Every serious home cook should use an independent oven thermometer. Built-in oven thermostats are notoriously inaccurate, often off by 25 degrees or more. I’ve tested ovens that were 50 degrees off from the set temperature!
Place your oven thermometer in the center of the oven rack and let it sit through several preheat cycles. This gives you a baseline understanding of your oven’s true temperature. You might discover that setting your oven to 350°F actually produces 375°F, which explains why your cookies burn.
Once you know your oven’s accuracy, you can adjust accordingly. If your oven runs 25 degrees hot, simply set it 25 degrees lower than recipes call for. This simple step dramatically improves cooking consistency.
Temperature Calibration
Many modern ovens allow you to calibrate the thermostat, which can correct minor inaccuracies. Check your owner’s manual for calibration instructions – this usually involves pressing certain button combinations to adjust the displayed temperature up or down.
If your oven is significantly off (more than 50 degrees) or calibration doesn’t work, you may need a professional technician to adjust or replace the thermostat. However, using an independent thermometer and adjusting recipe temperatures accordingly works perfectly well.
Oven Rack Placement Guide
Proper rack placement is one of the most overlooked aspects of oven best practices. The position of your food within the oven cavity dramatically affects cooking results due to heat distribution patterns.
Rack Positions Explained
Most ovens have 5-7 rack positions, numbered from the bottom. Here’s how each position affects cooking:
- Bottom rack (position 1) – Direct heat from bottom element, slowest overall cooking. Best for slow roasting and crisping pizza crusts.
- Lower-middle rack (position 2-3) – Good for large roasts, casseroles, and dishes that need longer cooking without excessive top browning.
- Center rack (position 3-4) – The sweet spot for most baking and roasting. Most consistent heat distribution.
- Upper-middle rack (position 4-5) – Good for baking that needs top browning, like cakes and muffins.
- Top rack (position 6-7) – Direct heat from top element, fastest cooking. Best for broiling and quick top browning.
Heat rises in conventional ovens, so upper positions cook faster and get more top heat. Lower positions cook slower with more bottom heat. The center position provides the most balanced cooking environment.
Food-Specific Rack Placement
Different foods require different rack positions for optimal results:
- Bread and pizza – Lower-middle or bottom rack to develop crispy bottoms
- Cookies – Center rack for even baking
- Cakes – Center or upper-middle rack to prevent bottom burning
- Roasted chicken – Center rack, lower if using a roasting pan
- Broiled steak – Top rack positioned 3-4 inches from broiler element
- Casseroles – Center or upper-middle rack for thorough heating
- Meringues and delicate baked goods – Center or lower position to prevent browning
These are general guidelines – you may need to adjust based on your specific oven’s characteristics. This is where learning your individual oven’s quirks becomes valuable.
Multiple Rack Cooking
When cooking on multiple racks simultaneously, rotation becomes critical for even results. I recommend rotating baking sheets 180 degrees halfway through cooking and swapping their positions (top to bottom, front to back).
For multiple-rack baking, leave at least 2-3 inches between pans and the oven walls for proper air circulation. Crowding the oven blocks airflow and creates uneven cooking.
When possible, I prefer using convection mode for multiple-rack cooking. The circulating fan eliminates much of the temperature variation between racks, reducing the need for constant rotation.
Cooking Modes and Settings Explained
Understanding when to use different oven settings is essential for oven best practices. Each mode serves a specific purpose and produces different results.
Bake vs Roast vs Broil
These three fundamental modes work differently:
Bake uses both top and bottom heating elements at moderate temperatures (usually 300-400°F). Heat surrounds food from all directions, cooking it evenly from the outside in. Baking is ideal for casseroles, breads, cakes, and anything that needs gentle, consistent heat.
Roast is essentially baking at higher temperatures (400-450°F) typically used for meats and vegetables. The high heat creates a flavorful browned exterior while cooking the interior. Roasting usually involves fat and produces caramelization for deep flavor development.
Broil uses only the top heating element at very high temperatures (500-550°F). It cooks food quickly from the top down, similar to an upside-down grill. Broiling is perfect for thin cuts of meat, melting cheese, and creating crispy toppings. Unlike baking and roasting, broiling requires close attention as food goes from perfectly cooked to burnt very quickly.
Think of it this way: bake for gentle cooking, roast for high-heat browning, and broil for quick top heat. Choosing the right mode for your food makes a tremendous difference in results.
Convection Settings
Convection ovens offer several specialized modes:
Convection Bake uses the fan with reduced heat from both elements. It’s excellent for cookies, pies, and pastries where you want even browning and flaky crusts. Reduce temperature by 25°F from recipe recommendations.
Convection Roast alternates between the fan and different heating elements. This creates a searing effect on meat surfaces while cooking the interior. I love convection roast for chicken and turkey – the skin crisps beautifully while the meat stays juicy.
Convection Broil circulates hot air from the top element. It’s faster than regular broiling and more even, making it great for thicker cuts of meat that need thorough cooking under the broiler.
When adapting recipes for convection, reduce temperature by 25°F and start checking for doneness 75% of the way through the recommended cooking time. The circulating air is significantly more efficient than static heat.
Special Modes
Modern ovens include specialized settings for specific tasks:
Proof maintains a low temperature (85-95°F) perfect for yeast dough rising. This gentle heat encourages yeast activity without killing it or causing premature fermentation.
Keep Warm holds food at serving temperature (around 170°F) without continuing to cook it. This is ideal for timing complex meals where different dishes finish at different times. However, I recommend using this sparingly as extended holding can dry out food.
Self-Clean uses extremely high temperatures (800-900°F) to incinerate food residue. While convenient, I have concerns about this mode. The intense heat can damage oven components over time, and the fumes can be problematic for people with respiratory issues or birds in the household.
Delay Start lets you program the oven to begin cooking later. This can be useful for meal planning, but I never use this feature with perishable foods due to food safety concerns. It’s fine for bread dough that will rise and then bake.
Temperature Conversion Guide
When converting between conventional and convection recipes, use these guidelines:
- Reduce temperature by 25°F when switching from conventional to convection
- Check for doneness 25% sooner with convection cooking
- Reduce cooking time by 20-25% for most convection recipes
- Reduce temperature by 50°F when converting from regular bake to convection broil
Keep a conversion chart handy until you become comfortable with these adjustments. Eventually, you’ll develop an intuitive sense for how convection changes cooking times and temperatures.
Oven Cooking Best Practices
Now that we understand oven settings and rack placement, let’s cover essential cooking techniques that will transform your results.
Hot Spot Detection and Management
Every oven has hot spots – areas that run consistently hotter than others. Identifying and compensating for these hot spots is one of the most valuable oven best practices you can learn.
Here’s how I test for hot spots using the bread method:
- Preheat your oven to 350°F
- Arrange slices of white bread in a grid pattern across a baking sheet
- Bake for 10-15 minutes until lightly toasted
- Remove the sheet and examine the toast pattern
- Darker areas indicate hot spots, lighter areas show cooler zones
Once you know your oven’s hot spots, you can position sensitive items accordingly. For cakes and cookies, rotate pans 180 degrees halfway through baking to compensate. This simple technique dramatically improves consistency.
You can also manage hot spots by placing baking stones or cast iron skillets on unused racks. These thermal masses help stabilize temperature and reduce fluctuations.
Air Circulation Tips
Proper air circulation is essential for even cooking. Here are my top tips:
- Don’t crowd the oven – leave at least 2 inches between pans and oven walls
- Use rimless baking sheets when possible to allow airflow underneath
- Avoid covering entire rack surfaces with foil or pans
- Rotate pans 180 degrees halfway through cooking
- Leave oven door closed as much as possible during cooking
Every time you open the oven door, temperature drops by 25-50 degrees and takes several minutes to recover. I use the oven light to check doneness without losing heat. If you must open the door, make it quick and close it gently.
Cookware Selection
Not all cookware is created equal for oven use. Different materials conduct and retain heat differently, affecting your cooking results:
Aluminum heats quickly and evenly, making it excellent for baking and roasting. It’s lightweight and responsive to temperature changes. However, acidic foods can react with uncoated aluminum.
Stainless steel is durable and non-reactive but heats less evenly. Look for tri-ply construction with aluminum cores for better heat distribution. It’s excellent for roasting pans and baking sheets.
Cast iron retains heat exceptionally well and creates beautiful searing. It’s perfect for cornbread, skillet cookies, and dishes that benefit from crisp edges. However, it responds slowly to temperature changes.
Glass and ceramic heat slowly but retain heat well. They’re excellent for casseroles and dishes where you want gentle, even heating. Reduce oven temperature by 25°F when using glass bakeware.
Silicone is flexible and non-stick but a poor heat conductor. It’s great for muffins and delicate items but can produce pale bottoms on baked goods.
For oven-safe cookware options that work across temperature ranges, look for pieces rated to at least 500°F. Always check your cookware’s temperature rating before putting it in the oven. Understanding air fryer and oven temperature ranges can also help when transitioning between these cooking appliances.
Common Cooking Mistakes
Avoid these common mistakes that undermine oven best practices:
- Not preheating sufficiently – Always preheat for baking, give extra time after the signal
- Opening the door too often – Use the oven light to check progress
- Crowding the oven – Leave space for air circulation between pans
- Using the wrong rack position – Center rack is safest, adjust based on food type
- Ignoring hot spots – Learn your oven’s patterns and rotate accordingly
- Trusting the built-in thermometer – Use an independent oven thermometer
- Not adjusting for convection – Reduce temperature by 25°F when using convection
I’ve made all of these mistakes myself, and correcting them transformed my cooking results. Pay attention to these fundamentals and you’ll see immediate improvements.
Oven Cleaning and Maintenance Routine
Regular cleaning is essential for both oven performance and food quality. Built-up residue affects heat distribution, creates smoke, and can transfer unpleasant flavors to your food.
Daily Maintenance
The best oven cleaning approach is prevention. After each use, once the oven has cooled slightly:
- Wipe up fresh spills immediately with a damp cloth
- Check for food debris on the oven floor
- Wipe door edges to prevent buildup
- Remove any fallen pieces from heating elements
Addressing spills while they’re fresh prevents them from baking onto surfaces and becoming difficult to remove. This simple habit saves hours of deep cleaning later.
Weekly Cleaning
Once a week, give your oven a quick cleaning session:
- Remove oven racks and wash in warm, soapy water
- Wipe interior surfaces with a damp cloth
- Clean the oven door glass inside and out
- Check and clean around door seals
- Vacuum or sweep around the oven exterior
This weekly routine prevents significant buildup and keeps your oven operating efficiently. A clean oven heats more evenly and doesn’t smoke during high-temperature cooking.
Deep Cleaning Methods
Every few months, perform a thorough deep clean:
Baking soda method – Make a paste from baking soda and water, apply to interior surfaces, and let sit overnight. The next day, wipe clean with a damp cloth and spray with vinegar to dissolve any remaining residue. This natural approach is effective and avoids harsh chemicals.
Ammonia method – Place a bowl of ammonia in a cold oven overnight. The fumes loosen grease and grime. The next day, remove the ammonia, ventilate well, and wipe clean with warm, soapy water. This method requires less scrubbing but needs good ventilation.
Commercial cleaners – These are effective but often contain harsh chemicals. If using them, follow directions carefully, wear gloves, ventilate thoroughly, and wipe all surfaces multiple times to remove residue.
For tough spots, make a paste of baking soda and water, apply to the area, and let sit for several hours. Scrub with a non-abrasive sponge and rinse thoroughly.
Self-Cleaning Cycle Safety
If you choose to use your oven’s self-cleaning feature, follow these safety precautions:
- Remove all racks and pans (the extreme heat can damage them)
- Wipe up large spills first (they can smoke excessively during cleaning)
- Ensure excellent ventilation – open windows and run exhaust fans
- Keep children and pets away from the kitchen
- Remove birds from the household (fumes are toxic to birds)
- Never leave the house during the cleaning cycle
- Wait until the oven has completely cooled before opening the door
Many experienced cooks avoid the self-cleaning cycle altogether due to concerns about fumes and potential damage to oven components. The baking soda method is safer and just as effective with a bit more effort.
Oven Safety Practices
Safety should always be a priority when working with ovens. These essential practices protect you and your family from accidents.
Basic Safety Rules
- Always use oven mitts when handling hot pans or touching oven surfaces
- Keep flammable materials away from the oven
- Never leave the oven unattended when in use
- Turn off the oven immediately if you smell gas
- Use the oven light to check food instead of opening the door
- Allow the oven to cool completely before cleaning
- Keep children away from hot ovens
- Ensure proper ventilation when using the oven
These simple rules prevent most common oven accidents. Develop these habits and they’ll become second nature.
Emergency Procedures
Know what to do in case of oven emergencies:
Oven fire – Keep the oven door closed. Turn off the oven. The lack of oxygen will suffocate the flames. Never open the door, as this feeds the fire with oxygen. If the fire doesn’t extinguish quickly, evacuate and call emergency services.
Grease fire – Never use water on a grease fire. Slide a metal lid over the pan to smother flames, or use a Class B fire extinguisher. Baking soda can also help extinguish small grease fires.
Smokey oven – Turn off the heat, close the door, and ventilate the area. Open windows and turn on exhaust fans. Once the oven has cooled, identify and clean the source of the smoke.
Gas smell – If you smell gas, do not use any electrical switches or appliances. Extinguish any open flames immediately. Open windows and doors if possible safely. Leave the house and call your gas company or emergency services from outside.
Family Safety Considerations
For households with children or pets, additional precautions are necessary:
- Use oven locks to prevent children from opening hot ovens
- Turn pot handles inward to prevent accidental spills
- Create a “no-go zone” around the oven during cooking
- Teach children about oven safety as soon as they’re old enough
- Consider placing oven knob covers to prevent accidental activation
- Use back burners when possible and keep flammable items away
These measures prevent accidents and create a safer kitchen environment for the whole family.
Common Oven Problems and Solutions
Even with proper oven best practices, issues can arise. Here are solutions to common problems:
Temperature inaccurate – This is usually caused by thermostat calibration drift. Solution: Use an oven thermometer and recalibrate if possible.
Uneven cooking – Caused by hot spots or poor air circulation. Solution: Test for hot spots using the bread method, rotate pans halfway through cooking, and avoid crowding the oven.
Food burns on bottom – The rack is too low or you’re using the wrong mode. Solution: Move to center rack and use bake mode instead of broil.
Food not browning – Temperature is too low. Solution: Verify temperature with an oven thermometer and increase by 25°F.
Oven won’t heat – Usually a heating element failure. Solution: Check your breaker, but this typically requires professional repair.
Self-clean not working – Often a door latch issue or temperature sensor problem. Solution: Ensure the door is locked properly, but may require professional service.
Oven smokes – Caused by spills or residue buildup. Solution: Clean thoroughly and always wipe spills immediately.
Door won’t close – Worn seals or bent hinges. Solution: Replace door seals and check hinges for damage.
For problems requiring professional repair, weigh the cost against the age of your oven. Repairs often make sense for ovens less than 10 years old, while replacement may be more economical for older units.
FAQs
What are the tips for using an oven?
The most important oven tips include: always preheat fully before baking (especially for baked goods), use an independent oven thermometer as built-in thermostats are often inaccurate by 25+ degrees, learn your oven’s hot spots and rotate pans accordingly, keep the door closed as much as possible to maintain temperature, don’t crowd the oven to ensure proper air circulation, clean spills immediately to prevent smoke and flavor transfer, and use the appropriate rack position for your food type.
How long does it take to preheat an oven?
Most ovens take 15-20 minutes to preheat to 350°F (175°C). Higher temperatures require more time – 400°F takes 20-25 minutes, while 450°F may take 25-30 minutes. Convection ovens typically preheat faster. However, I recommend giving your oven an additional 5-10 minutes after the preheat indicator goes off, as this allows the oven walls and racks to fully absorb heat for consistent cooking results.
What are the five rules for baking?
The five essential rules for baking are: 1) Preheat your oven completely before putting food in – this is non-negotiable for proper baking, 2) Use an oven thermometer to verify actual temperature since built-in thermostats are often inaccurate, 3) Position racks correctly based on what you’re baking (center rack for most items), 4) Don’t open the oven door frequently – use the oven light to check progress, and 5) Rotate pans 180 degrees halfway through baking to compensate for any hot spots in your oven.
What are common oven baking mistakes?
The most common oven baking mistakes include: not preheating sufficiently (or at all), opening the oven door too frequently which drops temperature significantly, using the wrong rack position for the food type, crowding the oven which blocks air circulation, not adjusting for convection settings (reduce temperature by 25°F), ignoring your oven’s hot spots instead of compensating for them, and trusting the built-in thermometer instead of using an independent one.
What is the difference between bake and roast?
Bake and roast are essentially the same cooking method but used in different contexts. Both use top and bottom heating elements to surround food with heat. Bake typically refers to lower temperatures (300-400°F) for foods like breads, cakes, and casseroles that need gentle, even cooking. Roast refers to higher temperatures (400-450°F) typically used for meats and vegetables where you want exterior browning and caramelization. The higher heat of roasting creates flavorful crusts while cooking the interior.
How do I use a convection oven?
When using a convection oven, reduce the recipe temperature by 25°F from what’s called for in conventional oven recipes. The circulating air cooks food more efficiently and evenly. Start checking for doneness about 25% sooner than the recipe suggests, as convection typically reduces cooking time by 20-25%. Use convection for roasting meats, baking cookies, and any dish where you want even browning. For delicate baked goods like cakes and soufflés, you may prefer conventional baking for more gentle heat.
What do oven symbols mean?
Common oven symbols include: single horizontal line (bottom heating only for pizza crusts), double horizontal lines (traditional bake from top and bottom), single wavy line (broil from top element), double wavy lines (dual grill), fan symbol (convection mode with circulating air), fan with line (convection bake), snowflake (defrost setting), and droplet (steam cooking on premium models). Understanding these symbols helps you select the right mode for your cooking task.
Why is my oven temperature inaccurate?
Oven temperature inaccuracy is extremely common – built-in thermostats are often off by 25 degrees or more. Causes include normal wear and tear on the thermostat sensor, calibration drift over time, or simply manufacturing variations. Older ovens tend to become more inaccurate. The solution is to use an independent oven thermometer to learn your oven’s true temperature. Many ovens can be recalibrated, but simply adjusting your recipe temperatures based on your thermometer readings works perfectly well.
Conclusion
Mastering oven best practices takes time and observation, but the results are worth the effort. By understanding your oven’s characteristics, following proper preheating procedures, using appropriate rack placement, and maintaining your appliance properly, you’ll achieve consistent, professional-quality results at home.
Remember that every oven is unique. The most valuable practice is learning your specific oven’s quirks and characteristics. Keep an oven thermometer handy, note hot spots, and track what works in your particular oven.
These fundamentals – proper preheating, accurate temperature knowledge, strategic rack placement, appropriate mode selection, and regular maintenance – form the foundation of successful oven cooking. Apply these principles consistently, and you’ll see immediate improvements in your cooking results.
Whether you’re baking delicate pastries, roasting a Sunday chicken, or broiling weeknight steaks, following these oven best practices will help you achieve delicious, consistent results every time you cook.



Leave a Comment