
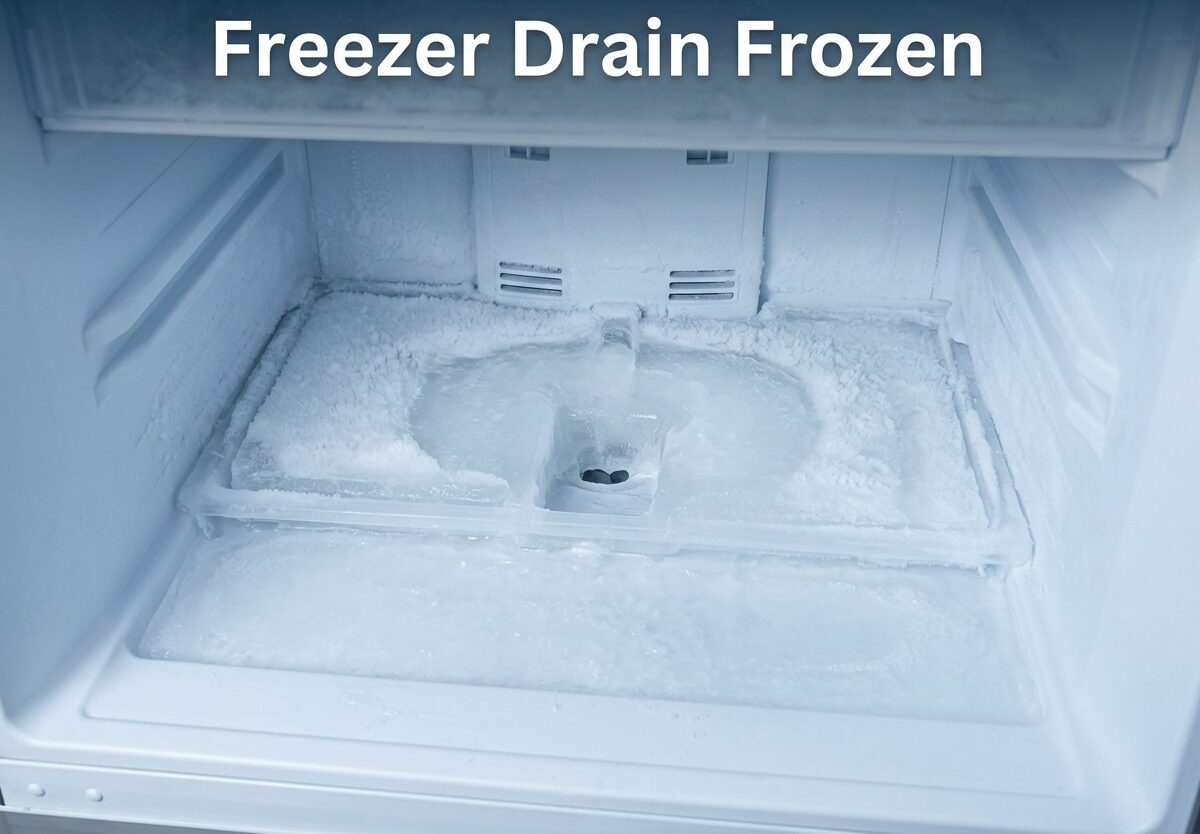
You open your freezer and find water pooling at the bottom. Again. The ice buildup is back, and there’s that puddle forming on the floor. If this sounds familiar, you’re dealing with a freezer drain frozen shut. I’ve been there, and after clearing my freezer drain four times in one year, I finally figured out how to stop it for good.
In this guide, I’ll walk you through exactly what’s happening, why it keeps occurring, and three proven methods to fix it. Including the copper wire trick that solved my recurring freezer drain problem permanently.
What Is a Freezer Drain and Why Does It Freeze?
Your freezer has a defrost drain hole located at the back bottom of the freezer compartment. During the defrost cycle, the heating element warms the evaporator coil, melting frost and ice. This water should flow through the drain tube into a drain pan beneath the refrigerator, where it eventually evaporates.
When the drain line freezes, that water has nowhere to go. It backs up, refreezes, and creates a cycle of ice buildup and water leaks. The freezer drain frozen problem typically happens because the drain tube passes through uninsulated space where cold air can freeze the water inside.
5 Signs Your Freezer Drain Is Frozen
Spotting a frozen drain early saves you from bigger headaches. Here are the telltale signs I’ve learned to recognize:
1. Water pooling in the freezer bottom – This is usually the first sign. Water collects under the bottom drawer instead of draining away.
2. Ice sheet under the freezer drawer – When water refreezes, it forms a solid ice layer at the bottom of the freezer compartment.
3. Water leaking onto the floor – Once the drain is completely blocked, melted water overflows and leaks out the door or onto your floor.
4. Frost buildup on the back wall – Excessive frost on the rear interior wall often indicates the drain isn’t functioning properly.
5. Unpleasant odors – Standing water that can’t drain leads to mold growth and that musty smell.
What Causes a Freezer Drain to Freeze?
Understanding the root cause helps prevent the problem from returning. Based on my research and experience, here are the main culprits:
Temperature set too low – If your freezer is colder than necessary (below 0°F), the drain tube is more likely to freeze. The ideal freezer temperature is between 0°F and 5°F.
Dirty condenser coils – When coils are coated in dust, your freezer works harder and runs longer defrost cycles. This creates more water that can overwhelm and freeze in the drain line.
Missing or broken drain strap – Many freezers have a small metal strap that carries heat from the defrost heater to the drain tube. If this strap is missing or improperly positioned, the drain stays too cold.
High humidity environment – If you live in a humid climate or your kitchen is particularly humid, your freezer produces more condensation. This extra water increases the chance of the drain freezing shut.
Door seal issues – A worn gasket lets warm, moist air inside. This moisture freezes on the evaporator coil and creates excess water during defrost cycles.
Tools You’ll Need to Fix a Frozen Freezer Drain
Before starting, gather these items. Most are already in your home:
Basic tools:
- Screwdriver (usually Phillips)
- Towels or rags for water cleanup
- Shallow pan or towels for the drain area
- Flashlight
For thawing methods:
- Turkey baster or large syringe
- Hot (not boiling) water
- Hair dryer
- Optional: 12-14 gauge copper wire (for permanent fix)
How to Unfreeze a Freezer Drain: Step-by-Step Methods
Here are three proven methods to fix a freezer drain frozen shut. I recommend trying them in order, starting with the quickest approach.
Method 1: Hot Water Flush (Quickest)
This method works in about 15-30 minutes and is effective for most clogs. It’s the first thing I try whenever my freezer drain acts up.
Step 1: Unplug the refrigerator – Safety first. Always disconnect power before working inside your freezer.
Step 2: Remove freezer contents – Take out all food and place it in a cooler with ice. You’ll need full access to the freezer interior.
Step 3: Locate the drain hole – Find the small hole at the bottom rear of the freezer compartment. It may be hidden under a plastic panel that you’ll need to remove.
Step 4: Flush with hot water – Fill a turkey baster with hot tap water (not boiling, which could damage plastic parts). Squirt the water directly into the drain hole. Repeat this process 5-10 times until the water begins to drain freely.
Step 5: Verify the fix – Pour a small amount of water into the drain. If it flows through without backing up, you’ve successfully cleared the ice. Plug the refrigerator back in and return food to the freezer.
Method 2: Hair Dryer Technique
When hot water alone doesn’t work, adding directed heat can melt stubborn ice blockages in the drain line.
Step 1: Follow safety and access steps – Unplug the refrigerator and remove all contents as described in Method 1.
Step 2: Remove the rear freezer panel – Most freezers have a removable panel at the back. Unscrew it carefully to expose the evaporator coil and drain trough.
Step 3: Position towels – Place towels around the drain area to catch melting water.
Step 4: Apply heat with hair dryer – Set your hair dryer to medium heat. Direct the airflow at the drain hole and the exposed portion of the drain line. Keep the dryer moving to avoid overheating any spot.
Step 5: Monitor progress – As the ice melts, you’ll see water begin to flow. Continue heating until water drains freely through the hole.
Step 6: Test and reassemble – Pour water into the drain to confirm it’s clear. Replace the rear panel, plug in the refrigerator, and return your food.
Method 3: The Copper Wire Permanent Fix
This is the method that finally stopped my freezer drain from freezing repeatedly. It transfers heat from the defrost element directly into the drain tube, preventing ice from forming.
Step 1: Complete thaw first – Use Method 1 or 2 to completely clear the frozen drain before installing the copper wire.
Step 2: Access the defrost components – With the refrigerator unplugged and rear panel removed, locate the defrost heater (usually a glass tube with a heating element inside) and the drain hole.
Step 3: Cut the copper wire – Cut a piece of 12-14 gauge copper wire approximately 6-8 inches long. Strip about 1/2 inch of insulation from each end if using insulated wire.
Step 4: Wrap around defrost heater – Carefully wrap one end of the copper wire around the defrost heater tube 2-3 times. Ensure good contact but don’t wrap so tightly that it damages the heater.
Step 5: Insert into drain hole – Route the other end of the wire directly into the drain hole. It should extend 2-3 inches down into the drain tube.
Step 6: Secure the wire – Use a small zip tie or electrical tape to secure the wire to prevent it from falling out. Make sure the wire stays in contact with both the heater and the drain.
Step 7: Reassemble the freezer – Replace the rear panel carefully, ensuring the wire remains in position. Plug in the refrigerator.
Step 8: Monitor for effectiveness – Over the next few weeks, check that the drain remains clear. The copper wire will transfer heat during each defrost cycle, keeping the drain from freezing.
How to Keep Your Freezer Drain From Freezing Again
Prevention beats repeated repairs. Based on what I’ve learned from appliance repair forums and my own experience, here’s how to avoid future issues:
Check temperature settings – Keep your freezer between 0°F and 5°F. Colder settings increase the likelihood of drain freezing without providing any food preservation benefit.
Clean condenser coils annually – Vacuum or brush dust from the coils behind or beneath your refrigerator. Clean coils improve efficiency and reduce the strain on your defrost system.
Install a drain strap – If your freezer has a defrost heater, ensure the drain strap is properly positioned. This simple metal part carries heat to the drain line and prevents freezing.
Control kitchen humidity – Use exhaust fans when cooking, run a dehumidifier if you live in a humid climate, and avoid leaving the freezer door open for extended periods.
Inspect door gaskets – Test your door seal by closing the door on a dollar bill. If it slides out easily, replace the gasket. A tight seal prevents warm, moist air from entering.
Schedule seasonal maintenance – Before winter and summer, inspect the drain area and flush it with hot water as a preventive measure. These seasonal transitions are when freezer drain problems most often occur.
When to Call a Professional vs DIY
Most freezer drain issues are DIY-friendly repairs that cost nothing but time. However, certain situations warrant professional help:
DIY if: You’re comfortable with basic tools, the problem is clearly a frozen drain, and your freezer is otherwise functioning normally.
Call a pro if: The drain keeps freezing despite your fixes, you notice ice on the evaporator coils that doesn’t melt during defrost, or you suspect a faulty defrost heater or thermostat.
Cost comparison: DIY repair costs $0-20 (for copper wire if needed). Professional repair typically runs $150-300 depending on your location and the specific problem.
Brand-Specific Tips
While the general principles apply to all freezers, some brands have unique considerations:
Whirlpool/KitchenAid/Maytag: These models often have the drain hole under a plastic cover at the rear of the freezer. The drain strap is particularly important on these units.
Samsung: Some Samsung models have the drain behind the rear panel. Access requires removing more screws, but the copper wire fix works exceptionally well.
Frigidaire: Frigidaire freezers sometimes have a rubber drain plug that can be removed for easier cleaning. Remember to replace it after clearing the clog.
LG: LG models often have a more complex drain system with a heater already installed. If your LG freezer drain keeps freezing, the heater itself may need replacement.
FAQs
How do I know if my freezer drain is frozen?
Look for water pooling at the bottom of your freezer, ice buildup under the bottom drawer, water leaking onto the floor, frost on the back wall, or unpleasant odors. These are the most common signs of a frozen freezer drain.
How long does it take to unfreeze a freezer drain?
The hot water flush method typically takes 15-30 minutes. Using a hair dryer may take 30-45 minutes. Complete thawing with the freezer unplugged can take 2-4 hours, but active methods are much faster.
Can I use a hair dryer to unfreeze my freezer drain?
Yes, a hair dryer on medium heat works well for thawing a frozen drain. Always unplug the refrigerator first, keep the dryer moving to avoid overheating, and never use it near water.
Why does my freezer drain keep freezing?
Recurring freezing is usually caused by temperature set too low, a missing drain strap, dirty condenser coils, high humidity, or a worn door gasket. The copper wire fix addresses the root cause by transferring heat to the drain line.
What happens if defrost drain is clogged?
Water from the defrost cycle backs up and refreezes, creating ice buildup. Eventually water overflows, leaking into the freezer compartment and onto your floor. Standing water can also cause mold growth and unpleasant odors.
How do you unfreeze a refrigerator drain hole?
Unplug the refrigerator, remove the rear panel if needed, then flush the drain with hot water using a turkey baster. For stubborn clogs, carefully apply heat with a hair dryer until water flows freely.
How to prevent freezer drain from freezing?
Keep temperature between 0-5°F, clean condenser coils annually, ensure the drain strap is properly positioned, control humidity in your kitchen, and inspect door gaskets. The copper wire fix provides a permanent solution for recurring problems.
Conclusion
A freezer drain frozen shut is frustrating, but it’s a problem you can solve yourself. The hot water flush works for most clogs, while the hair dryer method handles tougher ice blockages. For recurring issues like I experienced, the copper wire trick provides a lasting solution by preventing the drain from freezing in the first place.
Regular maintenance – checking temperature settings, cleaning coils, and inspecting door seals – goes a long way toward preventing future problems. With the right approach and a bit of patience, you can stop dealing with puddles and get back to using your freezer the way it was meant to work.


Leave a Comment