
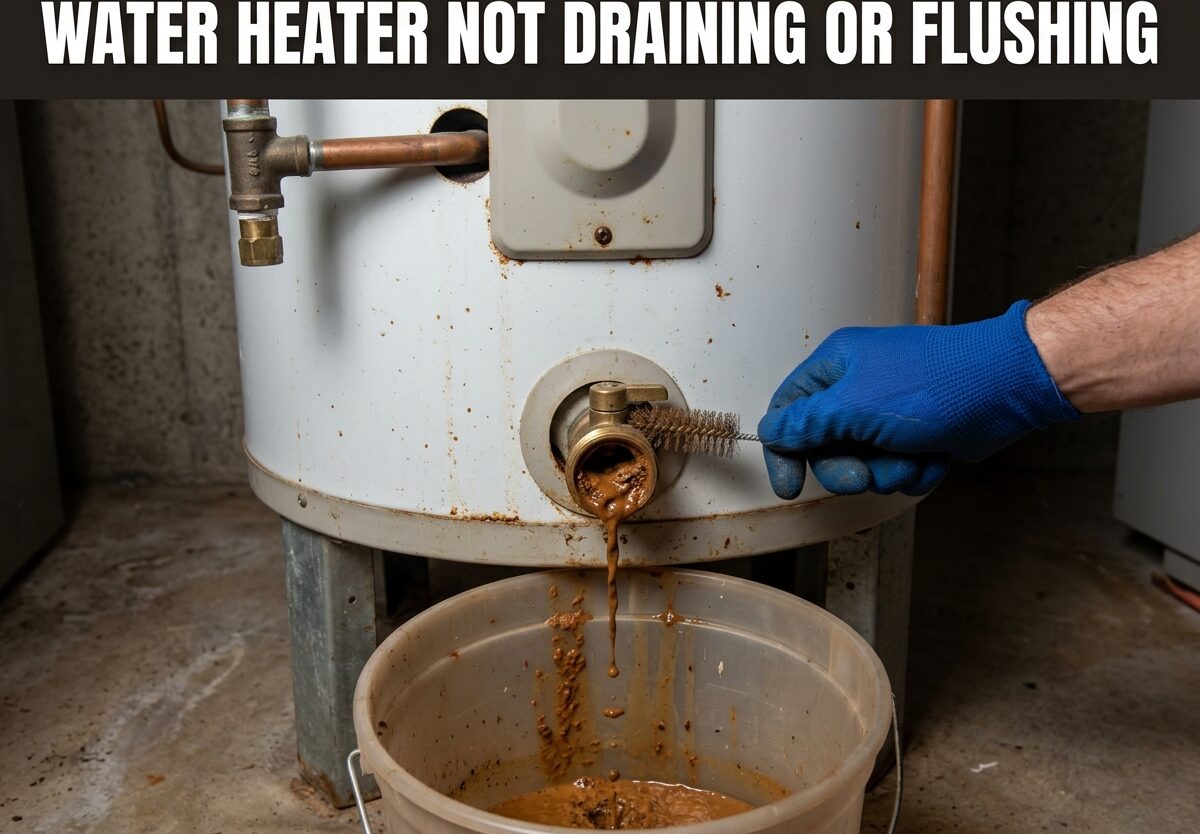
You’re standing in front of your water heater, drain valve open, hose connected, and nothing’s coming out. I’ve been there, and it’s frustrating. A water heater not draining is one of the most common maintenance issues homeowners face, especially in areas with hard water.
The good news is that most drainage problems are fixable without calling a professional. In this guide, I’ll walk you through exactly why your water heater isn’t draining and give you multiple methods to get it flowing again.
Water Heater Not Draining: Common Causes
Understanding why your water heater won’t drain helps you choose the right fix. In my experience helping homeowners troubleshoot this issue, these are the most common culprits.
Sediment Buildup at the Drain Valve
The number one reason your water heater isn’t draining is sediment accumulation. Over time, minerals from hard water settle at the bottom of your tank. When you open the drain valve, this sludge gets sucked into the valve opening like a vacuum seal, completely blocking water flow.
I’ve seen heaters with three inches of solid sediment at the bottom. That’s enough to completely clog the drain valve opening. The worst part is that the sediment forms a plug that’s actually stronger when you try to force water through it.
The Vacuum Effect
Your water heater is a sealed system. When you try to drain it without introducing air, a vacuum forms inside the tank. This vacuum prevents water from exiting through the drain valve.
Think of it like holding your thumb over a straw. The water stays inside until you let air in. The same principle applies to your water heater tank. Without breaking this vacuum, no amount of valve opening will get water flowing.
Heat Trap Nipple Problems
This is a cause many people overlook. Modern water heaters have heat trap nipples on the hot and cold water connections. These are designed to prevent heat loss, but they can also restrict flow during draining.
Some heat trap nipples have small balls inside that can get stuck in the closed position. Others have restrictive openings that barely let water through even under normal conditions. When you’re trying to drain the tank, these restrictions become complete blockages.
Closed Cold Water Supply
It sounds counterintuitive, but keeping the cold water supply OFF can actually prevent drainage. Without incoming water pressure to push sediment out, the drain has nothing to work with. This is why the power flush method (which I’ll cover) often works when standard draining fails.
Tools and Materials You’ll Need
Before attempting any of these solutions, gather these items:
- Garden hose (at least 5-10 feet long)
- Adjustable wrench or channel locks
- Screwdriver (flathead for some drain valves)
- Wire coat hanger or stiff wire
- Bucket or floor drain for water discharge
- Gloves and eye protection
- Towels or rags for cleanup
Safety Precautions Before Starting
WARNING: Water heater tanks contain scalding hot water under pressure. Before attempting any draining procedure, follow these safety steps:
- Turn OFF the power at the breaker panel (electric heaters) or turn the gas valve to the pilot position (gas heaters)
- Wait 2-3 hours for the water to cool if the heater was recently in use
- Never drain a water heater while it’s actively heating
- Keep children and pets away from the work area
How to Fix a Water Heater That’s Not Draining
Here are five proven methods to get your water heater draining, arranged from easiest to most advanced. I recommend trying them in order.
Method 1: Break the Vacuum with a Hot Water Faucet
This is the simplest solution and works in about 60% of cases. The vacuum effect is preventing drainage, and this method breaks that vacuum instantly.
- Connect your garden hose to the drain valve and run it outside or to a drain
- Open the drain valve fully
- Go inside and open the HOT water faucet closest to the water heater
- Wait 1-2 minutes for air to enter the tank
- You should hear water start flowing through the hose
The open faucet allows air to enter the tank, breaking the vacuum seal. Once air enters, water can exit through the drain valve naturally.
Method 2: Open the Pressure Relief Valve
If the faucet method doesn’t work, the pressure relief valve (T&P valve) can break stubborn vacuums. This valve is located on the side of the tank, usually 2/3 of the way up.
- With the drain valve open, locate the T&P valve on the side of the tank
- Flip the small metal lever on the valve upward
- You’ll hear air hissing into the tank
- Water should start flowing from the drain hose within a minute
- Flip the lever back down once draining starts
I’ve personally seen this method work when nothing else would. The T&P valve provides a direct air path into the tank, instantly breaking even stubborn vacuum locks.
Method 3: Use a Wire Coat Hanger
When sediment is blocking the drain valve itself, you need to physically break it up. This is messy but effective.
- Open the drain valve fully
- Take a wire coat hanger and straighten it out, leaving a small hook at one end
- Insert the wire into the drain valve opening
- Gently wiggle and push the wire in 2-3 inches
- You’ll feel resistance when you hit the sediment blockage
- Push and twist to break up the sediment plug
- Water should start flowing once the blockage is broken
Be prepared for messy sediment to come out once the blockage clears. This is normal – it’s the sludge that was causing your problem in the first place.
Method 4: The Power Flush Method
This is the method professional plumbers recommend and it works surprisingly well. Instead of draining the tank completely, you use incoming water pressure to flush sediment out.
- Leave the cold water supply ON
- Connect your hose to the drain valve
- Open a hot water faucet in the house
- Open the drain valve slowly
- Let incoming water pressure push sediment out through the drain
- Run for 5-10 minutes or until water runs clear
The power flush method is actually safer than complete draining because it prevents the tank from drying out and exposing the internal elements to air. I recommend this method for routine annual maintenance.
Method 5: Reverse Flow Backflush
When nothing else works, you can force water backward through the drain valve. You’ll need a washing machine hose or adapter to connect a faucet to your drain hose.
- Connect a faucet to the drain hose using an adapter
- Open the hot water faucet nearest the heater
- Turn on the cold water supply to the heater
- Gently run water backward through the drain hose
- This will push sediment back into the tank, breaking the blockage
- Disconnect the adapter and try normal draining again
This method requires special equipment but can save you from having to replace the entire drain valve assembly.
Electric vs Gas Water Heaters: Key Differences
The draining process is nearly identical for electric and gas heaters, but there are a few important differences to know:
Electric water heaters: Simply turn off the breaker at the electrical panel. There’s no pilot light to worry about, and no gas line to disconnect. The heating elements are inside the tank, so as long as power is off, you’re safe.
Gas water heaters: Turn the gas valve to the pilot position (don’t blow out the pilot light). If you plan to have the tank drained for more than an hour, consider turning the gas completely off. Never drain a gas heater while the burner is active or recently hot – the tank can warp from rapid cooling.
Prevent Future Drainage Problems
The best way to avoid water heater not draining issues is through regular maintenance. Sediment buildup is a progressive problem that gets worse over time, but you can stay ahead of it.
How Often Should You Flush Your Water Heater?
I recommend flushing your water heater at least once a year. In areas with extremely hard water, flush every six months. The entire process takes about 30 minutes and can extend your water heater’s lifespan by years.
During annual flushing, use the power flush method rather than complete draining. It’s faster, safer, and just as effective for maintenance purposes. Complete draining is only necessary when you’re replacing the heater or doing major repairs.
Consider a Water Softener
If you live in a hard water area, a water softener is the best investment you can make. Soft water contains far fewer minerals, which means dramatically less sediment buildup. Many homeowners report never having drainage issues after installing a softener.
For water damage prevention during flushing, having the right cleanup equipment on hand is smart. Consider a wet/dry vacuum for water cleanup in case of accidental spills or leaks during the draining process.
When to Call a Professional Plumber
Most water heater drainage issues are DIY-friendly, but some situations require professional help. Call a plumber if:
- The drain valve is broken, corroded, or completely seized
- You see signs of tank corrosion or leaks
- The water heater is over 10 years old and never been maintained
- You’re uncomfortable working with gas lines or electrical connections
- Multiple attempts at draining have failed
A professional can also check your best shop vacuums for water damage after completing repairs or recommend more extensive solutions if your water heater is nearing the end of its lifespan.
Frequently Asked Questions
How do I know if my water heater drain valve is clogged?
Signs include no water flow when the valve is open, slow trickling instead of steady flow, or sediment visible in the valve opening. You may also notice popping or rumbling noises from the tank, indicating sediment buildup.
Is 3 years too late to flush my water heater?
It’s never too late to flush a water heater. However, if your heater hasn’t been flushed in over 2 years, proceed carefully. Heavy sediment buildup can cause clogs when dislodged. Start with the power flush method rather than complete drainage.
Does flushing a water heater remove all sediment?
No, flushing removes most loose sediment but won’t eliminate hardened deposits that have adhered to the tank bottom. Regular annual flushing prevents sediment from hardening and becoming difficult to remove.
What causes whistling noises from my water heater?
Whistling typically indicates sediment buildup restricting water flow through heat trap nipples or the drain valve. It’s a warning sign that your water heater needs flushing soon to prevent complete blockage.
Why is my water heater not draining even with the valve open?
The most common causes are sediment blocking the drain valve opening, a vacuum effect in the tank, or heat trap nipples restricting flow. Try opening a hot faucet or the pressure relief valve to break the vacuum before attempting other methods.
Conclusion
Water heater not draining issues are frustrating but usually solvable with the right approach. Start with the simplest methods – breaking the vacuum with a faucet or T&P valve – before moving to more involved solutions like wire probing or reverse flushing.
Regular annual maintenance using the power flush method can prevent most drainage problems entirely. And remember, if you’re dealing with an older heater or a broken drain valve, there’s no shame in calling a professional.
Have you successfully fixed a water heater that wouldn’t drain? Share what worked for you in the comments below.



Leave a Comment