
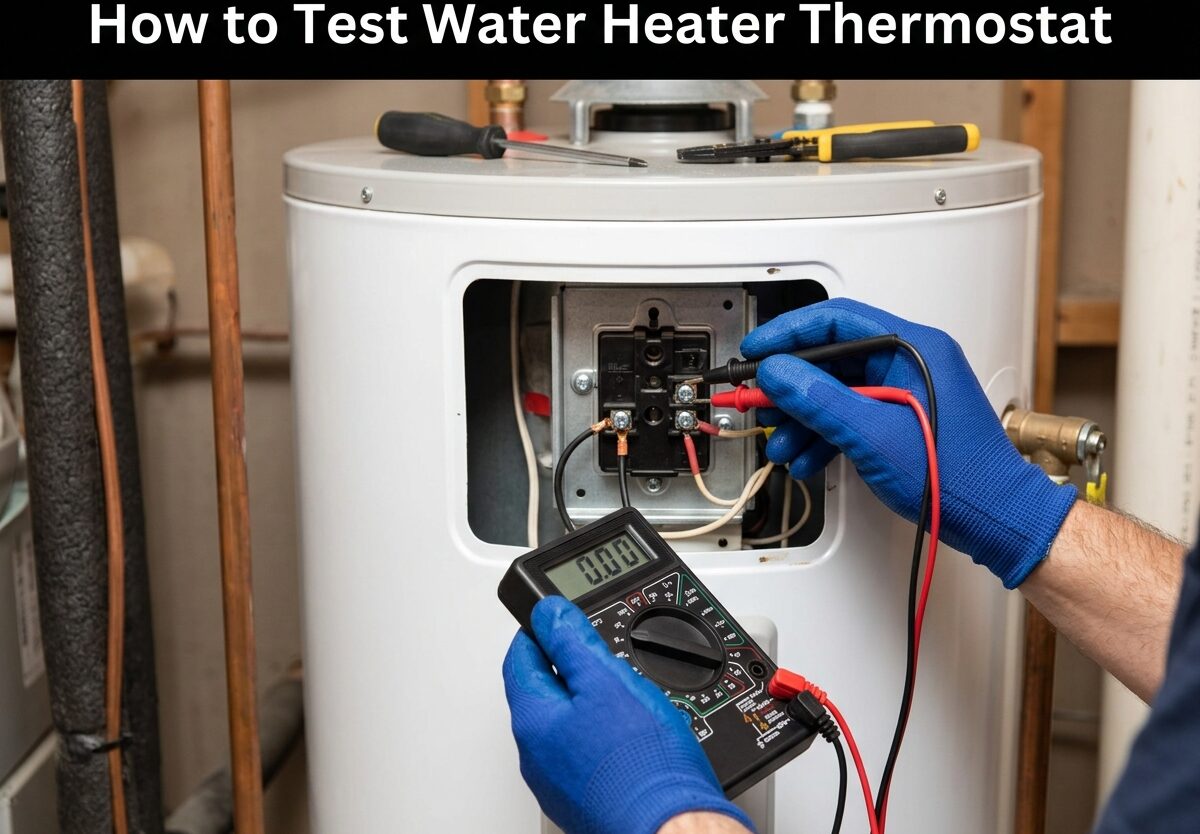
Testing your water heater thermostat is a straightforward diagnostic process that uses a multimeter to check for electrical continuity. When a thermostat fails, it either stops sending power to the heating elements (causing no hot water) or fails to shut off (creating scalding temperatures). I’ve tested dozens of water heaters over the years, and the thermostat is the culprit in about 70% of temperature problems. This guide will walk you through exactly how to test water heater thermostat components safely and accurately.
Signs Your Water Heater Thermostat May Be Failing
A failing thermostat usually gives you clear warning signs before it completely quits. The most obvious symptom is no hot water at all, which happens when the thermostat stops sending power to the heating elements. However, other symptoms are more subtle and might indicate a thermostat that’s working but not accurately.
You might notice water that’s only lukewarm or runs hot for just a few minutes before turning cold. This often means the lower thermostat has failed while the upper one still works. Scalding water that’s too hot is another red flag, especially if adjusting the temperature dial doesn’t help. Some homeowners discover thermostat problems when they receive unexpectedly high energy bills, because a faulty thermostat can cause the heater to run continuously.
The reset button on your water heater keeps tripping as a safety feature. If you find yourself pressing it frequently, your thermostat or heating element is likely failing. I see this often in homes with hard water, where sediment buildup causes overheating that triggers the reset.
Safety Precautions Before Testing
CRITICAL: Turn off power at the circuit breaker before attempting any testing. Electric water heaters use 240V, which can cause serious injury or death. I always double-check power is off with a non-contact voltage tester before touching any wires or terminals. Never assume flipping the switch inside the heater access panel is enough—you must shut off power at the main breaker panel.
For gas water heaters, turn the gas control valve to the “pilot” setting and wait 5 minutes for any gas to clear. If you smell gas at any point, leave your home immediately and call your gas company from outside. Don’t use any electrical switches or create any sparks near a gas odor.
Wear insulated gloves and safety glasses. Water heater panels can have sharp edges, and you’re working near electrical components. Keep your work area dry, and never touch the thermostat terminals with bare hands even when power is off—condensation can create a conductive path.
Tools and Equipment Needed
You’ll need a few basic tools to test your water heater thermostat properly. A digital multimeter is essential—it costs $15-30 at any hardware store and will show you if electrical continuity exists. I prefer digital models because they’re easier to read, but an analog multimeter works fine too.
Grab a screwdriver set to remove the access panels (usually Phillips-head #2). A non-contact voltage tester adds another layer of safety verification before you touch anything. Insulated gloves, a flashlight for seeing inside dark panels, and a notepad to record your multimeter readings round out your toolkit.
Understanding How Water Heater Thermostats Work
A water heater thermostat is essentially a temperature-controlled switch. It monitors water temperature inside the tank and closes an electrical circuit when the water drops below your set point (usually 120°F). This sends power to the heating elements. Once the water reaches the target temperature, the thermostat opens the circuit to stop heating and save energy.
Electric water heaters have two thermostats—an upper and a lower. The upper thermostat controls both elements and has a high-limit switch (ECO) that shuts off everything if water gets too hot. The lower thermostat only controls the bottom element. This dual-thermostat design allows for faster recovery and more even heating throughout the tank.
The reset button you see on the upper thermostat is actually a manual reset for the high-limit switch. It trips when water exceeds 180°F, preventing scalding or tank damage. If it trips once, that’s normal. Frequent tripping indicates a problem with the thermostat or heating element.
How to Test Water Heater Thermostat
Follow these steps exactly to test your water heater thermostat safely and accurately. I recommend testing both the upper and lower thermostats, even if you suspect only one is faulty. This takes about 20 minutes total.
Step 1: Turn off power at the breaker panel. Don’t just flip the switch on the water heater—go to your main electrical panel and flip the breaker labeled “water heater.” Double-check it’s off by trying to run hot water at a sink—the water should be cold after a few minutes.
Step 2: Remove both access panels. Most electric water heaters have two panels on the front—one upper and one lower. Use your screwdriver to remove the screws and carefully peel back the insulation. You’ll see the thermostat mounted to the tank with a plastic safety cover over the electrical connections.
Step 3: Remove the plastic safety covers. These snap or clip off and expose the thermostat terminals and wiring. Don’t disconnect any wires—just expose them for testing. Take a photo of the wiring with your phone so you know how everything connects if you need to replace the thermostat later.
Step 4: Inspect for visible damage. Look for burnt wiring, corrosion, melted plastic, or any obvious physical damage. If you see burn marks or smell something burnt, your thermostat or heating element has failed catastrophically and needs replacement.
Step 5: Test the upper thermostat first. Set your multimeter to the lowest ohms setting or continuity mode. Place one probe on the common terminal (usually labeled COM or L1) and the other on the heating element terminal (usually labeled L2). A reading of zero or near-zero ohms means the thermostat is allowing current through—this is good. Infinite resistance (display shows “OL” or “1”) means the thermostat is bad.
Step 6: Test the lower thermostat. Use the same process on the lower thermostat. The lower thermostat is simpler since it only controls one element. Test between the two main terminals for continuity. Again, zero ohms is good, infinite resistance means replacement is needed.
Step 7: Check the heating elements. While you’re testing, check the heating elements by placing multimeter probes on the two element terminals. A good element reads 10-16 ohms for 240V elements. Infinite resistance means a burned-out element, which is often mistaken for a thermostat problem.
How to Use a Multimeter for Thermostat Testing
A multimeter might look intimidating, but using one to test a thermostat is straightforward. Set your multimeter to measure resistance (ohms), usually represented by the Ω symbol on the dial. If your multimeter has a continuity setting (often a diode symbol), use that instead—it will beep when it detects a complete circuit.
Place one probe on each terminal you’re testing. The order doesn’t matter for continuity testing. For the upper thermostat, you’re checking if electricity can flow from the common terminal to the heating element terminal. For the lower thermostat, simply test across the two main terminals.
A good thermostat shows near-zero resistance—typically less than 1 ohm. This means electricity can flow freely through the thermostat. A bad thermostat shows infinite resistance (your meter displays “OL” for overload or “1” on the left side of the display). This means the thermostat has an open circuit and won’t allow electricity through, which explains why you have no hot water.
Common mistakes I see include testing with the thermostat wires disconnected (you need them connected for an accurate test), using the wrong multimeter setting, or not making solid contact with the terminals. Make sure your probes are touching metal terminals firmly—paint or corrosion can cause false readings.
Reading and Interpreting Test Results
Understanding your multimeter readings tells you exactly what’s wrong with your water heater. Zero or near-zero ohms indicates continuity, meaning the thermostat is functional. Infinite resistance (OL or 1) means the thermostat has failed and needs replacement.
What about readings in between? If you see something like 50-100 ohms, this usually indicates corrosion or a failing thermostat that’s about to quit completely. Replace it now rather than waiting for a complete failure.
Sometimes both thermostats test good but you still have temperature problems. This usually points to a heating element issue or sediment buildup. Test the heating elements directly by placing probes on the element terminals. A good 240V element reads 10-16 ohms. Anything significantly higher or infinite means the element has failed.
Another scenario: your upper thermostat tests good but the lower one shows problems. This typically means only the bottom half of your tank heats, which explains why you get some hot water but it runs out quickly. Replace the faulty thermostat and you should see full hot water capacity restored.
Testing Without a Multimeter
Don’t have a multimeter? You can still get useful diagnostic information, though it’s less precise. Start with a careful visual inspection—look for burn marks, melted plastic, corroded terminals, or loose wiring connections. Any of these indicate thermostat failure.
Try the power-on observation method. With the breaker off, turn your thermostat temperature dial all the way down, then back to your normal setting (usually 120°F). Turn the breaker back on and listen carefully. You should hear a distinct click within 30 seconds as the thermostat engages and sends power to the elements. No click often means a failed thermostat.
Use a cooking thermometer to test actual water temperature. Run hot water at a faucet for 2 minutes, then fill a cup and check the temperature. If it’s significantly different from your thermostat setting, the thermostat is likely miscalibrated or failing. This method won’t tell you if the thermostat has completely failed, but it can identify thermostats that are inaccurate.
These alternative methods have limitations. They won’t detect partially failed thermostats or identify whether the upper, lower, or both thermostats are problematic. For definitive diagnosis, a multimeter is essential and costs less than a professional service call.
Electric vs Gas Water Heater Thermostat Testing
Testing procedures differ significantly between electric and gas water heaters. Electric water heaters use electrical thermostats that send power to heating elements, so testing involves checking continuity with a multimeter. The steps outlined in this guide apply specifically to electric water heaters.
Gas water heaters use a gas control valve/thermostat assembly that regulates gas flow to the burner. Testing a gas thermostat is different—you’re checking if the pilot light ignites the main burner when the thermostat calls for heat. Listen for the burner clicking on after you turn up the temperature dial. No ignition usually indicates a faulty gas valve or thermocouple problem.
Gas water heaters also have a different safety mechanism. Instead of electrical reset buttons, they use a thermal switch that shuts off gas flow if the water overheats. Many modern gas units have a sealed combustion chamber that makes DIY testing difficult or impossible.
I recommend professional service for gas water heater thermostat issues. Working with gas lines and combustion systems carries additional risks, and the components are often integrated into assemblies that require specialized tools to service safely.
Common Testing Mistakes to Avoid
I’ve seen homeowners make several mistakes when testing water heater thermostats. The most dangerous is forgetting to turn off the breaker first. Always shut off power at the main panel—testing live with 240V can be fatal.
Testing the wrong terminals is another common error. Each thermostat has multiple terminals, but you only need to test between the common (COM) and heating element terminals. Testing between ground and power terminals gives misleading results.
Many people disconnect wires before testing, which gives inaccurate readings. Test thermostats with all wires connected for proper results. If you must disconnect wires (for replacement or other work), photograph the wiring first so you can reconnect everything correctly.
Don’t confuse thermostat failure with heating element failure. Both cause similar symptoms, but heating elements typically fail more often in areas with hard water. Always test both thermostats and elements when diagnosing temperature problems.
Finally, don’t skip testing the lower thermostat. Many homeowners only test the upper thermostat because it’s easier to access, but lower thermostat failure is common and causes the “only 5 minutes of hot water” problem I hear about constantly.
When to Replace vs Repair
Water heater thermostats aren’t typically repaired—they’re replaced when they fail. The good news is replacement thermostats cost only $15-30, making this one of the most affordable water heater repairs. OEM (original equipment manufacturer) thermostats from brands like Rheem, AO Smith, or Bradford White cost slightly more but ensure compatibility.
Professional replacement runs $100-300 including parts and labor. If you’re comfortable with basic electrical work and safety procedures, this is a great DIY project. The process involves disconnecting wires, unscrewing the old thermostat from the tank, installing the new one, and reconnecting wires using your photo reference.
Consider replacement vs complete water heater replacement if your unit is over 10-12 years old. Thermostats can be replaced on older units, but if other components are failing, investing in a new water heater might be more cost-effective in the long run. New models are significantly more energy-efficient and can pay for themselves in lower utility bills over 5-7 years.
Preventive Maintenance Tips
Regular maintenance extends your thermostat’s life and prevents sudden failures. I recommend flushing your water heater tank annually to remove sediment buildup. Sediment acts as insulation, causing the thermostat to work harder and potentially overheat. Connect a hose to the drain valve and run 3-5 gallons of water into a floor drain or outside until it runs clear.
Check your anode rod every 2-3 years and replace it when corroded. The anode rod sacrifices itself to protect your tank from rust, and a failing anode can cause corrosion that affects thermostat operation. This $20 part can add years to your water heater’s life.
Keep your thermostat set to 120°F. Higher temperatures accelerate thermostat wear and increase scalding risk. If you need hotter water for specific reasons, consider a point-of-use heater rather than running your main tank at higher temperatures.
Test your thermostats annually as part of routine maintenance. This 20-minute checkup can identify failing components before they leave you with cold water. I recommend doing this in spring before heavy hot-water usage months begin.
Frequently Asked Questions
How do I know if my thermostat is bad on my water heater?
Signs of a bad thermostat include no hot water, lukewarm water that runs cold quickly, water that’s too hot regardless of temperature settings, frequently tripping reset buttons, and unusually high energy bills. Definitive diagnosis requires a multimeter continuity test showing infinite resistance (OL reading) across thermostat terminals.
What should a thermostat read on a multimeter?
A good water heater thermostat should read zero or near-zero ohms (typically less than 1 ohm) when testing between terminals. This indicates continuity and that the thermostat allows electricity to flow. Infinite resistance shown as OL or 1 on the display means the thermostat has failed and needs replacement.
Can I test a water heater thermostat with power on?
NO. Never test a water heater thermostat with power on. Electric water heaters use 240V which can cause serious injury or death. Always turn off power at the main circuit breaker before testing, and verify it’s off with a non-contact voltage tester. Continuity testing requires power to be off anyway.
Why does my reset button keep tripping?
The reset button trips when water temperature exceeds 180°F as a safety measure. Frequent tripping indicates a stuck thermostat that doesn’t open when it should, a failing heating element that overheats, or excessive sediment buildup causing hot spots. If it trips more than once, replace the thermostat and test the heating elements.
How do I test upper vs lower thermostat?
Test the upper thermostat first by placing multimeter probes on the common terminal (COM) and the heating element terminal. Then test the lower thermostat across its two main terminals. Electric water heaters require both thermostats to function properly—the upper controls power to both elements while the lower only controls the bottom element.
Why do I only get 5 minutes of hot water?
This classic symptom usually indicates lower thermostat or heating element failure. Your upper thermostat heats the top portion of the tank which gives you initial hot water, but the lower portion stays cold. Test both lower thermostat and lower heating element with a multimeter. The lower thermostat is the most common culprit.
Is it worth replacing a water heater thermostat?
Absolutely. Replacement thermostats cost only $15-30 while professional repair runs $100-300. This is one of the most affordable water heater repairs. DIY replacement is straightforward if you’re comfortable with basic electrical work. Even professional replacement costs far less than a new water heater ($800-1500 installed).
Can a bad thermostat cause high electric bills?
Yes. A faulty thermostat can cause the heating elements to run continuously or cycle too frequently, significantly increasing energy consumption. This happens when the thermostat fails to open the circuit at the correct temperature or when it misreads actual water temperature. High energy bills combined with temperature problems often indicate thermostat failure.
Conclusion
Learning how to test water heater thermostat components saves you money and helps you diagnose temperature problems before they become emergencies. The process is straightforward: turn off power, access the panels, use a multimeter to check continuity, and interpret the results. Most thermostat failures show infinite resistance on a multimeter and require simple replacement.
Safety must always come first. Never work on a live water heater, and don’t hesitate to call a professional if you’re uncomfortable with any part of this process. Gas water heaters in particular often require professional service due to the complexity and safety concerns of gas systems.
Regular testing as part of annual maintenance can catch failing thermostats before you’re left with cold water. Combined with periodic tank flushing and anode rod inspection, this simple diagnostic test extends your water heater’s life and ensures reliable hot water for years to come.
Leave a Comment