
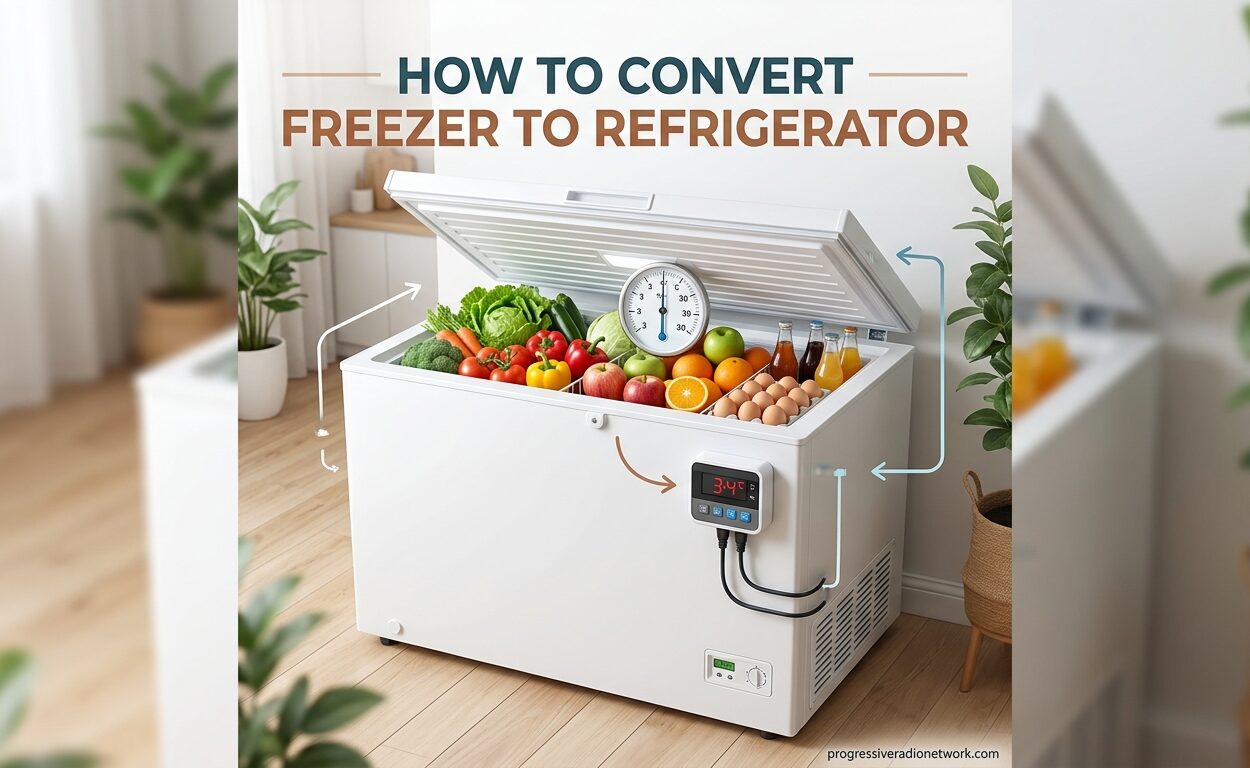
Converting a freezer to a refrigerator is one of the most effective DIY projects for reducing energy consumption while gaining extra food storage. Freezers have superior insulation compared to standard refrigerators, which means when you convert one to fridge temperatures, it runs significantly less often and uses dramatically less electricity. I’ve seen homeowners report energy savings of 75-90% after making this simple modification.
The conversion process is straightforward and requires just one key component: an external temperature controller. This device overrides the freezer’s built-in thermostat, allowing you to maintain refrigerator temperatures between 35-40°F instead of freezer temperatures. Whether you’re looking to add extra refrigerated storage for your growing family, preparing for off-grid living, or simply want to reduce your electricity bill, converting a freezer to a refrigerator offers an economical and practical solution.
What makes this project so appealing is its simplicity. For the cost of a temperature controller ($30-60) and a few hours of your time, you can create an extremely energy-efficient refrigerator that outperforms commercial models in efficiency. Many users, including homesteaders and off-grid enthusiasts, have been running converted freezers for 2-5+ years without issues. Let me walk you through everything you need to know to successfully complete this conversion. For even better food preservation, consider pairing your converted fridge with vacuum sealers for food preservation to extend the shelf life of your stored items.
Why Convert a Freezer to a Refrigerator
The primary reason most people convert a freezer to a refrigerator is energy efficiency. Standard refrigerators cycle on and off frequently throughout the day because they have thinner insulation and are opened more often. Freezers, however, are built with much thicker insulation and tighter seals to maintain sub-zero temperatures. When you operate a freezer at refrigerator temperatures, that superior insulation means the compressor runs much less frequently.
Real-world measurements from users who have made this conversion show electricity consumption of just 0.08-0.25 kWh per day. Compared to a typical refrigerator that uses 1-2 kWh daily, the savings are substantial. Over the course of a year, that’s a reduction of 300-600 kWh or more. For off-grid and solar-powered homes, this efficiency difference can make the difference between needing a larger, more expensive battery bank or getting by with a modest system.
Beyond energy savings, converted freezers offer practical benefits. A chest freezer converted to a refrigerator provides significantly more usable storage space than a standard refrigerator of similar dimensions. The vertical orientation of upright freezers makes them ideal for garage refrigerators, beverage storage, or as a second fridge for bulk grocery storage. Home brewers particularly love this conversion for creating kegerators, as the temperature control allows precise beer serving temperatures. Many users also invest in food storage solutions to maximize the efficiency of their extra refrigerated space.
What You’ll Need for the Conversion
The good news is that this conversion requires minimal equipment. Unlike many DIY projects that demand specialized tools and extensive supplies, converting a freezer to a refrigerator needs just one critical component. Here’s what you’ll need to get started.
Essential Equipment
External Temperature Controller: This is the heart of the conversion and the only component you absolutely must purchase. An external temperature controller plugs into your wall outlet, your freezer plugs into the controller, and a temperature probe runs inside the freezer compartment. When the temperature rises above your set point, the controller turns power on to the freezer; when it reaches the target temperature, it cuts power. This simple on/off cycling maintains precise refrigerator temperatures.
Popular temperature controller brands include Inkbird (especially the ITC-308 model), Johnson Controls (A19 model), and various generic options available online. Digital models with displays are easier to set up and monitor than analog versions. Look for controllers with adjustable differential settings (the temperature range between turning on and off), as this feature helps prevent excessive compressor cycling that could wear out your freezer over time.
Optional but Helpful Items
Thermometer: While your temperature controller will display the current temperature, having an independent thermometer inside the unit helps verify accuracy. Appliance thermometers cost $5-15 and provide peace of mind that your food is staying at safe temperatures.
Small Fan: Many users add a small computer fan or battery-operated fan inside their converted fridge to improve air circulation. This helps maintain consistent temperatures throughout the compartment and reduces condensation buildup, especially in chest freezers where cold air settles at the bottom.
Moisture Absorbers: Condensation is the most common challenge with converted freezers. Reusable moisture absorbers (like DampRid or silica gel packs) help control humidity and prevent water from pooling in the bottom of your unit.
Storage Bins or Baskets: For chest freezer conversions, you’ll want containers to organize items and make accessing food buried at the bottom easier. Milk crates, plastic totes, or wire baskets all work well for this purpose.
Chest Freezer vs Upright Freezer: Which is Better?
When choosing a freezer to convert, you’ll need to decide between a chest freezer (opens from the top) and an upright freezer (opens from the front like a refrigerator). Each has distinct advantages for this application.
Chest Freezers offer superior energy efficiency due to their design. Cold air is denser than warm air and naturally settles to the bottom. When you open the lid on a chest freezer, most of that cold air stays in the unit rather than pouring out. This means the compressor doesn’t have to work as hard to recover temperature after opening. Chest freezers also tend to have thicker insulation overall, contributing to even greater efficiency. The main drawbacks are accessibility issues (bending over to reach items) and the challenge of organizing contents so nothing gets lost in the depths.
Upright Freezers provide easier access and organization with their shelving systems similar to standard refrigerators. You can see everything at eye level without digging, making them more convenient for daily use. However, when you open the door on an upright, much of the cold air spills out, requiring more compressor runtime to recover temperature. Upright models also typically have thinner insulation in the doors compared to chest freezers. Still, they remain significantly more efficient than standard refrigerators and are often preferred for garage refrigerators or secondary fridges where convenience outweighs maximum efficiency.
From my research and user feedback, chest freezers are the clear winner for pure energy efficiency, making them the top choice for off-grid applications or maximum energy savings. Upright freezers win on convenience and are better suited as garage refrigerators or beverage fridges where accessibility matters more than squeezing out every last watt of savings.
How to Convert Freezer to Refrigerator: Step-by-Step Guide
The conversion process is straightforward and can be completed in under an hour. Follow these steps carefully, and you’ll have a fully functional refrigerator running at optimal temperatures.
Step 1: Choose Your Freezer
Almost any freezer can be converted, but manual defrost models are preferable to frost-free units. Manual defrost freezers have simpler compressors designed for fewer on/off cycles, which aligns well with refrigerator operation. Frost-free freezers contain built-in heating elements that periodically melt ice buildup, and these won’t activate during refrigerator operation, potentially causing issues over time. That said, many users have successfully converted frost-free freezers without problems. The most important factor is choosing a freezer in good working condition with no existing cooling issues.
Step 2: Select and Purchase Your Temperature Controller
Invest in a quality temperature controller from a reputable brand. The Inkbird ITC-308 and Johnson Controls A19 are the most commonly recommended models, with proven track records and reliable performance. Avoid the cheapest no-name controllers, as inaccurate temperature control could jeopardize food safety or damage your freezer. Expect to spend $30-60 for a reliable controller.
Step 3: Install the Temperature Probe
The temperature probe is the sensor that tells your controller when to turn the freezer on and off. Proper placement is crucial for accurate temperature control. Run the probe wire through the freezer door gasket or through a small hole drilled in the side (some users prefer not to drill to maintain the freezer’s integrity). Position the probe at approximately the midpoint of the interior compartment, away from the cooling coils and walls. This ensures it measures the actual air temperature where your food will be stored, not the temperature near the cooling elements.
Step 4: Set Up the Temperature Controller
Plug your temperature controller into the wall outlet, then plug your freezer into the controller. Set your desired refrigerator temperature. The ideal range for food safety is 35-38°F. The FDA recommends keeping refrigerators at 40°F or below, with 37°F being an optimal target that provides a safety buffer. Set the temperature differential (the range between turning on and off) to 2-3 degrees. This prevents the compressor from cycling too frequently, which could cause premature wear. For example, if you set the controller to 37°F with a 3-degree differential, it will turn on at 40°F and off at 37°F.
Step 5: Test and Monitor
Let your converted refrigerator run for 24 hours and monitor the temperature closely. Place an independent thermometer inside to verify that your controller’s readings match the actual temperature. Check that the temperature remains consistently in the 35-40°F range and doesn’t fluctuate too widely. You may need to adjust your settings slightly to achieve the optimal balance between temperature consistency and compressor cycling frequency. Once you’re satisfied with the performance, start transferring food gradually rather than filling it all at once, which helps the unit stabilize.
Step 6: Manage Condensation
Since freezers are designed for sub-zero temperatures, they will accumulate moisture when operated at refrigerator temperatures. This is normal but requires management. Place moisture absorbers in the bottom of the unit to collect excess water. Consider adding a small fan to improve air circulation and reduce condensation buildup. Wipe down the interior weekly to prevent mold growth and maintain a clean environment. Some users place a towel or shallow tray in the bottom to catch moisture drips.
Step 7: Organize for Easy Access
If you’re using a chest freezer, develop an organizational system that works for your needs. Milk crates, plastic bins, or wire baskets help categorize items and make it easier to retrieve food from the bottom. Some users build custom shelving using PVC pipe or wood to create layers similar to an upright fridge. Label containers clearly so you know what’s inside without having to dig through everything.
Temperature Settings and Calibration
Proper temperature calibration is critical for food safety in your converted refrigerator. The FDA recommends keeping refrigerators at 40°F or below to prevent bacterial growth in perishable foods. However, setting your converted freezer exactly to 40°F leaves little margin for error if temperatures fluctuate. I recommend targeting 35-37°F as your set point, which provides a safety buffer while keeping food at optimal storage temperatures.
Place an appliance thermometer in the middle of the compartment to verify accuracy. Digital probe thermometers are inexpensive and provide precise readings. Check multiple locations to ensure even temperature distribution, especially in chest freezers where temperatures can vary between top and bottom. If you notice significant temperature variations, reposition your controller’s probe to a more central location or add a small fan to improve air circulation.
The temperature differential setting on your controller deserves careful consideration. A smaller differential (1-2 degrees) maintains more consistent temperatures but causes more frequent compressor cycling. A larger differential (3-4 degrees) reduces cycling frequency but allows wider temperature swings. For most applications, a 2-3 degree differential strikes the right balance between temperature stability and compressor longevity. Monitor your unit over several days and adjust as needed based on your observations.
Be aware that ambient temperature affects your refrigerator’s performance. If you place the unit in an unheated garage or space that experiences temperature extremes, you may need seasonal adjustments. Most freezer compressors are designed to operate in environments down to 45-50°F, so extremely cold garages in winter could cause issues. In hot weather, the compressor will run more frequently to maintain temperature, which is normal but may increase energy consumption slightly.
Managing Condensation and Moisture
Condensation is the single most common challenge when converting a freezer to a refrigerator. Freezers are designed for sub-zero temperatures where moisture freezes as frost, not refrigerator temperatures where it remains liquid. As a result, you’ll notice water droplets forming on the interior walls and pooling in the bottom of your converted fridge. This is completely normal but requires ongoing management.
The most effective solution for condensation is placing moisture-absorbing products inside the unit. Reusable desiccant packs, silica gel canisters, or products like DampRid actively pull moisture from the air. Position these in the bottom of the compartment where moisture naturally collects. For chest freezers, you may need multiple absorbers placed throughout the space. These products will need regular replacement or reactivation according to the manufacturer’s instructions.
Air circulation significantly reduces condensation problems. Stagnant air allows moisture to settle on surfaces, while moving air helps maintain consistent humidity levels. Many users add small battery-operated fans or computer case fans inside their converted refrigerators. Position the fan so it doesn’t blow directly on the temperature probe, which could cause inaccurate readings. Even a tiny fan making one air exchange per hour can dramatically reduce condensation buildup.
Routine maintenance is essential for moisture control. Wipe down the interior walls and floor weekly with a mild vinegar solution to prevent mold and mildew growth. Some users place a clean towel or shallow plastic tray in the bottom to catch drips, making cleanup easier. If you notice excessive water accumulation, check your door seal for gaps that might be allowing humid air to enter. A compromised gasket can dramatically increase moisture problems.
For particularly humid environments or chest freezers with severe condensation issues, some users install a small drain. This involves drilling a small hole through the bottom of the freezer and installing a simple plastic valve that allows water to drain into a container. This is more invasive but provides a permanent solution if other methods aren’t sufficient. If you go this route, be extremely careful not to puncture any refrigerant lines, which would destroy the freezer.
Managing Common Challenges
While condensation is the most obvious challenge, several other issues commonly arise when converting freezers. Understanding these potential problems and their solutions will help you achieve long-term success with your converted refrigerator.
Compressor Longevity Concerns: Many people worry that converting a freezer will damage the compressor or shorten its lifespan. The concern stems from the fact that refrigerator temperatures cause the compressor to run more frequently than freezer temperatures would. However, real-world user experiences overwhelmingly show that compressors handle this duty without issues. Many users report running converted freezers for 2-5+ years without compressor failure. The key is setting an appropriate temperature differential (2-3 degrees) to prevent excessive short cycling. Avoid differentials smaller than 1 degree, which cause the compressor to turn on and off too frequently. While I can’t guarantee your specific freezer won’t experience issues, the track record of successful conversions suggests this concern is often overstated.
Temperature Inconsistency: Chest freezers in particular can develop temperature stratification, with colder temperatures at the bottom and warmer temperatures near the top. This occurs because cold air settles and warm air rises. The solution is improved air circulation and strategic probe placement. Position your temperature probe in the middle of the compartment to get an average reading. If you notice significant temperature variations (more than 5 degrees between top and bottom), add a small fan to mix the air. Some users place the probe in a container of water, which stabilizes readings and prevents fluctuations from door openings.
Freezing Items: Some converted freezers run colder than intended, especially near the cooling coils. If you find items freezing near the back or bottom of the unit, adjust your temperature set point up by 1-2 degrees. You can also create a barrier between the cooling elements and your food storage area using a piece of cardboard or plastic. This prevents direct contact with the coldest surfaces. Monitor temperatures with multiple thermometers to identify problem areas.
Door Seal Issues: Over time, door gaskets can compress or lose their seal, allowing cold air to escape and humid air to enter. This causes temperature fluctuations and increases condensation. Test your door seal by closing a dollar bill in the door and trying to pull it out. If it slides out easily, your gasket needs replacement. Clean gaskets regularly with warm soapy water to maintain their flexibility and sealing ability. For chest freezers, ensure the lid closes fully and the latch mechanism works properly.
Frost Buildup: Even at refrigerator temperatures, some frost may accumulate on the cooling coils, especially in humid conditions. This reduces efficiency and should be removed periodically. Manual defrost freezers will need defrosting every few months to maintain optimal performance. Unplug the unit, remove all food, and let the frost melt completely before restarting. While inconvenient, this maintenance requirement is one reason manual defrost freezers work well for this conversion.
Organization Tips for Your Converted Fridge
Making the most of your converted refrigerator requires thoughtful organization, especially with chest freezers where accessing items at the bottom can be challenging. Proper organization prevents food waste, makes meal planning easier, and improves your overall experience with the unit.
Use Clear Bins and Baskets: Clear plastic containers allow you to see contents at a glance without opening each one. Choose shallow bins that are easy to stack and remove. Wire baskets provide excellent airflow and visibility while keeping similar items grouped together. Label each container clearly with its contents and date, especially for items that will be stored long-term.
Implement a Rotation System: Place newer items in the back or bottom and move older items forward so they get used first. This “first in, first out” approach prevents food from spoiling before you remember it’s there. For chest freezers, consider using numbered bins or a simple inventory list to track what’s buried at the bottom without having to dig through everything.
Zone Your Storage: Designate specific areas for different types of food. Keep dairy products in the coldest area (usually near the bottom in chest freezers or toward the back in uprights). Reserve the warmest spots for condiments and less perishable items. This strategic placement ensures each food type gets the optimal storage temperature for maximum freshness.
Maximize Vertical Space: In upright freezers, use the existing shelves efficiently by adding risers or shelf organizers. For chest freezers, consider building or buying stackable organizers that create layers similar to traditional refrigerator shelving. Some creative users build custom PVC or wooden shelf systems that allow easy access to items at the bottom without removing everything on top.
Partner with Vacuum Sealing: Vacuum-sealed foods last 3-5 times longer in the refrigerator and are much less prone to freezer burn or spoilage. If you’re adding a converted refrigerator for extra storage, consider investing in vacuum food sealing to extend the life of your stored foods. Properly sealed items also produce less moisture, which helps control condensation inside your converted fridge. For those requiring professional-grade equipment, professional food storage equipment like chamber vacuum sealers can provide even better results for long-term food preservation.
Energy Savings and Cost Benefits
The energy savings from converting a freezer to a refrigerator are substantial and well-documented by real users who track their electricity consumption. Standard refrigerators typically use 1-2 kWh per day, while converted freezers often consume just 0.08-0.25 kWh daily. This represents a reduction of 75-90% in energy use for refrigeration.
To put this in practical terms, at the national average electricity rate of approximately $0.15 per kWh, a standard refrigerator costs $55-110 per year to operate. A converted freezer would cost just $4-14 annually for the same refrigeration capacity. Over a 10-year lifespan, that’s $500-1000 in savings per converted unit. If you’re replacing an old inefficient refrigerator with a converted freezer, your savings could be even greater.
For off-grid and solar-powered homes, the benefits extend beyond monetary savings. The reduced energy load means smaller battery banks, fewer solar panels, or more capacity available for other uses. Many homesteaders and off-grid enthusiasts specifically choose converted freezers because their efficient operation makes renewable energy systems more feasible and affordable.
The conversion cost itself is minimal—typically $30-60 for a quality temperature controller. Compared to purchasing a new energy-efficient refrigerator, which can cost $500-2000, this DIY approach pays for itself in energy savings within the first year or two of operation. Even compared to buying a used refrigerator, the conversion offers better efficiency and often lower overall cost when you factor in long-term energy consumption.
To measure your actual savings, consider using a Kill-a-Watt or similar electricity usage monitor. These devices plug between your appliance and the wall outlet, providing precise data on power consumption. Many converted freezer owners have shared their measurements online, and the consistency of their reports (0.08-0.25 kWh/day) confirms the dramatic efficiency gains possible with this conversion.
Safety Considerations and Warnings
While converting a freezer to a refrigerator is generally safe, several important considerations deserve your attention before proceeding. Understanding these potential issues and taking appropriate precautions will help ensure a successful and safe conversion.
Electrical Safety: This project involves modifying how your appliance receives power, which carries inherent risks. Always follow the temperature controller manufacturer’s instructions precisely. Use grounded outlets and avoid extension cords whenever possible. If you’re not comfortable with basic electrical work, consider hiring an electrician to install the controller. Never bypass safety features or attempt to modify the freezer’s internal wiring. The external controller method is safe because it doesn’t require altering the freezer’s electrical system—it simply controls power delivery to the entire unit.
Warranty Implications: Converting a freezer to a refrigerator will almost certainly void the manufacturer’s warranty. This modification changes the intended use of the appliance, and manufacturers would understandably refuse to cover repairs under these circumstances. For this reason, many people choose to convert older freezers that are already out of warranty, or they purchase used units specifically for this purpose. If warranty coverage matters to you, be aware that this modification eliminates that protection.
Food Safety: Maintaining proper refrigerator temperatures is critical for preventing foodborne illness. The FDA recommends keeping refrigerators at 40°F or below. I suggest setting your converted freezer to 35-37°F to provide a safety margin. Use an accurate thermometer to verify temperatures regularly, especially during seasonal changes or extreme weather. Never leave perishable foods in a unit that isn’t maintaining proper temperatures. If you notice temperature fluctuations or the compressor seems to be malfunctioning, stop using the unit for food storage until the issue is resolved.
Compressor Strain: While real-world experience suggests most compressors handle refrigerator operation without problems, there is theoretical risk of increased wear due to more frequent cycling. Setting an appropriate temperature differential (2-3 degrees) helps minimize this risk by preventing excessive on/off cycles. Monitor your unit for unusual sounds, vibrations, or performance changes that could indicate developing problems. If your freezer is already old or showing signs of wear, conversion might accelerate its decline.
Building Codes and Regulations: If you’re planning a permanent installation as part of a kitchen renovation or new construction, check local building codes and regulations. Some jurisdictions have specific requirements for permanent appliance installations that might affect your plans. For most DIY projects in existing spaces, building codes aren’t a concern, but it’s worth verifying if your situation is more complex.
Frost-Free Freezer Considerations: As mentioned earlier, frost-free freezers contain heating elements designed to melt ice buildup. These elements won’t activate during refrigerator operation, potentially causing long-term issues. While many users successfully convert frost-free models without problems, manual defrost freezers are generally considered safer for this application due to their simpler design and fewer components that could be affected by the conversion.
Frequently Asked Questions
Can you convert a freezer to a refrigerator?
Yes, converting a freezer to a refrigerator is a straightforward DIY project. The process requires installing an external temperature controller that overrides the freezer’s built-in thermostat, allowing it to maintain refrigerator temperatures (35-40°F) instead of freezer temperatures. This conversion typically takes less than an hour and requires minimal equipment—just a temperature controller costing $30-60. Most freezers can be successfully converted, though manual defrost models are generally preferable to frost-free units.
How do I convert freezer into normal fridge?
Converting a freezer to a refrigerator requires just five main steps. First, purchase an external temperature controller (Inkbird ITC-308 and Johnson Controls A19 are popular options). Second, install the temperature probe inside the freezer compartment, positioning it away from walls and cooling elements at roughly the midpoint. Third, plug the controller into the wall and the freezer into the controller. Fourth, set your desired temperature (35-37°F is ideal) with a 2-3 degree differential. Finally, monitor the temperature for 24 hours before adding food, making adjustments as needed to maintain consistent refrigeration temperatures.
Will converting a freezer damage the compressor?
This is a common concern, but real-world experience suggests compressor damage is rare. Many users have successfully run converted freezers for 2-5+ years without compressor failure. The key is setting an appropriate temperature differential (2-3 degrees) to prevent excessive short cycling that could strain the compressor. While the refrigerator temperature does cause more frequent on/off cycles than freezer temperatures would, most compressors handle this duty without issues. That said, conversion will void your warranty, so using an older freezer out of warranty is often the safest choice.
What temperature controller should I use?
The most consistently recommended temperature controllers for this conversion are the Inkbird ITC-308 and Johnson Controls A19. Both models have proven track records with thousands of successful conversions. Digital models with displays are easier to set up and monitor than analog versions. Look for controllers with adjustable differential settings to prevent excessive compressor cycling. Avoid the cheapest no-name controllers, as inaccurate temperature control could compromise food safety. Expect to spend $30-60 for a reliable controller that will provide accurate temperature regulation for years.
How much energy does a converted freezer save?
Energy savings are substantial—typically 75-90% compared to standard refrigerators. Real-world measurements from converted freezer owners show electricity consumption of just 0.08-0.25 kWh per day, compared to 1-2 kWh for conventional refrigerators. This translates to annual electricity costs of just $4-14 versus $55-110 for standard models. Over a 10-year lifespan, that’s $500-1000 in savings per unit. For off-grid and solar-powered homes, the reduced energy load can mean smaller battery banks and fewer solar panels, making renewable energy systems more affordable and feasible.
Do freezers make good refrigerators?
Freezers make excellent refrigerators, often outperforming purpose-built refrigerators in efficiency and storage capacity. Their superior insulation means they maintain temperature better while using less energy. Chest freezers in particular are extremely efficient because cold air stays inside when the lid is opened. Converted freezers provide more usable storage space than similarly sized refrigerators, making them ideal for bulk storage, extra food storage for large families, or specialized uses like kegerators for home brewing. The main tradeoff is managing condensation, but with proper moisture control measures, converted freezers function excellently as refrigerators.
Is chest freezer or upright freezer better for conversion?
Chest freezers are generally better for pure energy efficiency due to their superior insulation and design that keeps cold air inside when opened. This makes them ideal for off-grid applications or maximum energy savings. However, upright freezers offer much better convenience with shelving systems and eye-level access similar to standard refrigerators. If accessibility and organization matter most, an upright freezer is the better choice. If maximum efficiency is your goal, choose a chest freezer. Both types convert successfully to refrigerators, so your decision should be based on which advantages matter more for your specific needs.
Will this void my warranty?
Yes, converting a freezer to a refrigerator will void the manufacturer’s warranty. This modification changes the intended use of the appliance, and manufacturers would understandably refuse to cover repairs under these circumstances. For this reason, many people choose to convert older freezers that are already out of warranty, or they purchase used units specifically for this purpose. If warranty coverage matters to you, be aware that this modification eliminates that protection. However, for the relatively low cost of a used freezer plus a temperature controller, you can create an efficient refrigerator without risking warranty coverage on a new appliance.
Conclusion
Converting a freezer to a refrigerator offers an accessible DIY project that delivers substantial energy savings while providing additional food storage. The process requires just one key component—an external temperature controller—and can be completed in under an hour. Whether you’re seeking to reduce your electricity bill, prepare for off-grid living, or simply add extra refrigerated storage, this conversion provides an economical and efficient solution.
The energy savings are impressive: 75-90% reduction compared to standard refrigerators, with real-world users reporting electricity consumption of just 0.08-0.25 kWh per day. Over a 10-year lifespan, that translates to $500-1000 in savings per unit. For off-grid and solar-powered homes, the reduced energy load can make renewable energy systems more feasible and affordable.
While condensation management and organization require some attention, these challenges are easily addressed with moisture absorbers, improved air circulation, and thoughtful storage solutions. The growing community of users who have successfully completed this conversion provides ample evidence that converted freezers can provide years of reliable service as efficient refrigerators.
If you’re ready to proceed, start by choosing an appropriate freezer (manual defrost models are preferred), purchase a quality temperature controller from a reputable brand like Inkbird or Johnson Controls, and follow the step-by-step installation process outlined in this guide. With proper setup and maintenance, your converted refrigerator will provide efficient, reliable food storage for years to come.




Leave a Comment