
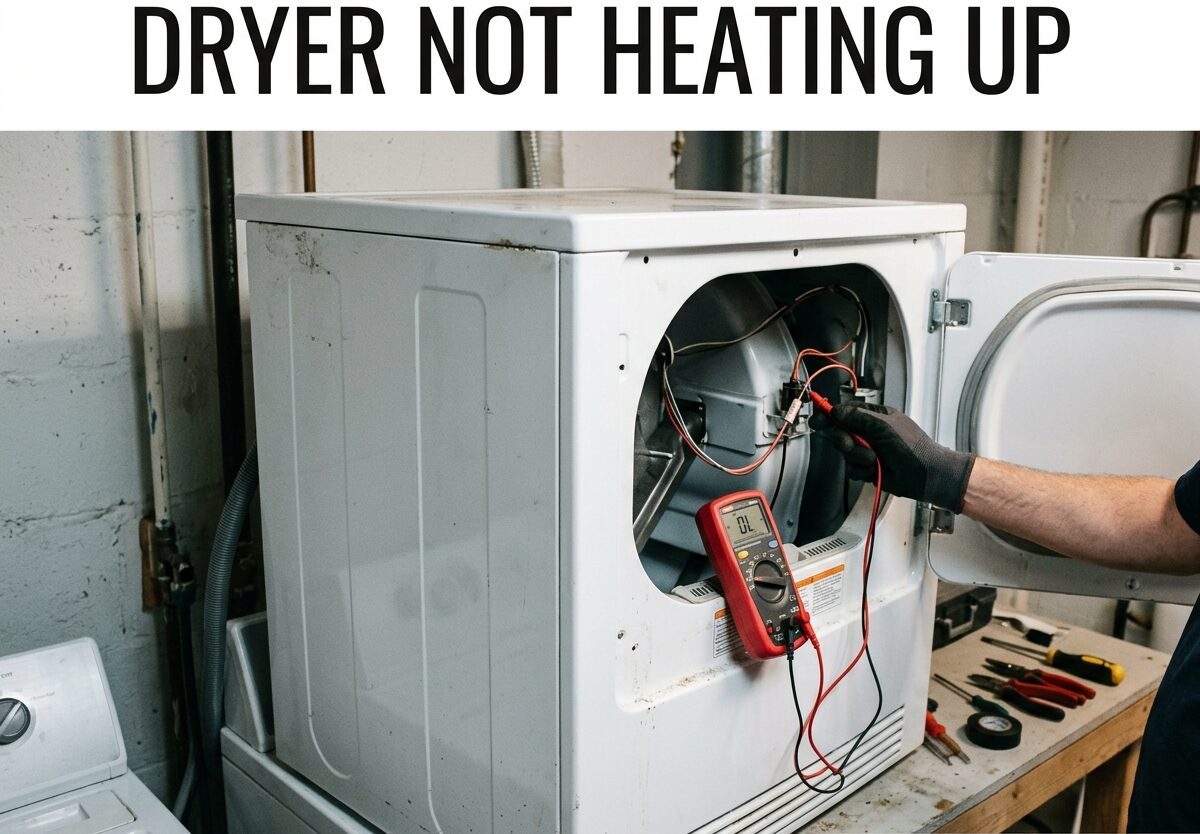
Your dryer not heating up is one of the most frustrating appliance problems. You load it with wet clothes, come back an hour later, and everything is still damp. The good news is that most heating issues have simple fixes you can handle yourself.
The most common reasons a dryer stops heating include clogged lint screens or vents, tripped circuit breakers, faulty heating elements, blown thermal fuses, and gas supply issues. I’ve helped troubleshoot dozens of dryers over the years, and about 70% of the time, the problem is one of these five causes.
Let me walk you through quick checks you can do in five minutes, then dive deeper into each potential issue. I’ll cover both electric and gas dryers, and help you decide when to call a professional.
Quick Troubleshooting Checklist (5-Minute Checks)
Before you grab any tools or start taking panels off, run through these quick checks. These simple steps solve the problem about 40% of the time.
Check 1: Clean the lint screen. Pull out the lint trap and inspect it. If you see buildup, clean it thoroughly with warm water and mild soap. A clogged lint screen restricts airflow and can cause heating issues or even trigger the thermal fuse.
Check 2: Verify your dryer settings. Make sure you haven’t accidentally selected “Air Dry,” “Fluff,” or “No Heat” cycle. These settings run the dryer without producing heat. Select a normal or high heat cycle and test again.
Check 3: Check the circuit breaker (electric dryers only). Electric dryers require 240 volts from a double breaker. Sometimes one half trips while the other stays on, allowing the drum to spin but preventing heating. Check your breaker panel for any tripped breakers.
Check 4: Inspect your load size. Overloading the dryer prevents proper airflow and heat distribution. Try running a smaller load to see if that helps.
Check 5: Check the gas valve (gas dryers only). Ensure the gas supply valve behind the dryer is fully open. The valve handle should be parallel to the gas line when open.
If none of these quick checks solve the problem, don’t worry. We’ll dive deeper into the most common causes and how to fix them.
Dryer Not Heating Up? Understanding Why Your Dryer Runs But Doesn’t Heat
It’s confusing when your dryer runs but doesn’t heat. The drum spins, the timer counts down, but your clothes come out damp. This happens because your dryer’s heating system is separate from its motor system.
In electric dryers, a heating element coils up and glows red hot, warming the air that passes through it. Gas dryers use a burner assembly with an igniter and flame to heat the air. When either system fails, the motor can still spin the drum, but no heat is produced.
The most common culprit is actually a safety feature called the thermal fuse. This small device cuts power to the heating element if it detects dangerous temperatures. Unfortunately, thermal fuses are one-time use devices – once they blow, they must be replaced.
Understanding this helps explain why fixing the root cause (like a clogged vent) is crucial. Replacing a blown thermal fuse without addressing what caused it to blow will just result in another blown fuse.
Top Cause #1: Clogged Lint Screen and Dryer Vent
A clogged lint screen or blocked dryer vent is the single most common cause of a dryer not heating up. I see this issue in about 35% of cases I troubleshoot. The good news is it’s also the easiest to fix.
Every load of laundry produces lint. Some gets caught in the lint screen, but some makes it past into the vent hose and exhaust system. Over time, this buildup restricts airflow dramatically. Your dryer needs proper airflow to heat efficiently – when air can’t circulate, the dryer can’t maintain proper temperature.
Symptoms of a clogged vent system:
Your clothes take longer than usual to dry, often requiring multiple cycles. The exterior of your dryer feels unusually hot during operation. You might notice lint accumulation around the outdoor vent hood or the dryer itself takes longer to complete cycles.
How to check your vent system:
Disconnect the vent hose from the back of your dryer and run a test cycle. If the dryer heats properly with the vent disconnected, you’ve confirmed the blockage is in your vent hose or external ductwork. Use a shop vacuum or vent cleaning brush to clean out the hose.
For a thorough cleaning, check the outdoor vent hood. Remove any visible debris or lint buildup. If your vent run is longer than 25 feet or has multiple bends, consider hiring a professional vent cleaning service every 1-2 years.
Prevent this issue by cleaning your lint screen before every single load. Yes, every load. It takes 10 seconds and extends your dryer’s lifespan significantly.
Top Cause #2: Tripped Circuit Breaker (Electric Dryers)
If you have an electric dryer, a tripped circuit breaker could be causing your dryer not heating up issue. This is surprisingly common and accounts for about 20% of electric dryer heating problems I encounter.
Electric dryers require 240 volts to operate the heating element, but only 120 volts to run the motor. Your dryer uses a double circuit breaker – one 120-volt circuit for the motor and another 120-volt circuit for the heating element. When one side trips, the motor still works but the heating element doesn’t.
How to check your breaker:
Go to your electrical panel and look for the breaker labeled “dryer.” It should be a double breaker with two switches connected. Look closely – sometimes one side appears “on” but has actually tripped internally. You’ll usually see a red indicator or the switch will be in a middle position.
Flip the breaker fully off, wait 30 seconds, then flip it back on. Run your dryer and check if it’s now heating properly.
Why breakers trip:
Breakers can trip due to power surges, electrical storms, or overloaded circuits. However, if your breaker trips repeatedly, you may have a more serious electrical issue or a failing component in your dryer that’s drawing too much power. In this case, consult an electrician.
If your home has an older fuse box instead of circuit breakers, check that both fuses for the dryer circuit are good. A blown fuse would need replacement.
Top Cause #3: Faulty Heating Element
A faulty heating element is a common cause of dryers not heating up, especially in older electric dryers. The heating element is essentially a coiled wire that glows red hot when electricity passes through it. Over time, these coils can burn out or break.
Signs of a bad heating element:
The most obvious sign is that your dryer runs but produces no heat at all. You might see visible breaks in the heating coil if you can safely access it. Sometimes you’ll see burn marks on the coil or notice that it doesn’t glow red during operation (if you can see it through a panel).
Testing your heating element:
You’ll need a multimeter to test your heating element. First, unplug your dryer or turn off the breaker. Access the heating element – it’s usually located in the back of the dryer cabinet, though location varies by brand.
Set your multimeter to the lowest ohms setting. Touch the probes to the two terminals on the heating element. You should get a reading between 10 and 50 ohms. If your meter shows “OL” or infinity, the heating element is broken and needs replacement.
Replacement cost:
A new heating element costs between $30 and $80, depending on your dryer model. If you’re comfortable with DIY repairs, this is a manageable project. Professional installation typically runs $150-300 including the part.
Heating elements typically last 10-15 years with proper maintenance. If your dryer is newer and the element fails, check your vents and lint screen – restricted airflow can cause elements to fail prematurely.
Top Cause #4: Blown Thermal Fuse
A blown thermal fuse is a frustrating but important safety feature that prevents dryer fires. When I troubleshoot a dryer not heating up, the thermal fuse is the culprit about 15% of the time. Here’s the critical thing to understand: thermal fuses blow for a reason, and you must find that reason before replacing it.
The thermal fuse is a small safety device designed to cut power to the heating element if it detects unsafe temperatures. It’s typically located on the blower housing or near the heating element. Once it blows, it cannot be reset – it must be replaced.
What causes thermal fuses to blow:
The number one cause is a clogged vent system. When your dryer can’t exhaust properly, heat builds up inside the cabinet and triggers the thermal fuse. Other causes include a failing cycling thermostat, a restricted exhaust hood, or too much lint buildup around the heating element.
Testing the thermal fuse:
Unplug your dryer and locate the thermal fuse. Use a multimeter set to continuity test or low ohms. Touch the probes to both terminals of the fuse. If you get no continuity (infinite resistance), the fuse is blown.
Critical warning:
Before replacing a blown thermal fuse, you MUST find and fix the root cause. If you simply replace the fuse without addressing a clogged vent or bad thermostat, the new fuse will blow again, often within a few cycles.
Replacement cost:
Thermal fuses are inexpensive at $10-30, but professional installation runs $100-200. This is a moderate DIY project if you’re comfortable with basic tools and safety procedures.
Top Cause #5: Gas Dryer Specific Issues
Gas dryers have unique issues that can cause them to stop heating. If you have a gas dryer not heating up but running, these are the most likely culprits. Gas dryer heating problems require extra caution – if you’re uncomfortable working with gas, call a professional.
Closed or blocked gas valve:
The most basic issue is a closed gas supply valve. Check behind your dryer and ensure the valve handle is parallel to the gas line (open position). If it’s perpendicular, the gas is shut off. Also check that your home’s gas supply hasn’t been interrupted.
Failed igniter:
Modern gas dryers use an electric igniter rather than a pilot light. The igniter glows white-hot to ignite the gas. If the igniter fails, no ignition occurs and no heat is produced. You can often see the igniter glow through a small peephole on the burner assembly. If it doesn’t glow during the heating cycle, it likely needs replacement.
Dirty or faulty flame sensor:
The flame sensor confirms that ignition has occurred. If it’s dirty or fails, the gas valve will shut off as a safety measure. Cleaning the flame sensor with sandpaper sometimes solves the issue. If not, replacement is needed.
Gas valve solenoid issues:
The gas valve has electric solenoids that open to allow gas flow. These can fail over time. Testing requires specialized equipment, so diagnosis is often best left to professionals.
Safety warning:
Gas appliances pose carbon monoxide and fire risks if improperly serviced. If you smell gas, leave your home immediately and call your gas company or emergency services. For any gas dryer issues beyond simple valve checks, I recommend professional service.
Brand-Specific Troubleshooting Tips
Different dryer brands have quirks and common issues specific to their designs. These brand-specific tips can help you diagnose your dryer not heating up problem faster.
Whirlpool and Maytag Dryers:
These brands (owned by the same parent company) often have thermal fuses located on the rear bulkhead behind the back panel. Common error codes include F-01 (primary control failure) and F-22 (exhaust thermistor open). The thermal fuse is white with two wires and is a common failure point.
Samsung Dryers:
Samsung dryers display helpful error codes. Heating error codes include hE, hE1, hE2, and hE3. These indicate various heating circuit problems. Samsung thermal fuses are often located on the blower housing, accessible through the rear panel. Samsung dryers also have a known issue with the heating element connector melting over time.
LG Dryers:
LG error codes for heating issues include dHE, dHE1, and dHE2. These typically indicate heating element or thermal fuse problems. LG dryers use a dual heating element system, and sometimes one half fails while the other works, resulting in reduced heating capacity.
GE and Hotpoint Dryers:
GE dryers often place the thermal fuse on the blower housing near the bottom front of the cabinet. Common heating-related error codes include E13 (heating circuit open) and E14 (thermal fuse open). GE dryers have a reputation for reliable heating elements but problematic thermostats.
Always consult your owner’s manual for specific information about your model. Model-specific guides are often available on manufacturer websites if you’ve misplaced your manual.
Tools You’ll Need for DIY Troubleshooting
Before diving into DIY dryer repair, gather these basic tools. Having everything ready makes the process smoother and safer. These tools will cover most common dryer not heating up diagnostics and repairs.
Multimeter ($15-40):
A multimeter is essential for testing heating elements, thermal fuses, and thermostats. You’ll use it for continuity tests, which check if electricity can flow through a component. Digital multimeters are easiest to read and most versatile.
Screwdriver set:
You’ll need both Phillips and flathead screwdrivers. Dryer panels are typically held with 1/4 inch screws, but some brands use different sizes. A magnetic screwdriver helps prevent dropping screws inside the dryer cabinet.
Nut driver set:
Many dryer components are secured with nuts rather than screws. A 1/4 inch and 5/16 inch nut driver will handle most dryer fasteners. Socket wrenches work but nut drivers are faster for dryer repair.
Shop vacuum:
A shop vacuum with a narrow attachment is invaluable for cleaning lint from inside the dryer cabinet and vent system. This is also useful for general dryer maintenance.
Flashlight:
The inside of a dryer cabinet is dark. A bright flashlight helps you inspect components, identify problems, and locate screws during disassembly and reassembly.
Work gloves:
Dryer interiors have sharp metal edges. Work gloves protect your hands from cuts. They also provide some insulation when working on recently-operated dryers that may still be warm.
These tools represent an investment of about $50-100 if you don’t already own them. Considering that professional dryer repair runs $150-300 per visit, building a basic tool collection quickly pays for itself if you plan to tackle DIY repairs.
Repair vs Replace: Making the Right Decision
When your dryer is not heating up, you’ll face an important decision: repair or replace? This decision framework helps you make a smart choice based on costs, dryer age, and repair complexity.
The 50% Rule:
Appliance repair experts use the 50% rule: if the repair cost exceeds 50% of a new dryer’s cost, consider replacing instead. A basic new dryer costs $400-600, so repairs over $200-300 might justify replacement.
Consider dryer age:
Dryers typically last 13-15 years with proper maintenance. If your dryer is under 5 years old, repair is usually the right choice unless the repair is extremely expensive. If it’s over 10 years old and needs a major repair, replacement might make more sense.
DIY vs Professional repair costs:
DIY heating element replacement: $30-80 for parts
Professional heating element replacement: $150-300
DIY thermal fuse replacement: $10-30 for parts
Professional thermal fuse replacement: $100-200
Professional diagnostic visit: $80-150 (often applied to repair if you proceed)
When to replace:
Consider replacement if your dryer has multiple failing components, is over 10 years old, has rusted or damaged internal parts, or requires a repair costing more than 50% of replacement cost. Also consider replacement if you want upgraded features or better energy efficiency.
Energy efficiency considerations:
Newer dryers are slightly more efficient, but the difference isn’t dramatic – maybe $20-40 per year in energy savings. Unless your current dryer is very old, energy savings alone probably won’t justify replacement.
Warranty status:
Check if your dryer is still under warranty. Many manufacturers offer 1-2 year full coverage and 5-10 year coverage on specific components like the drum or motor. If your dryer is covered, repair is definitely the right choice.
When to Call a Professional
While many dryer not heating up issues are DIY-friendly, some situations call for professional help. Knowing when to call a pro saves time, prevents frustration, and ensures safety.
Call a professional for gas dryer issues:
Gas appliances pose serious risks including fire, explosion, and carbon monoxide poisoning. If you’re not experienced with gas lines and connections, don’t attempt DIY gas dryer repairs. Professional service is worth the cost for safety alone.
Call a professional for electrical issues beyond breakers:
Tripped breakers are simple to check yourself. But if you need to test voltage at the outlet, replace a power cord, or diagnose complex electrical problems, call an electrician or appliance repair professional.
Call a professional if you lack tools or confidence:
There’s no shame in calling a pro if you don’t have the tools, time, or confidence to tackle a repair. DIY saves money only when done correctly. An improper repair can cause further damage or safety hazards.
Call a professional for complex disassembly:
Some dryer models require extensive disassembly to access components. If accessing the heating element or thermal fuse requires removing multiple panels, drums, or complicated assemblies, professional service might be more efficient.
Call a professional if you can’t diagnose the problem:
If you’ve checked all the common causes and your dryer still isn’t heating, a professional has the expertise and tools to diagnose rare or complex issues. They can also identify multiple problems that might be occurring simultaneously.
Average professional repair costs:
Expect to pay $80-150 for a diagnostic visit. If you proceed with the repair, most companies apply this fee to the total repair cost. Complete repairs typically run $150-400 depending on parts and labor.
Red flags that require immediate professional service:
If you smell burning plastic, see sparks, smell gas, or notice any signs of electrical arcing, stop using your dryer immediately and call a professional. These are serious safety concerns that require expert attention.
Preventive Maintenance to Avoid Future Problems
The best way to deal with a dryer not heating up is to prevent it from happening in the first place. These simple maintenance habits extend your dryer’s lifespan and improve performance.
Clean the lint screen every load:
This is the single most important maintenance task. Clean the lint screen before every single load. It takes 10 seconds and prevents most vent-related issues. Every few months, wash the screen with warm water and mild soap to remove residue from dryer sheets.
Clean the dryer vent annually:
Disconnect the vent hose from the back of your dryer and clean it with a shop vacuum or vent brush. Clean the outdoor vent hood and ensure the flapper moves freely. If your vent run is long or complex, consider professional vent cleaning every 1-2 years.
Inspect the vent hose regularly:
Check that your vent hose isn’t crushed, kinked, or damaged. Replace vinyl or plastic vent hoses with rigid metal ducting, which is safer and more durable. Ensure the hose is as short and straight as possible.
Don’t overload the dryer:
Overloading restricts airflow and strains components. Fill the dryer no more than halfway full for optimal performance. Large, bulky items like comforters are better off at a laundromat with commercial-capacity equipment.
Use appropriate dryer settings:
Match heat settings to fabric types. High heat isn’t necessary for most clothes and can damage both fabrics and your dryer. Use lower heat settings when possible to extend component lifespan.
Schedule professional maintenance:
Consider having your dryer professionally cleaned and inspected every 2-3 years. Technicians can clean internal areas you can’t access and identify potential problems before they cause failures.
Frequently Asked Questions About Dryers Not Heating Up
Why is my dryer running but has no heat?
When your dryer runs but has no heat, it typically means the motor works but the heating system has failed. Common causes include a tripped circuit breaker (electric dryers), faulty heating element, blown thermal fuse, or clogged vent system. The dryer drum spins because the motor has its own power circuit, while the heating element runs on a separate circuit that can fail independently. Start by checking the circuit breaker, then test the thermal fuse and heating element with a multimeter.
How do you reset a dryer that won’t heat?
To reset a dryer that won’t heat, first unplug it or turn off the circuit breaker for 30 seconds. For electric dryers, check your breaker panel and flip the dryer breaker fully off, then back on. Some dryers have a reset button on the control panel – hold it for 3-5 seconds. Gas dryers may require resetting the gas valve by turning it off, waiting 30 seconds, then turning it back on. After resetting, run a test cycle to check if heat is restored. If these steps don’t work, the problem likely requires component testing or replacement rather than a simple reset.
Is it worth fixing a dryer that doesn’t heat?
Whether it’s worth fixing a dryer that doesn’t heat depends on the dryer’s age and the repair cost. For dryers under 5 years old, repair is usually the best choice unless the repair exceeds 50% of a new dryer’s cost. For dryers over 10 years old, consider replacement if the repair is expensive. Common repair costs include $100-200 for a thermal fuse, $150-300 for a heating element, and $150-400 for professional service with parts. If you’re comfortable with DIY, parts are inexpensive ($10-80), making repair very worthwhile. Factor in that a quality new dryer costs $400-800, so minor to moderate repairs are usually economically sensible.
How do I know if my dryer heating element is blown?
You can tell if your dryer heating element is blown by testing it with a multimeter for continuity. First, unplug the dryer and access the heating element (usually behind the rear panel or inside the cabinet). Set your multimeter to the lowest ohms setting and touch the probes to the heating element terminals. A reading between 10-50 ohms indicates a good element. A reading of infinite resistance or ‘OL’ means the element is blown and needs replacement. Visual signs include visible breaks in the coil, burn marks, or no glow during operation. If you’re not comfortable with this test, a professional can diagnose the issue quickly.
Conclusion: Getting Your Dryer Heating Again
Dealing with a dryer not heating up is frustrating, but most issues are fixable. Start with the quick checks – clean the lint screen, verify settings, check the breaker. These simple steps solve the problem nearly half the time.
If quick checks don’t work, work through the most common causes: clogged vents, tripped breakers, faulty heating elements, blown thermal fuses, and gas supply issues. Remember that clogged vents often cause thermal fuses to blow, so always address the root cause before replacing components.
Safety first – especially with gas dryers. If you’re uncomfortable with any step or dealing with gas components, call a professional. The $150-300 service call is cheaper than a fire or carbon monoxide incident.
Prevent future issues by cleaning your lint screen every load and scheduling vent cleaning annually. These simple habits extend your dryer’s life and prevent most common heating problems.
Now that you understand the common causes and solutions, you can tackle your dryer not heating up issue with confidence. Whether you handle the repair yourself or call a professional, you’ll know exactly what’s happening and what needs to be fixed.


Leave a Comment