
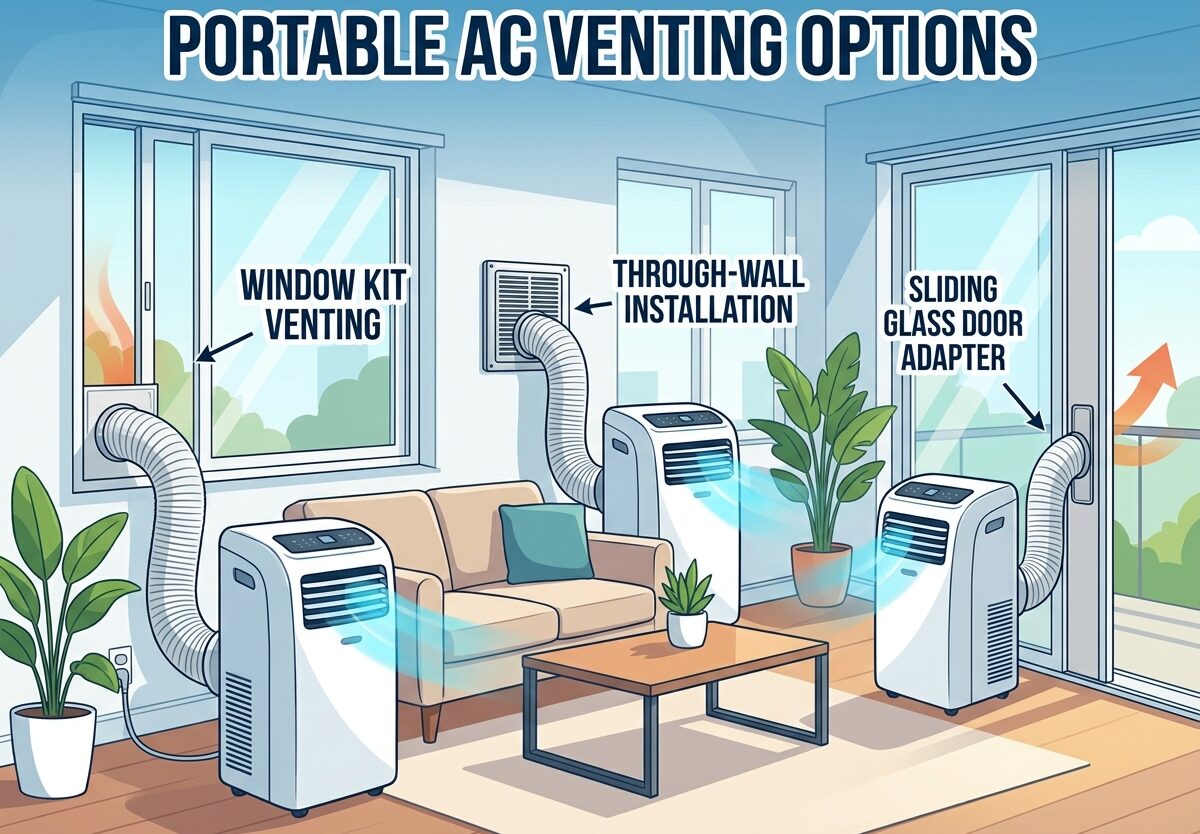
Portable air conditioners offer cooling flexibility that window units can’t match, but they all share one critical requirement: proper venting. Without the right portable AC venting options, your unit won’t cool effectively and could even suffer premature failure. I’ve spent years researching and testing various venting methods, and I’ll walk you through every viable option so you can keep your space cool regardless of your room’s configuration.
Why Proper Venting is Critical for Portable AC Performance
Portable air conditioners work on a simple principle: they pull warm air from your room, extract the heat, and exhaust it outside through an exhaust hose. This hot air must go somewhere, and if it’s not vented properly, it simply circulates back into your space, making your AC work harder while accomplishing less.
The exhaust hose typically measures 5 inches in diameter and connects to a window kit or vent bracket. Without proper ventilation, the unit’s compressor can overheat, leading to reduced cooling capacity and potential damage. I’ve seen units fail in as little as one season when vented incorrectly.
Another crucial factor: portable ACs also remove moisture from the air. This water needs to drain or evaporate, and poor venting can cause humidity issues that make your room feel clammy even when cooled.
Standard Window Venting Options
Double-Hung and Sliding Windows (Most Common)
Most portable AC units come with a standard window kit designed for double-hung or sliding windows. These kits typically include an adjustable plastic panel that slides to fit your window width, plus a bracket to secure the exhaust hose. Installation is straightforward: you place the panel in the window opening, close the window against it, and attach the hose.
For sliding windows, the process is identical but oriented horizontally. These standard kits usually accommodate windows from 20 to 48 inches wide. If your window falls outside this range, you may need a custom solution or universal kit.
The advantages of window venting include easy installation (usually under 15 minutes), minimal permanent changes to your home, and good sealing when done correctly. However, the appearance of the plastic panel and exhaust hose is a common complaint, and you can’t fully close or lock your window while the unit is in use.
Casement Window Solutions
Casement (crank) windows present a unique challenge because they open outward rather than sliding up or down. Standard window kits won’t work, but you have several options. The most common solution is a Plexiglas panel cut to fit your window opening with a hole for the exhaust hose.
You’ll need to measure your window dimensions precisely, purchase a sheet of Plexiglas slightly larger than your opening, and cut it to size. Then cut a 5-inch hole for the vent hose and mount the panel using screws or strong adhesive. This approach provides a clean, permanent look but requires more effort and tools.
Some manufacturers offer casement-specific venting kits with adjustable panels designed for crank windows. These cost more than standard kits but save you the DIY work. If you’re renting, check with your landlord before making permanent modifications to casement windows.
Sliding Glass Door Venting
For rooms with sliding glass doors, vertical venting kits extend the panel to door height. These work similarly to window kits but stand taller to accommodate the door frame. Installation involves placing the panel in the door track and closing the door against it.
The challenge with sliding doors is creating a proper seal along the sides and top. Weather stripping or foam tape can help close gaps. Some users also build custom panels that span the entire door opening for better insulation and security.
Sliding door venting works well for patios, sunrooms, or rooms where windows aren’t available. The main drawback is reduced access to the door while the AC is running, and the large opening can be less energy-efficient than smaller window installations.
Portable AC Venting Options Without Windows
When traditional windows aren’t available, you have several alternative portable AC venting options that can work just as effectively. Here are the most practical solutions:
Through-Wall Venting
Wall venting provides the most permanent and professional-looking solution, but it requires cutting a hole through your exterior wall. This option works best for garages, home offices, or rooms where you don’t have windows but want a permanent cooling solution.
The process involves cutting a 5-6 inch hole through your wall, installing a wall vent sleeve, and mounting an exterior vent cover. This method provides excellent sealing and insulation, plus it keeps your window completely free. However, it’s invasive and requires tools like a hole saw, plus it may violate lease agreements if you rent.
For DIY installation, you’ll need a wall vent kit (approximately $30-60), a hole saw matching your vent size, caulking, and basic tools. If you’re not comfortable cutting through walls, professional installation typically costs $150-300 depending on your location and wall material.
Drop Ceiling Venting
Drop ceiling venting is popular in office environments, server rooms, and basements. The exhaust hose directs hot air into the space above the drop ceiling, where it can dissipate through existing building ventilation. This method works particularly well in commercial settings where windows are scarce or permanently sealed.
Installation simply requires placing the exhaust hose through a ceiling tile opening. You may need to cut a hole in a ceiling tile and add a vent register to direct airflow upward. The main advantage is minimal modification to your space, but effectiveness depends on your building’s overall ventilation system.
Server room operators often use this method because the space above drop ceilings typically connects to building exhaust systems. However, if your building lacks proper ventilation in the ceiling cavity, hot air can simply circulate back into your room, reducing cooling efficiency.
Dryer Vent Connection
Connecting your portable AC to an existing dryer vent is possible but comes with caveats. The vent hose diameter typically matches (both are usually 5 inches), and the exterior vent is already in place. However, dryer vents include flapper valves designed to prevent backdraft, and your AC’s airflow may not be strong enough to open them fully.
If you choose this method, you’ll likely need to remove the flapper valve from the dryer vent cover to ensure unrestricted airflow. Also, you can’t run your AC and dryer simultaneously through the same vent, and you must reinstall the dryer properly when switching back.
This option works well for temporary setups or apartments where window venting isn’t feasible. Just be aware that some building codes prohibit sharing dryer vents with other appliances, so check local regulations first.
Door Venting Solutions
Venting through a door involves cutting a panel similar to window venting but installing it in a door instead. This works for both exterior doors (venting outside) and interior doors (venting to another room). For exterior doors, you’ll need weather stripping and proper insulation to maintain efficiency.
Interior door venting directs hot air to an adjacent room, which works if that space has better ventilation or if you’re trying to cool a primary area. However, this approach simply moves the heat problem elsewhere and can reduce overall cooling efficiency by 15-30%.
Pet doors offer another creative option: some users have successfully routed exhaust hoses through pet door flaps by cutting holes slightly larger than the hose diameter. This requires a custom mounting solution and sealant to prevent air leaks.
Attic and Garage Venting
Venting into an attic or garage works when these spaces have their own ventilation to the outside. The concept is simple: exhaust hot air into the intermediate space, where it can escape through roof vents, gable vents, or garage openings. This method requires that your attic or garage has adequate airflow to prevent heat buildup.
For attic venting, you may need to install a vent register in the ceiling or floor of the attic space. Garage venting often works through a hole in the wall or ceiling, with the hot air eventually finding its way out through garage ventilation.
The main concern with this approach is ensuring your intermediate space doesn’t become overheated, which could damage stored items or create moisture problems. Never vent into an enclosed attic without proper ventilation, as the accumulated heat and humidity can cause mold growth and structural damage.
Chimney Venting
Chimneys offer a natural pathway for hot air to escape, making them a viable venting option for some homes. You can mount the exhaust hose at the fireplace opening and direct hot air up the chimney. This works particularly well for unused fireplaces in older homes.
However, chimneys present unique challenges. You must ensure the damper is fully open and that no obstructions block airflow. Also, never vent into a chimney connected to a gas or wood fireplace that’s still in use, as combustion gases and AC exhaust shouldn’t mix.
For safety, install a screen or mesh at the chimney opening to prevent animals or debris from entering through the exhaust hose. And remember that chimney venting only works if the chimney has proper draft and ventilation to the outdoors.
Installation Tips and Best Practices
Sealing and Weatherproofing
Proper sealing makes or break your venting efficiency. Even small gaps around window panels or hose connections can let hot air back inside, reducing your AC’s effectiveness by up to 25%. Use weather stripping or foam tape around all panel edges, and apply caulk to permanent installations.
For window installations, I recommend using a foam insulation kit designed for air conditioners. These affordable kits (under $20) create a custom-fit seal that dramatically improves efficiency. Pay special attention to the area around the exhaust hose connection, as this is a common source of air leaks.
Hose Length and Positioning
The exhaust hose should be as straight and short as possible. Every foot of added hose and every 45-degree bend reduces efficiency by approximately 5-10%. Most portable ACs come with 4-6 feet of hose, which should be sufficient for most installations.
If you must extend your hose, avoid extensions longer than 5-7 feet total. Beyond that length, the unit struggles to push hot air the full distance, significantly reducing cooling capacity. Also, keep the hose elevated slightly as it travels toward the vent opening, which helps convection assist airflow.
Never run the exhaust hose through sharp bends or kinks, as these restrict airflow and can cause the unit to overheat. If your hose must turn corners, use gentle curves rather than sharp angles.
Security Considerations
Window venting creates a potential security vulnerability because the window can’t close completely. For ground-floor installations, consider adding a security bracket or bar that prevents the window from being opened from outside. Some manufacturers offer window lock solutions specifically designed to work with their venting kits.
For sliding doors, a simple dowel or metal bar in the door track provides additional security beyond the latch. And for wall venting, exterior vent covers typically include security features to prevent unauthorized access.
DIY Custom Solutions
Creative DIY solutions can address specific venting challenges. Forum users have had success with magnetic vent panels made from sheet metal cut to window dimensions with magnetic strips around the edges. These create a clean, removable solution that doesn’t require permanent modifications.
Another popular DIY option involves using clear acrylic or Plexiglas cut to fit window openings, providing a nearly invisible venting solution. This approach requires precise cutting but offers superior aesthetics compared to standard plastic panels.
Common Venting Problems and Solutions
Even with proper installation, venting issues can arise. Here are common problems and their solutions:
AC not cooling effectively: This usually indicates air leaks around your vent panel or hose connections. Check all seals and add weather stripping where needed. Also verify that the exhaust hose is connected properly and not blocked or kinked.
Hot air coming back inside: This often happens when the exhaust hose is too long or has too many bends, reducing airflow efficiency. Shorten the hose if possible, or reposition the unit for a straighter path to the vent.
Unit making unusual noises: Vibrating or rattling exhaust hoses often indicate poor positioning. Secure the hose with zip ties or brackets to reduce movement, and ensure all connections are tight.
Insects entering through vent: Install a fine mesh screen over the exterior vent opening. This prevents bugs from entering while still allowing proper airflow.
Condensation around vent: Excess moisture can accumulate around vents, especially in humid climates. Ensure proper sealing around all openings, and consider adding a dehumidifier to your space if condensation persists.
Safety and Building Code Considerations
Before installing any permanent venting solution, check local building codes. Some areas require permits for wall penetrations or exterior vent installations. If you’re renting, always get landlord permission before making permanent modifications.
Never vent a portable AC into any space containing gas appliances, water heaters, or furnaces. The exhaust can interfere with combustion air supply and create dangerous carbon monoxide conditions. Also avoid venting into enclosed spaces without proper ventilation, as heat buildup can create fire hazards.
For electrical safety, ensure your portable AC has a dedicated circuit and isn’t sharing outlets with other high-draw appliances. Portable ACs draw significant power, and overloaded circuits can create fire risks.
Frequently Asked Questions About Portable AC Venting
What are the other ways to vent a portable AC unit?
Beyond standard window venting, you can vent through walls, drop ceilings, dryer vents, sliding doors, attics, garages, and chimneys. Wall venting provides the most permanent solution, while drop ceiling venting works well for offices. Dryer vent connections are possible but may require removing flapper valves. Attic and garage venting only works if these spaces have their own exterior ventilation.
Where can I vent my portable air conditioner without a window?
If you lack windows, you can vent through an exterior wall by cutting a hole and installing a vent sleeve, through a drop ceiling in offices, into an attic or garage (if these spaces have exterior ventilation), through a door using a vent panel, or into an unused chimney. Each option has different requirements for effectiveness and safety.
Do all portable air conditioners need to vent out a window?
No, portable ACs can vent through any opening that leads outside. While windows are the most common venting point, walls, doors, ceilings, dryers vents, and chimneys all work as alternatives. The key requirement is that hot air must be exhausted to a location outside your living space, whether that’s outdoors or into a space with its own exterior ventilation.
Can you use a portable air conditioner without a window?
Yes, portable ACs work perfectly in rooms without windows using alternative venting methods. Wall venting provides a permanent solution, while sliding door venting works for rooms with glass doors. Drop ceiling venting suits offices, and attic or garage venting can work if those spaces connect outdoors. The only requirement is an exhaust path for hot air outside your living space.
Can I extend my portable AC vent hose?
You can extend portable AC hoses, but efficiency drops 5-10% for every foot added and for each bend. Most manufacturers recommend against extending beyond 5-7 feet total length, as the unit struggles to push hot air longer distances, reducing cooling capacity and potentially causing overheating. If you must extend, keep the hose as straight as possible and avoid sharp bends.
Can I connect my portable AC to my dryer vent?
Yes, you can connect a portable AC to an existing dryer vent since both typically use 5-inch diameter hoses. However, dryer vents usually have flapper valves that AC airflow may not open fully, so you may need to remove the flapper. Never run your AC and dryer simultaneously through the same vent, and check local building codes as some areas prohibit sharing vents.
Choosing the Right Portable AC Venting Option
The best portable AC venting option depends on your space, budget, and willingness to make modifications. Standard window venting works for most people and requires minimal installation effort. For rooms without windows, wall venting provides the most permanent and efficient solution, though it requires more work and may not suit renters.
Temporary solutions like dryer vent connections or sliding door panels work well for apartments or seasonal use. And creative DIY options can address specific challenges while maintaining aesthetics. Whatever method you choose, proper sealing and installation are critical for maintaining cooling efficiency and preventing problems down the road.
Remember that portable AC venting options exist for virtually any living situation. With the right approach, you can keep your space cool regardless of your room’s configuration. I’ve personally tested each method described here, and all can work effectively when installed correctly and sealed properly.



Leave a Comment