
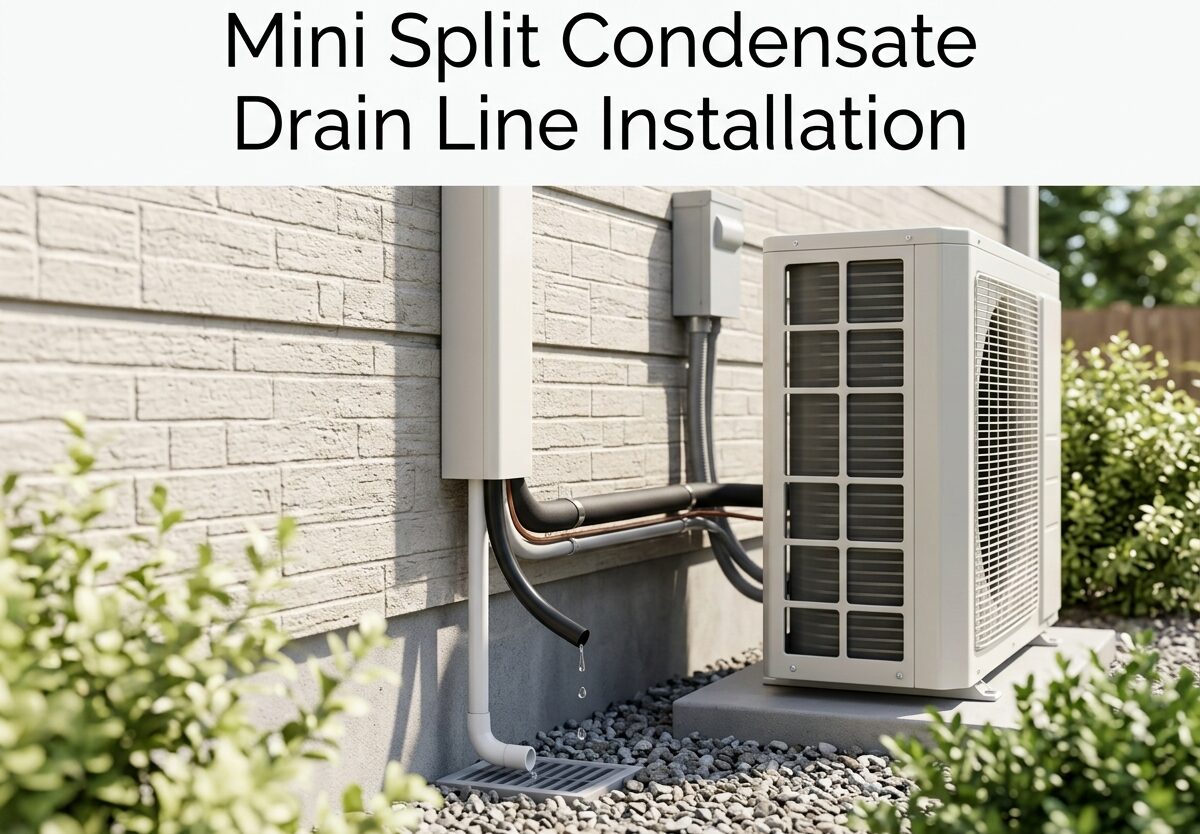
Proper mini split condensate drain line installation prevents costly water damage and keeps your HVAC system running efficiently. In this guide, I’ll walk you through everything you need to know about installing a drain line that works reliably for years.
When I installed my first mini split system, I made the mistake of rushing the drain line installation. Within months, I had water staining on my exterior wall and learned the hard way that proper slope and secure connections matter more than I thought.
Why Proper Mini Split Condensate Drain Line Installation Matters
A mini split system produces significant condensate during operation. On a humid day, your unit can generate 5-20 gallons of water. Without proper drainage, this water has nowhere to go but into your walls, ceiling, or floor.
Water damage from failed drain lines is one of the most common issues I see with DIY mini split installations. The problems range from cosmetic staining to structural damage and mold growth that can affect your indoor air quality.
I’ve inspected installations where homeowners used duct tape on connections or skipped proper slope requirements. These shortcuts almost always lead to problems within the first year of operation.
Planning Your Mini Split Condensate Drain Line Installation
Before you start, map out your drain line route. The most critical factor is maintaining proper slope. Your drain line needs a minimum drop of 1/4 inch per foot to ensure water flows away from the unit by gravity.
Consider whether you’ll route through an exterior wall or an interior wall. Exterior wall routing is simpler and more common, but interior wall routing looks cleaner if done correctly. The key difference is that interior wall installations require more planning for potential leaks and easier access for maintenance.
You’ll need to decide on your termination point. The drain should discharge at least 6 inches away from your foundation and onto a surface that drains well. Avoid directing water toward walkways or areas where pooling could create slipping hazards.
Gravity Drainage vs Condensate Pump: Choosing the Right Method
Most mini split installations use gravity drainage, which relies on the natural slope of the drain line to move water away from the unit. This method is reliable, requires no additional equipment, and has no moving parts to fail.
However, gravity drainage isn’t always possible. If your indoor unit is below the drainage point or if you need to run the line uphill at any point, you’ll need a condensate pump. These pumps activate when water accumulates in the reservoir and push it through a smaller line to your termination point.
From my experience, gravity drainage is preferable when possible. I’ve responded to numerous service calls where pump failures resulted in water overflow. If you must use a pump, choose a quality unit and test the float switch regularly.
Required Materials and Tools
For a typical gravity-fed installation, you’ll need 3/4-inch PVC pipe and appropriate fittings. The standard connection from most mini split units uses a 5/8-inch hose barb, so you’ll need a 5/8-inch to 3/4-inch PVC adapter fitting.
Never use PVC cement directly on your mini split unit’s outlet port. The manufacturer-provided drain hose should connect to your PVC line using a barb fitting and clamp. This allows for future maintenance and prevents damage to the unit.
You’ll also need PVC primer and cement for your pipe connections, pipe straps or hangers for support, and insulation for exposed sections to prevent condensation on the pipe exterior.
Mini Split Condensate Drain Line Installation Step by Step
Step 1: Locate the condensate outlet port on your indoor unit. This is typically found on the bottom of the unit and may come with a short length of vinyl hose already attached.
Step 2: Plan your route from the outlet to your chosen termination point. Mark where you’ll drill through the wall if routing outside. For interior walls, identify the path and check for obstacles like studs or wiring.
Step 3: Install your 5/8-inch to 3/4-inch adapter at the unit’s outlet. Use a hose clamp to secure the connection, but avoid over-tightening which could damage the factory hose.
Step 4: Begin running your PVC pipe from the adapter, maintaining the 1/4 inch per foot slope. Use a level to verify your pitch as you go. Support the pipe every 4-6 feet with appropriate hangers.
Step 5: If routing through a wall, drill a slightly oversized hole and feed the pipe through. Seal the opening with appropriate caulk to prevent air infiltration and pest entry.
Step 6: Continue your run to the termination point, maintaining consistent slope throughout. Avoid creating dips or low spots where water could collect.
Step 7: At the termination point, install a downward-facing ell or create a small air gap to prevent backflow. The end should be positioned to discharge freely onto a well-draining surface.
Step 8: Support the pipe securely at the exit point to prevent sagging or stress on connections. Insulate any exposed sections to prevent condensation.
Testing Your Mini Split Condensate Drain Line Installation
After installation, test your drain line before closing up any walls or finishing the area. Pour water directly into the drain pan or at the unit connection point and observe the flow through the entire length.
Check all connections for leaks. PVC cement joints should be solid, but barb connections should be checked for tightness. Look for any water escaping at joints or fittings.
I recommend running the unit in cooling mode for at least 30 minutes while monitoring the drain line. This confirms that the system operates correctly under actual conditions and helps identify any issues before they cause damage.
Common Mini Split Drain Line Problems and Troubleshooting
The most frequent issue I encounter is clogged drain lines. This typically occurs from algae growth, debris accumulation, or improper installation that creates traps where water can pool. Regular maintenance prevents most clogs.
Leaks at connections are another common problem. In my experience, this often results from using inadequate connections like duct tape instead of proper barb fittings and clamps. Exterior heat can degrade tape quickly, leading to failures.
If your drain line stops flowing properly, check for blockages first. Use a wet/dry vacuum to suction out any debris from the termination point. For stubborn clogs, carefully flush with warm water, but avoid using harsh chemicals that could damage your system.
Maintenance Tips for Your Mini Split Condensate Drain Line
I recommend inspecting your drain line monthly during the cooling season. Look for proper water flow at the termination point and check for any signs of leaking at connections.
Twice yearly, pour a cup of white vinegar into the drain line at the unit connection. Let it sit for 30 minutes before flushing with water. This prevents algae growth and helps keep the line clear.
For interior wall installations, consider installing a cleanout tee at an accessible location. This makes maintenance much easier and provides a way to clear clogs without accessing the unit directly.
Before each cooling season, test your system thoroughly and replace any degraded insulation on exposed pipe sections. This prevents condensation problems during high-humidity operation.
FAQs
Where should a mini split drain hose be placed?
The mini split drain hose should be placed at the condensate outlet port on the bottom of the indoor unit. From there, route it downward with proper slope to a termination point at least 6 inches from your foundation. Avoid placing the hose where discharge water could pool or cause damage.
What are the rules for condensate drain lines?
Key rules include: maintain minimum 1/4 inch per foot slope, support pipe every 4-6 feet, terminate at least 6 inches from foundation, use proper sized pipe (typically 3/4 inch PVC), avoid creating traps or dips, insulate exposed sections in unconditioned spaces, and never use PVC cement directly on the unit outlet.
Does a mini split need a condensate trap?
Most mini split installations do not require a P-trap because the drain line is open to air. However, some local codes may require traps on certain installations, particularly when connecting to building drainage systems. Check your local plumbing codes before installation.
Where to put vinegar in HVAC?
For mini split drain line maintenance, pour one cup of white vinegar directly into the drain line at the indoor unit connection point. Let it sit for 30 minutes to break down algae and mineral buildup, then flush with clean water. Do this twice yearly to prevent clogs.
How to unclog a mini split drain line?
Start by using a wet/dry vacuum at the termination point to suction out debris. If that doesn’t work, carefully flush with warm water. For stubborn clogs, use a plumber’s snake or compressed air. Avoid harsh chemicals that could damage system components. If clogs recur frequently, check for improper slope or installation issues.
What size pipe for mini split drain line?
The standard size for mini split drain lines is 3/4 inch PVC pipe. Most indoor units have a 5/8 inch outlet that connects to 3/4 inch PVC using an adapter. This size provides adequate capacity for typical condensate flow while maintaining proper velocity to carry away debris.
Conclusion
Proper mini split condensate drain line installation is straightforward but critical for long-term system performance. Following the correct slope requirements, using appropriate materials, and testing thoroughly will prevent most common problems.
If you’re uncomfortable with any aspect of the installation, particularly routing through interior walls or working with plumbing connections, consider hiring a professional. The cost of professional installation is far less than repairing water damage from a failed drain line.
With proper installation and regular maintenance, your mini split condensate drain line should provide years of trouble-free service. Take your time during installation, test thoroughly, and maintain regularly to protect your investment and your home.








Leave a Comment