
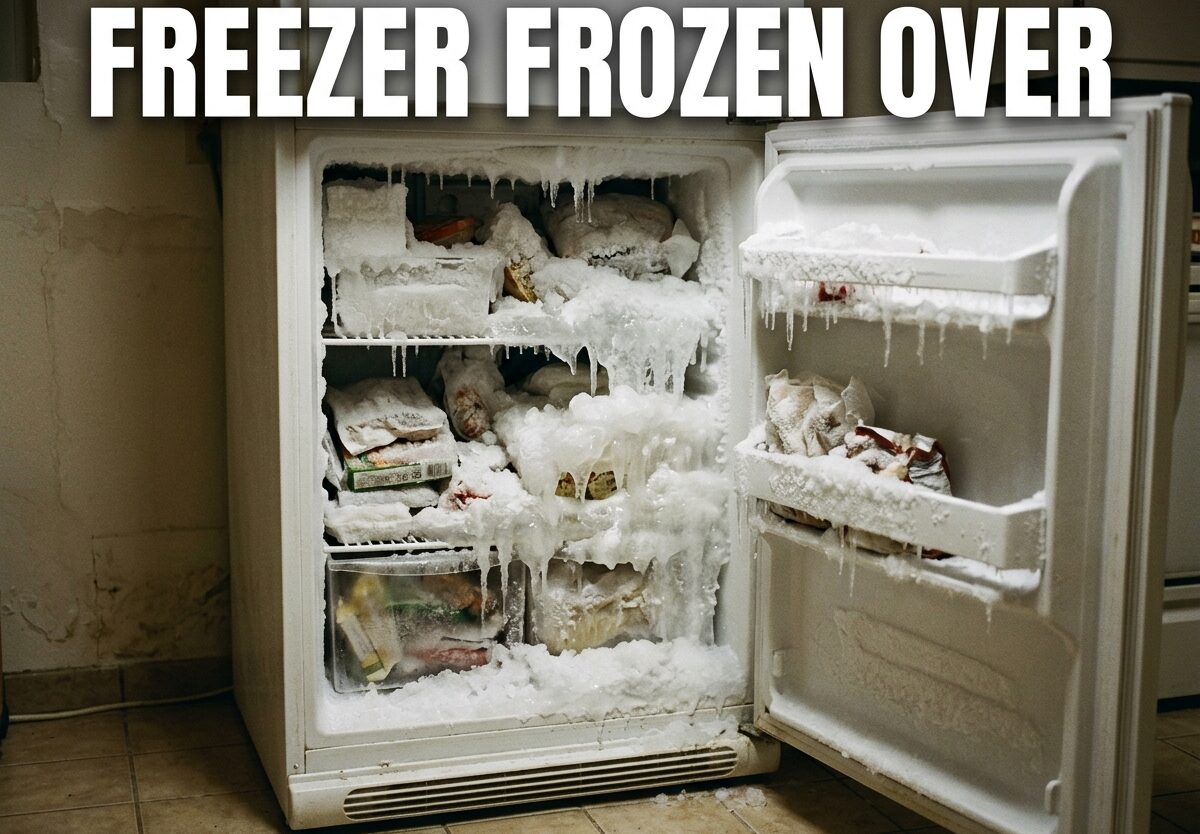
Opening your freezer to find it encased in ice is frustrating and concerning. When a freezer frozen over occurs, it means excessive frost has accumulated on the walls, coils, and even your food. This common issue affects thousands of homeowners annually and can lead to spoiled food, higher energy bills, and potential appliance failure if left untreated.
I’ve seen this problem countless times, and the good news is that most causes are fixable without calling a professional. In this comprehensive guide, I’ll walk you through exactly why your freezer is icing up, how to diagnose the specific cause, and step-by-step instructions to resolve it. You’ll also learn prevention strategies to keep your freezer running efficiently for years to come.
Whether you’re dealing with a thin layer of frost or a solid block of ice, understanding the root cause is essential. Most people reach for a scraper and chisel away the ice, but this only treats the symptom. Let’s identify and fix the actual problem so it doesn’t keep happening.
What is Freezer Frozen Over?
A freezer frozen over means excessive ice has built up on the interior surfaces beyond normal frost accumulation. While some frost is normal in freezers, especially older models, thick ice layers indicate a problem with your appliance’s defrost system or sealing. The ice typically forms on the back wall, evaporator coils, or accumulates at the bottom of the freezer compartment.
Modern frost-free freezers are designed to prevent this exact problem through automatic defrost cycles. Every 8-24 hours, your freezer’s defrost system temporarily heats the evaporator coils to melt any frost buildup. This melted water drains through a tube into a pan near the compressor where it evaporates. When any component in this system fails, ice begins to accumulate and can eventually block airflow, reduce cooling efficiency, and prevent the freezer from maintaining proper temperature.
Normal frost appears as a thin, white crystalline layer that melts during defrost cycles. Problematic ice buildup appears as thick, clear or white ice sheets that don’t melt away and may even form on food packages. If you notice ice crystals on your frozen food or ice forming on the freezer ceiling, your freezer is likely over-freezing due to an underlying issue.
Why is My Freezer Frozen Over?
Several factors can cause your freezer to ice up, ranging from simple user habits to component failures. The most common culprit is a faulty door seal, which allows warm, moist air to enter the freezer continuously. Every time warm air enters, it condenses and freezes on the cold surfaces, creating a cycle of ice buildup that worsens over time.
The defrost system is another frequent failure point. This system consists of three main components: the defrost heater, defrost timer (or control board in newer models), and defrost thermostat. If any of these parts fails, the automatic defrost cycle won’t occur, causing ice to accumulate continuously. I’ve seen cases where a simple $15 part replacement solved the problem completely.
A clogged defrost drain is particularly troublesome because it creates a backup effect. When melted frost can’t drain properly, it refreezes and forms ice sheets at the bottom of the freezer. This ice can block the drain completely, creating a vicious cycle. Sometimes you’ll notice water pooling on the floor when the freezer goes through defrost mode, which is a clear sign of drain blockage.
Other causes include temperature settings that are too low (below 0°F/-18°C), frequent door openings, placing hot food directly into the freezer, and high humidity in your home. Even a door that doesn’t close completely due to misalignment or food items blocking the seal can cause rapid ice accumulation. In some cases, a faulty temperature sensor or control board can cause the freezer to run continuously, leading to excessive ice formation.
How to Fix a Freezer That Has Frozen Over
Before attempting any repairs, you need to identify which component is causing the problem. I recommend starting with the simplest and most common issues before moving to more complex repairs. The following diagnostic steps will help you pinpoint the exact cause and determine whether this is a DIY fix or requires professional service.
Step 1: Test the Door Seal (Gasket)
The door seal is the most common cause of freezer icing issues and the easiest to test. Close the freezer door on a dollar bill or piece of paper, then try to pull it out. You should feel resistance. Repeat this test around the entire door perimeter, paying special attention to the corners and hinge side. If the bill slides out easily anywhere, your door seal is compromised and needs replacement.
Visually inspect the gasket for cracks, tears, or deformation. Clean the seal with warm soapy water to remove any debris that might prevent proper contact. Sometimes a dirty seal is the only problem, and a thorough cleaning resolves the issue. If the seal appears damaged or doesn’t spring back when pressed, replacement is necessary. Door seals are relatively inexpensive and typically easy to replace yourself.
Step 2: Perform a Manual Defrost
Before testing components, you’ll need to remove all ice buildup. Unplug your refrigerator and remove all food from the freezer. Place frozen food in a cooler with ice packs to keep it safe during the repair process. Leave the freezer door open and place towels around the base to catch melting water. For faster results, you can place bowls of boiling water inside the freezer compartment, but never use sharp tools or heat guns which can damage the interior.
Allow the freezer to defrost completely, which typically takes 4-8 hours depending on ice thickness. Once all ice has melted, clean the interior with a solution of baking soda and water to remove any odors. This is also the perfect time to clean the condenser coils at the back or bottom of your refrigerator, as dusty coils reduce efficiency and can contribute to cooling problems.
Step 3: Clear the Defrost Drain
Located behind the back panel inside the freezer, you’ll find a small drain hole at the bottom center. This drain often clogs with food particles, ice, or debris. Use hot water to flush the drain, or carefully use a pipe cleaner or turkey baster to clear blockage. I’ve found that a mixture of hot water and baking soda works exceptionally well for stubborn clogs.
To verify the drain is clear, pour a small amount of water down the hole and confirm it flows freely into the drain pan beneath the refrigerator. If water backs up or doesn’t flow through, the drain line may be clogged further down, requiring professional service to access and clear. A properly functioning drain is essential for preventing future ice buildup.
Step 4: Test Defrost System Components
If the door seal and drain are functioning properly, the issue likely lies with the defrost system components. The defrost heater is located at the bottom of the evaporator coils behind the rear freezer panel. Use a multimeter to test for continuity – a lack of continuity indicates a failed heater that needs replacement. This is one of the most common defrost system failures.
The defrost thermostat, also called a bi-metal switch, is clipped to the evaporator coils and prevents the heater from overheating. It should show continuity when cold and open when heated to its activation temperature (typically around 40-50°F). If it shows no continuity when cold, it’s faulty and preventing the defrost cycle from completing.
On newer refrigerators with electronic control boards, the defrost timing is managed by the main board rather than a mechanical timer. These boards can be diagnosed using manufacturer-specific error codes displayed on the control panel. Consult your owner’s manual for the specific procedure to enter diagnostic mode on your model.
When to Call a Professional
While most freezer icing issues are DIY-friendly, certain situations require professional service. If you’ve replaced the door seal, cleared the drain, and tested the defrost components but ice continues to build up, there may be a more complex issue with the control board or sealed system components. These repairs require specialized tools and training beyond typical DIY capabilities.
Cost estimates for professional repair range from $150-400 depending on the specific issue and your location. A simple defrost heater replacement might cost $150-200 including labor, while control board replacement can exceed $400. If your refrigerator is over 10-15 years old, consider whether the repair cost justifies the investment versus replacement with a new, more energy-efficient model.
Warning signs that indicate immediate professional help is needed include burning smells, unusual noises that persist after defrosting, visible damage to sealed system components, or refrigerant leaks (indicated by oily residue). Attempting to repair sealed system components or handle refrigerants without proper EPA certification is illegal and potentially dangerous.
Remember that unauthorized repairs may void your manufacturer’s warranty. If your refrigerator is still under warranty, contact the manufacturer or authorized service provider before attempting any repairs yourself. Many manufacturers cover parts for 5-10 years on sealed system components, which could save you significant repair costs.
How to Prevent Freezer Ice Buildup
Prevention is always easier than repair, and several simple habits can significantly reduce the likelihood of future freezer icing issues. The most important factor is maintaining proper temperature settings. Your freezer should be set to 0°F (-18°C) for optimal food preservation and efficient operation. Settings lower than this don’t preserve food significantly better but can cause excessive ice buildup and increased energy consumption.
Keep your freezer reasonably full but not overcrowded. A full freezer retains cold better during power outages and helps maintain stable temperatures. However, overcrowding blocks airflow between items and can cause uneven cooling. Aim to keep your freezer about 75% full, using freezer-safe containers and organizing items to allow proper air circulation. If you don’t have enough food to fill the space, you can use water-filled containers to take up volume and help regulate temperature.
Minimize door openings, especially during humid weather. Every time you open the freezer door, warm, moist air enters and condenses on cold surfaces. Plan ahead and retrieve everything you need in one trip rather than opening the door multiple times. Check that the door closes completely each time and that no food items are blocking the seal from making proper contact.
Allow hot food to cool to room temperature before placing it in the freezer, but don’t leave it out longer than two hours for food safety reasons. Hot food releases moisture when placed in the freezer, which contributes to frost buildup. Use shallow containers to speed cooling and cover food tightly to prevent moisture transfer. For long-term storage, prevent freezer burn with quality vacuum sealers which remove air and moisture, extending food life and reducing ice crystals.
Proper food organization plays a surprising role in preventing ice buildup. Don’t store items directly against the back wall where they can block airflow to the evaporator coils. Use the freezer’s built-in baskets and dividers to keep organized. Label items with dates and use older items first to prevent forgotten food from contributing to moisture problems. Consider using best vacuum sealers for freezer storage to maximize food quality and reduce freezer-related issues.
Regular maintenance includes cleaning the door gasket monthly with warm soapy water to ensure a proper seal. Vacuum the condenser coils annually or more often if you have pets. A faulty seal or dirty coils forces your freezer to work harder, creating more frost and using more energy. These simple maintenance tasks take just minutes but can prevent expensive repairs and extend your appliance’s lifespan significantly.
Signs Your Freezer is Over-Freezing
Recognizing early warning signs can help you address problems before they become severe. Ice crystals forming on food packages indicate temperature fluctuations or excessive moisture. While small ice crystals don’t necessarily mean spoiled food, they affect quality and are a sign that something isn’t working properly. Food with extensive ice crystals or freezer burn should be discarded or used immediately.
Frost accumulating on the freezer walls or ceiling, especially in a frost-free model, is a clear indicator of problems. Pay attention to where the frost forms – frost on the door side suggests seal issues, while frost on the back wall points to defrost system problems. Ice at the bottom typically indicates a clogged drain that needs attention before it completely blocks.
If your refrigerator section seems too warm while the freezer is icing up, this indicates an airflow problem between compartments. In most refrigerators, cold air from the freezer cools the fresh food section. When ice blocks the vents, the freezer gets too cold while the fridge stays too warm. This specific symptom often points to evaporator fan issues or excessive ice blocking airflow channels.
Unusual noises coming from the freezer, such as clicking, buzzing, or frequent cycling on and off, suggest component stress or failure. A normally functioning freezer should run quietly with only occasional compressor sounds. Pay attention to any changes in your appliance’s typical sound patterns – they’re often early warning signs of developing problems.
Finally, watch your energy bills. A freezer that’s icing up works harder and runs longer than normal, consuming more electricity. If you notice a sudden unexplained increase in energy usage accompanied by freezer issues, this confirms that your appliance is struggling and needs attention. Addressing problems early saves money on both energy costs and potential repairs.
FAQ
How to fix a freezer that has frozen over?
Start by unplugging the refrigerator and removing all food. Perform a complete manual defrost by leaving the door open for 4-8 hours with towels to catch water. Test the door seal with a dollar bill – replace if worn. Clear the defrost drain with hot water and a pipe cleaner. Test the defrost heater and thermostat for continuity with a multimeter. Replace any failed components before plugging back in.
What happens when your freezer freezes over?
When your freezer freezes over, excessive ice builds up on walls, coils, and food. This reduces cooling efficiency, increases energy consumption, and can cause food spoilage or freezer burn. Ice may block airflow between freezer and refrigerator sections. The compressor works harder and may fail prematurely. In severe cases, ice can damage door seals and internal components, leading to costly repairs.
How do you fix a freezer that is frosting up?
First determine the cause: test the door seal for gaps, check if the defrost drain is clogged, and verify temperature settings aren’t too low. For seal issues, clean thoroughly or replace the gasket. Clear drains with hot water and baking soda. If these don’t solve the problem, test defrost system components (heater, timer, thermostat) and replace any faulty parts. Regular maintenance like cleaning coils and door gaskets prevents future frosting.
Will freezer frost go away on its own?
No, frost will not go away on its own in a malfunctioning freezer. In properly functioning frost-free models, automatic defrost cycles remove normal frost accumulation. However, when the defrost system fails or door seals leak, frost will continue accumulating and worsen over time. The underlying problem must be identified and repaired before manual defrosting. Without fixing the root cause, frost will return within days to weeks.
Conclusion
Dealing with a freezer frozen over is frustrating, but understanding the causes and solutions empowers you to resolve the issue effectively. Whether it’s a simple door seal replacement, a clogged drain that needs clearing, or a failed defrost component requiring replacement, most problems are diagnosable and fixable with basic tools and patience. The key is identifying the specific cause before attempting repairs, as this saves time and prevents unnecessary parts replacement.
Regular maintenance and good habits go a long way in preventing future issues. Test your door seal monthly, keep coils clean, maintain proper temperature settings, and minimize door openings. Consider upgrading your food storage system with vacuum food sealers for long-term storage to improve food quality and reduce moisture-related problems in your freezer.
If you’re unsure about any repair or lack the necessary tools, don’t hesitate to call a professional. The cost of professional service is often less expensive than replacing an entire appliance due to attempted DIY repairs gone wrong. For serious food preservation enthusiasts, chamber vacuum sealers for freezer storage offer professional-level results that complement a well-maintained freezing system.
By addressing freezer icing problems promptly and implementing preventive measures, you’ll extend your appliance’s lifespan, reduce energy costs, and keep your frozen food in optimal condition. A freezer that runs efficiently is one of the hardest-working appliances in your home – give it the attention it deserves and it will serve you reliably for years to come.


Leave a Comment