
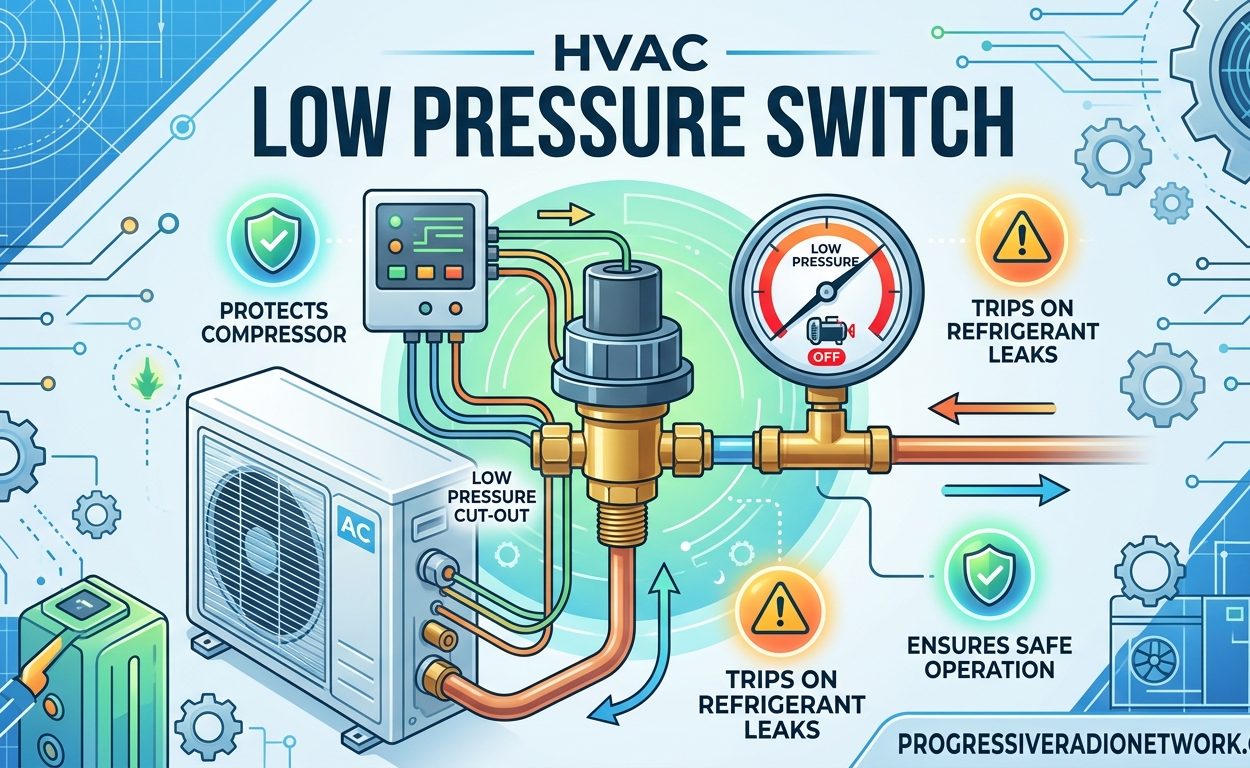
In this comprehensive guide, I’ll walk you through everything you need to know about your HVAC low pressure switch, from understanding its critical safety function to testing, troubleshooting, and replacement. Your air conditioning system relies on this small but essential component to protect expensive compressor parts from catastrophic damage.
Whether your AC isn’t cooling properly, the compressor won’t start, or you’re dealing with a pressure switch that keeps tripping, understanding how this safety device works can save you thousands in repair costs. Let me break down the technical details into clear, actionable steps.
What Is an HVAC Low Pressure Switch
An HVAC low pressure switch is a safety device that monitors refrigerant pressure on the suction side of your air conditioning system and shuts down the compressor when pressure drops below safe levels (typically 25-40 PSI) to prevent compressor damage. This switch is your compressor’s guardian, preventing operation when refrigerant levels are too low to lubricate and cool the internal components properly.
The switch monitors what technicians call “low side pressure” or “suction line pressure” – the pressure of refrigerant returning to the compressor after absorbing heat from your home. When this pressure falls below the cut-out threshold (commonly 25-40 PSI for most residential systems), the switch opens the electrical circuit and cuts power to the compressor.
Modern systems using R-410A refrigerant operate at higher pressures than older R-22 systems. R-410A systems typically have cut-out settings around 40-50 PSI and cut-in around 80-120 PSI, while R-22 systems usually cut out at 25-35 PSI and cut in at 65-80 PSI.
Without this protection, a simple refrigerant leak could destroy a compressor worth $1,500-3,000 within hours. The low pressure switch prevents what technicians call “refrigerant starvation” – running the compressor without adequate refrigerant flow for cooling and lubrication.
How the Low Pressure Switch Works
The switch uses a pressure-sensitive diaphragm connected to electrical contacts. When refrigerant pressure drops below the cut-out threshold, the diaphragm moves and opens the circuit to the compressor. When pressure returns to normal (65-80 PSI), the switch automatically closes and allows operation to resume.
Inside the switch housing, a metal diaphragm responds to pressure changes from the suction line. This mechanical movement either opens or closes electrical contacts that control the compressor’s power circuit. Most residential switches use SPST (Single Pole Single Throw) contacts that handle 24-240VAC depending on your system configuration.
The switch has two key pressure settings: the cut-out point (when it opens) and the cut-in point (when it closes again). This difference between cut-out and cut-in is called the “differential” and prevents rapid cycling. For example, a switch might open at 30 PSI but not close again until pressure reaches 70 PSI, giving the system time to stabilize.
Two types of reset mechanisms exist: automatic reset switches reactivate on their own when pressure returns to normal, while manual reset switches require pressing a button or powering the system off and back on. Manual reset versions are often used in commercial applications where you want a technician to investigate the cause before restart.
Low Pressure Switch vs High Pressure Switch
Many homeowners confuse these two components, but they serve opposite functions in your HVAC system. The low pressure switch protects against too little refrigerant (low pressure), while the high pressure switch protects against too much pressure from conditions like a dirty condenser or blocked airflow.
Low Pressure Switch:
- Located on the suction line (larger copper pipe)
- Monitors 25-80 PSI range (typical)
- Protects against refrigerant loss
- Prevents compressor damage from starvation
- Usually automatic reset
High Pressure Switch:
- Located on the liquid line (smaller copper pipe)
- Monitors 300-600+ PSI range
- Protects against overpressure conditions
- Prevents system damage from excessive pressure
- Often manual reset (requires investigation)
Both switches work together to protect your system. The low pressure switch typically has a pressure port with a Schrader valve for testing, while high pressure switches may use different connection types depending on manufacturer.
Where Is the Low Pressure Switch Located
On most residential split systems, you’ll find the low pressure switch mounted on the suction line near the outdoor condenser unit. Look for the larger copper pipe connecting the indoor coil to the outdoor unit – the switch is typically within 2-3 feet of the condenser, often near the service valve access ports.
The switch has a small sensing line or port that taps into the suction line pressure, usually through a Schrader valve fitting or an SAE flare connection. On packaged units (all-in-one systems), the switch location varies by manufacturer but is still on the low side of the refrigerant circuit.
For furnace applications, the low pressure switch is completely different – it’s a vacuum-based safety switch that monitors venting pressure, not refrigerant. I’ll explain this crucial difference in a later section because it’s a common source of confusion for homeowners.
Access for testing usually requires removing the condenser unit’s access panel. Always turn off power at the disconnect before working inside the unit. You’ll typically find the switch wired into the compressor’s control circuit, often with a small wiring harness that can be disconnected for testing.
Signs Your HVAC Low Pressure Switch Is Failing
Recognizing when your low pressure switch is malfunctioning can help you address problems early. Here are the most common symptoms I’ve encountered over years of HVAC work:
- AC not cooling but compressor runs – The switch might be stuck open or failing to close even when pressure is normal. This prevents the compressor from engaging even though refrigerant levels are fine.
- Compressor won’t start at all – A failed switch stuck in the open position cuts all power to the compressor. The condenser fan may run, but the compressor stays silent.
- Intermittent cycling – The system cools for a while then shuts down unexpectedly. This often indicates a switch with erratic behavior or pressure sensitivity issues.
- Frequent tripping that resets after power cycle – The switch is doing its job by detecting low pressure, but the underlying issue (like a small refrigerant leak) keeps recurring.
- Burning smell near outdoor unit – Electrical issues within the switch can cause overheating. This is a serious symptom requiring immediate professional attention.
Forum discussions from HVAC technicians and homeowners consistently point to intermittent issues as the most frustrating to diagnose. The switch might test fine one moment but fail the next, making electrical problems particularly tricky to identify without proper testing equipment.
Common Causes of Low Pressure Switch Activation
Understanding why your low pressure switch activates helps determine whether you’re dealing with a switch problem or a system problem. The switch itself may be working correctly by responding to actual low pressure conditions.
Refrigerant Leaks: The most common cause is a slow refrigerant leak somewhere in the system. As refrigerant escapes over months or years, pressure gradually drops until the switch reaches its cut-out point. Forum posts from homeowners reveal this can happen even to brand new systems – manufacturing defects or poor connections can cause leaks within months of installation.
Thermostatic Expansion Valve (TXV) Problems: A faulty or stuck TXV can cause pressure drops that trigger the switch. The TXV meters refrigerant flow into the evaporator coil, and when it malfunctions, it can starve the compressor. Multiple HVAC discussions highlight TXV failures as a common culprit when pressure switches repeatedly trip.
Airflow Restrictions: A dirty air filter, blocked return duct, or frozen evaporator coil can cause pressure drops. Reduced airflow across the evaporator means less refrigerant evaporating, leading to lower suction pressure. This is one of the easiest fixes – simply replacing a clogged filter can resolve switch tripping issues.
Defective Switch: Sometimes the switch itself fails. Internal contacts can corrode or weld together, the diaphragm can lose sensitivity, or electrical connections can fail. Age and exposure to outdoor elements contribute to switch degradation over time.
How to Test an HVAC Low Pressure Switch
Testing your low pressure switch requires basic electrical knowledge and a digital multimeter. This procedure will help you determine if the switch is functioning correctly or if the problem lies elsewhere in your system.
Tools Needed:
- Digital multimeter with continuity test function
- Insulated screwdrivers
- Wire strippers (for terminal removal if needed)
- Pen and paper for recording readings
Step 1: Safety First
Turn off all power to the HVAC system at the breaker and the outdoor disconnect switch. Verify power is off before touching any components. Capacitors in the outdoor unit can hold dangerous charges even after power is disconnected.
Step 2: Locate the Switch
Remove the condenser access panel to locate the low pressure switch on the suction line. Identify the wiring connections – most switches have two wires connecting to the compressor control circuit. Note the wire colors and terminal positions for reconnection.
Step 3: Disconnect Wires
Disconnect the wires from the switch terminals. If they’re push-on terminals, gently pull them off. If they’re screw terminals, use your screwdriver. Some technicians prefer cutting the wires and reinstalling with new connectors – this prevents accidentally reversing the connections.
Step 4: Test for Continuity
Set your multimeter to continuity mode (usually indicated by a sound wave symbol). Touch one probe to each terminal of the switch. With normal system pressure, you should hear a beep or see near-zero resistance, indicating the switch is closed.
Step 5: Interpret Your Results
- Continuity with normal pressure: Switch is probably good. The issue may be actual low refrigerant pressure.
- No continuity with normal pressure: Switch is likely bad and needs replacement.
- Inconsistent readings: Switch may be failing intermittently. Try gently tapping the switch – if readings change, internal components are failing.
Important Note: This test only verifies switch operation. It doesn’t tell you if the switch is activating at the correct pressure. For that, you’d need a set of refrigerant gauges to measure actual system pressure, which requires EPA Section 608 certification to handle legally in most cases.
Troubleshooting Common Low Pressure Switch Problems
Once you’ve tested the switch, you may still need to determine the root cause of recurring issues. Let’s address the most common scenarios I see in the field and what they indicate.
Problem: Switch Keeps Tripping
If your low pressure switch repeatedly activates, it’s almost certainly responding to actual low pressure conditions rather than malfunctioning. The system has a refrigerant leak or restriction that must be addressed. Simply resetting the switch without fixing the underlying issue will only lead to repeated trips and potential compressor damage.
Start by checking for obvious issues: a severely dirty air filter, blocked return vents, or frozen evaporator coil. If these check out, you’re likely dealing with a refrigerant leak. At this point, professional service is recommended because locating leaks requires specialized equipment and repairing them requires EPA-certified handling of refrigerants.
Problem: Switch Won’t Reset
Manual reset switches that refuse to reset indicate persistent low pressure or a failed switch. If you’ve verified adequate pressure with gauges and the switch still won’t close, it’s defective. However, never attempt to bypass a pressure switch – the consequences can be catastrophic.
Forum discussions from HVAC professionals contain horror stories of compressors destroyed after bypassing switches. A compressor worth $2,000-4,000 can be ruined in less than an hour of operation without adequate refrigerant flow. Always replace a failed switch rather than bypassing it.
Problem: Intermittent Operation
Systems that work sometimes but not others often have electrical connection issues. Loose terminals, corroded connections, or damaged wiring can cause erratic behavior. Inspect all wiring connections at the switch and the contactor. Clean corroded terminals with electrical contact cleaner and ensure tight connections.
Temperature sensitivity can also cause intermittent issues. Some switches fail only when extremely hot or cold. If problems occur primarily at certain times of day, heat-related failure may be the culprit.
How to Replace an HVAC Low Pressure Switch
Replacing a low pressure switch ranges from relatively simple to quite complex, depending on your system configuration. Here’s what you need to know before attempting this repair.
Critical Warning: If your system has refrigerant in the circuit and the switch is brazed or soldered into the line, replacement requires full refrigerant recovery. This process demands EPA Section 608 certification and specialized recovery equipment. Attempting this without proper certification violates federal law and can result in substantial fines.
Simple Replacement (Threaded/Schrader Valve):
If your switch threads into a Schrader valve or service port, replacement is straightforward. Simply unscrew the old switch (you may lose a small amount of refrigerant – this is normal and legal for minor service), apply thread sealant compatible with refrigerants to the new switch, and install it. These switches typically cost $15-40.
Complex Replacement (Brazed/Soldered):
When the switch is brazed into the copper line, replacement requires cutting out the old switch, brazing in a new one, and then evacuating and recharging the system. This is definitively professional work. The labor-intensive process explains why some homeowners face $1,000+ quotes – it’s not the switch cost, but the refrigerant recovery and recharge labor.
Matching Specifications:
Always replace with the exact same pressure ratings. Installing a switch with different cut-out/cut-in values can compromise system protection. The original switch should be stamped with its pressure settings. When in doubt, OEM replacement parts are preferable to universal switches for this reason.
Cost Considerations:
DIY replacement of a threaded switch costs $15-40 for the part. Professional replacement with refrigerant recovery typically runs $200-600 depending on your location and the refrigerant type. R-410A systems often cost more to service due to higher pressure requirements and slightly different procedures.
Furnace vs AC Low Pressure Switch Differences
This is one of the most confusing aspects of HVAC pressure switches for homeowners, and the forums are full of mixed information. Let me clarify the fundamental differences between these two completely different components.
AC/Refrigerant Low Pressure Switch:
- Monitors refrigerant pressure in PSI (pounds per square inch)
- Protects compressor from damage due to low refrigerant
- Located on the suction line near the outdoor condenser
- Typical range: 25-80 PSI
- Used in air conditioning and heat pump systems
Furnace Low Pressure Switch:
- Monitors venting vacuum in inches of water column (WC)
- Protects against improper venting or blocked exhaust
- Located near the inducer motor or draft hood
- Typical range: 0.5-1.0 inches WC (very low pressure)
- Used in gas and oil furnaces only
These switches measure completely different things. The furnace switch responds to vacuum created by the inducer motor – if venting is blocked by a bird’s nest, ice, or collapse, the switch detects insufficient vacuum and prevents furnace operation for safety. This prevents carbon monoxide from entering your home.
AC switches respond to refrigerant pressure. They’re completely different components serving different safety functions. When researching online, make sure you’re reading information about the correct type of switch for your system.
Preventing Low Pressure Switch Failures
While you can’t prevent every failure, proper maintenance significantly reduces the likelihood of pressure switch problems. Here are the preventive measures I recommend based on years of field experience.
Regular Filter Changes: Change your air filter every 1-3 months depending on usage and filter type. A clogged filter restricts airflow, which can cause pressure drops and switch activation. This is the single most effective preventive maintenance task for homeowners.
Annual Professional Maintenance: Have your system inspected annually by a qualified technician. They’ll check refrigerant pressures, inspect for leaks, test switch operation, and identify potential problems before they cause failures. This small annual investment can prevent major repairs.
Keep the Outdoor Unit Clean: Ensure your outdoor condenser has adequate airflow. Keep vegetation at least 2 feet away, clean debris from the fins, and gently wash the coil annually with a garden hose (turn off power first). Restricted outdoor airflow can cause pressure issues that affect switch operation.
Address Problems Promptly: If your AC starts performing poorly or making unusual sounds, don’t wait. Small problems like refrigerant leaks only get worse over time. Catching them early can prevent switch failures and compressor damage.
Surge Protection: Electrical surges can damage switch electronics. Consider installing a whole-home surge protector or at minimum an HVAC-specific surge protector at the outdoor disconnect. This protects all your system’s electrical components, including pressure switches.
Cost Considerations and Professional Service
Deciding between DIY repair and professional service depends on the specific issue, your skill level, and legal requirements. Let’s break down the costs and considerations.
Simple DIY (Threaded Switch Replacement):
- Part cost: $15-40
- Tools required: Wrenches, multimeter
- Skill level: Intermediate DIY
- Legal considerations: Legal for minor service involving small refrigerant releases
Professional Service (Brazed Switch with Recovery):
- Typical cost: $200-600
- Includes: Refrigerant recovery, switch replacement, evacuation, recharge
- Time required: 2-4 hours
- Warranty: Professional labor often comes with warranty
When to Call a Professional:
- Any repair requiring brazing or soldering
- Refrigerant leak detection and repair
- System recharge after repairs
- Diagnosis of intermittent issues
- Any work on systems under warranty
FAQ
How do I know if my AC low pressure switch is bad?
What does a low pressure switch do in HVAC?
How do I reset my HVAC low pressure switch?
Can I bypass my HVAC low pressure switch?
How much does it cost to replace an HVAC low pressure switch?
Conclusion
Understanding your HVAC low pressure switch is essential for maintaining a healthy air conditioning system and avoiding expensive compressor repairs. This small safety device plays a critical role in protecting your investment, and recognizing its failure symptoms can help you address problems before they escalate.
Remember that most “low pressure switch problems” are actually the switch doing its job by responding to real low pressure conditions. When the switch activates, it’s telling you something is wrong with refrigerant levels or system airflow. Simply bypassing or repeatedly resetting the switch without addressing the underlying issue will only lead to more expensive repairs down the road.
For simple switch replacements on threaded connections, confident DIYers can handle the repair themselves. But anytime brazing, refrigerant recovery, or system recharging is required, professional service is the right call. The cost difference between DIY and professional service might seem significant, but compressor replacement costs thousands more than any service visit.
Regular maintenance, prompt attention to cooling problems, and professional annual inspections will keep your HVAC low pressure switch and entire system running efficiently for years to come. Your compressor will thank you.

Leave a Comment