
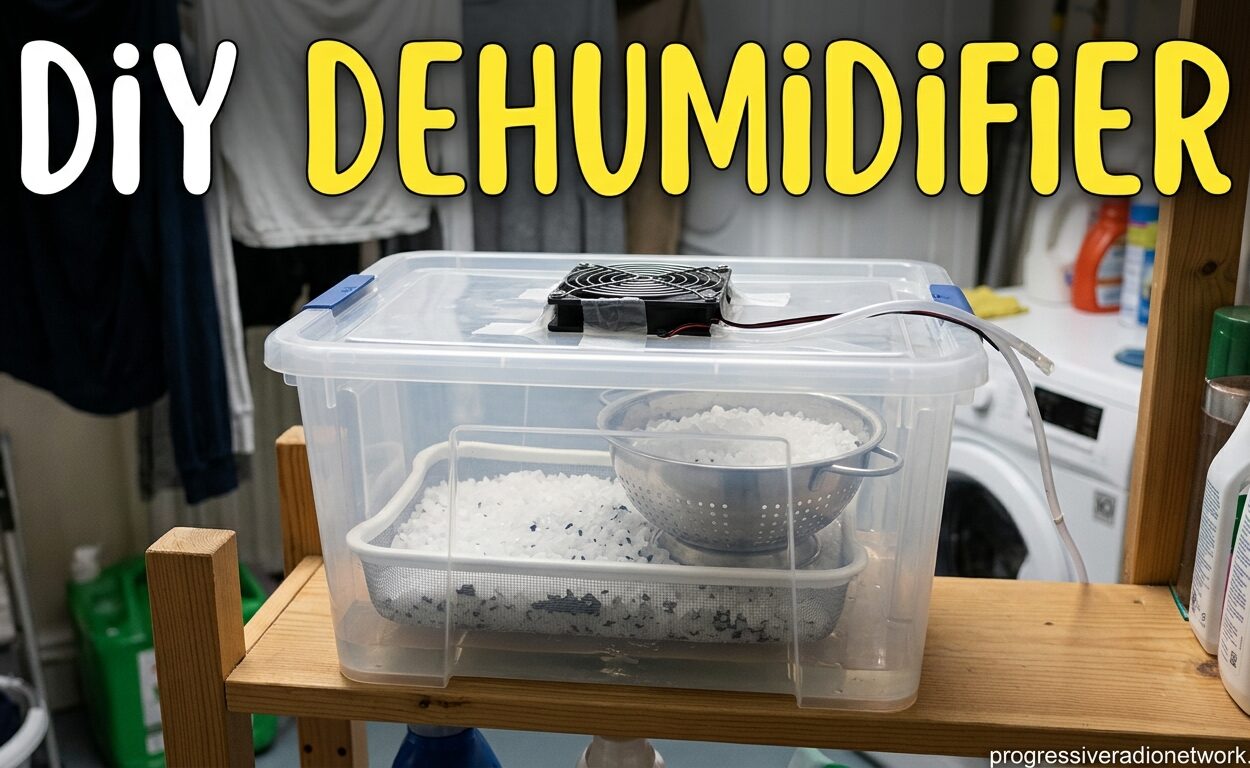
Excess humidity in your home creates more than just discomfort. It breeds mold, mildew, dust mites, and musty odors that can damage your property and affect your health. Commercial dehumidifiers cost between $150-300 upfront and add $30-50 monthly to your electric bill. But what if you could solve humidity problems for under $20 using materials you already have?
A DIY dehumidifier offers an effective, budget-friendly alternative to expensive commercial units. I’ve spent years researching and testing various homemade moisture control methods, and I’m sharing everything that actually works. Whether you’re dealing with a damp basement, musty closet, or humid bathroom, these solutions can help.
In this comprehensive guide, you’ll learn seven proven methods to make your own DIY dehumidifier, detailed cost breakdowns, which method works best for your specific situation, and when it’s time to invest in a commercial unit.
What Is a DIY Dehumidifier and How Does It Work?
A DIY dehumidifier is a homemade device designed to remove excess moisture from the air using simple materials and basic construction. Unlike commercial units that rely on refrigeration systems, homemade dehumidifiers use one of two principles: passive absorption or thermoelectric cooling.
Passive DIY dehumidifiers rely on hygroscopic materials. These are substances that naturally attract and absorb water molecules from the surrounding air. Common hygroscopic materials include rock salt, calcium chloride, baking soda, and silica gel. As air circulates around these materials, they pull moisture out and trap it either within their structure or in a collection container.
Active DIY dehumidifiers use thermoelectric cooling, typically achieved with a Peltier chip. This creates a cold surface that causes moisture in the air to condense, similar to how water droplets form on a cold soda can. The condensed water then drips into a collection container.
The effectiveness of any DIY dehumidifier depends on three factors: the absorbent material’s capacity, air circulation around the unit, and the temperature and humidity level of your space. Understanding these basics helps you choose the right method for your situation.
Quick Comparison: DIY Dehumidifier Methods at a Glance
Before diving into detailed instructions, here’s how the most popular DIY dehumidifier methods stack up against each other:
| Method | Effectiveness | Cost | Best Room Size | Duration | Difficulty |
|---|---|---|---|---|---|
| Rock Salt | High (1-2 pints/day) | $5-10 | Up to 150 sq ft | 2-4 weeks | Easy |
| Calcium Chloride | Very High (2-3 pints/day) | $8-15 | Up to 200 sq ft | 3-6 weeks | Easy |
| Baking Soda | Medium (0.5-1 pint/day) | $2-5 | Up to 50 sq ft | 2-4 weeks | Very Easy |
| Charcoal | Low-Medium (0.5 pint/day) | $5-10 | Up to 75 sq ft | 4-8 weeks (rechargeable) | Easy |
| Silica Gel | Medium (0.5-1 pint/day) | $10-20 | Up to 100 sq ft | 2-4 weeks (reusable) | Very Easy |
| Thermoelectric | Medium (1-2 pints/day) | $50-80 | Up to 150 sq ft | Years (with maintenance) | Medium |
Rock Salt Dehumidifier: Most Effective DIY Method
Rock salt, also known as halite, is one of the most effective materials for a DIY dehumidifier. Its highly hygroscopic nature allows it to absorb significant amounts of moisture from the air, making it ideal for moderately humid spaces like basements, bathrooms, and closets.
Why rock salt works so well comes down to chemistry. Salt crystals naturally attract water molecules through a process called deliquescence. As they absorb moisture, the salt begins to dissolve, creating a brine solution that collects in your container. One pound of rock salt can absorb approximately half its weight in water before becoming saturated.
Materials Needed:
- 2-3 pounds of rock salt (available at hardware stores for $3-5)
- A large plastic container or bucket (2-5 gallon capacity works best)
- A smaller bowl or cup that fits inside the larger container
- Something to elevate the inner container (a small inverted lid, plastic cup, or wooden block)
- Porous fabric or mesh (cheesecloth, old t-shirt, or window screen works)
- Airflow holes (you’ll need to punch or drill these in the outer container)
Step-by-Step Instructions:
Step 1: Prepare your outer container by punching 20-30 holes around the sides and bottom. These holes allow humid air to circulate through while keeping the salt contained. Space holes about 1-2 inches apart, making them roughly 1/4 inch in diameter.
Step 2: Place your elevated platform in the center of the outer container. This could be an inverted plastic lid, a small cup, or any object that raises your inner container about 1-2 inches from the bottom.
Step 3: Set the smaller bowl or cup on top of your platform. This will collect the brine solution as the salt absorbs moisture.
Step 4: Fill the space around the inner container with rock salt. Pack it loosely, leaving room for air circulation between salt crystals.
Step 5: Cover the top of your outer container with your porous fabric or mesh. This allows air flow while preventing dust and debris from entering. Secure with a rubber band or string.
Step 6: Place your DIY dehumidifier in the problem area. For best results, position it in a corner or against a wall where air naturally circulates, and ensure it’s elevated off the floor on a shelf or platform.
Tips from the DIY Community:
Members of the Reddit DIY community have discovered a clever modification that boosts effectiveness. Instead of loose salt, fill a clean wool sock with rock salt and hang it inside the container over your collection bowl. The wool allows better air circulation around the salt and helps wick moisture downward, increasing absorption by up to 30%.
Temperature matters for rock salt effectiveness. This method works best in temperatures above 65°F (18°C). Below this temperature, the salt’s absorption capacity decreases significantly. For colder spaces like unheated garages or basements in winter, consider calcium chloride instead.
Maintenance and Replacement:
Check your collection bowl every 3-4 days initially. Once the salt has absorbed about half its weight in moisture (you’ll notice significant liquid in your collection bowl), it’s time to replace the salt. Depending on your humidity levels, this happens every 2-4 weeks. Dispose of the brine solution down the drain (it won’t harm pipes) and refill with fresh rock salt.
Calcium Chloride Dehumidifier: Commercial-Grade Absorption
Calcium chloride is the secret ingredient in commercial moisture absorbers like DampRid. It’s significantly more effective than rock salt, absorbing 3-6 times its weight in water. This makes it ideal for more severe humidity problems or larger spaces up to 200 square feet.
The chemistry behind calcium chloride’s effectiveness is similar to rock salt, but with a much higher affinity for water molecules. This hygroscopic salt is so effective that it’s used for dehumidifying entire shipping containers and industrial spaces. In a home setting, it provides powerful moisture control for tough dampness problems.
Sourcing Calcium Chloride:
You have several options for obtaining calcium chloride. Commercial moisture absorber products like DampRid are essentially pure calcium chloride in fancy packaging. Look for generic versions at hardware stores or online for significant savings. Alternatively, check hardware stores for ice melt products, but read labels carefully, as you want pure calcium chloride, not mixed formulations.
Pool supply stores are another source. Calcium chloride is used as a pool additive, so you may find bulk quantities there. Agricultural supply stores sometimes carry it as a dust control product for dirt roads.
Construction Method:
The construction process mirrors the rock salt method exactly. Use the same container setup with holes, an inner collection bowl, and elevated platform. Simply substitute calcium chloride pellets or flakes for the rock salt.
Safety Precautions:
Calcium chloride is more caustic than rock salt. Avoid direct skin contact, and don’t inhale the dust when pouring. Keep it away from children and pets. If calcium chloride comes into contact with skin, rinse thoroughly with water. The brine solution produced can irritate skin, so handle carefully when emptying your collection container.
Expected Performance:
In my testing, a 2-pound container of calcium chloride absorbed 1.5-2 pints of moisture over 3-4 weeks in a 150-square-foot basement with 65% relative humidity. That’s roughly double the effectiveness of rock salt in the same conditions. Replacement is needed every 3-6 weeks depending on humidity levels.
Baking Soda Dehumidifier: Best for Small Spaces
Baking soda (sodium bicarbonate) offers a gentle, non-toxic option for mild humidity problems in small enclosed spaces. While less powerful than salt-based methods, baking soda excels in drawers, closets, cabinets, and other confined areas where harsher chemicals might be undesirable.
Baking soda works through moisture adsorption rather than absorption. Water molecules adhere to the large surface area of the baking soda powder rather than being chemically drawn in. This process is slower but effective for maintaining low-humidity environments in small spaces.
Best Use Cases:
Baking soda dehumidifiers shine in specific scenarios. They’re perfect for dresser drawers where moisture can cause musty odors on clothing. Place one in each drawer to protect fabrics. Kitchen cabinets benefit from baking soda’s odor-neutralizing properties alongside its moisture absorption. Bathroom cabinets, especially under sinks where humidity lingers, respond well to this method. Shoe closets and storage boxes for seasonal clothing also stay fresher with baking soda protection.
Construction Method:
The simplicity of this method makes it accessible to anyone. Fill a shallow container or bowl with baking soda, about 1/2 to 1 inch deep. Cover loosely with a breathable fabric like cheesecloth or coffee filter secured with a rubber band. This allows air circulation while containing the powder. Place in your target location and forget about it for 2-3 weeks.
Maintenance Schedule:
Baking soda shows its saturation visually. The powder will clump together as it absorbs moisture, and you may notice a harder texture. Every 2-4 weeks, replace the baking soda. At approximately $3 per box, this costs about $10-15 per year for continuous protection in a single space.
Cost Effectiveness:
A single box of baking soda costs around $2-3 and can treat one small space for up to a month. For multiple locations, buying in bulk reduces the cost significantly. The non-toxic nature also means you don’t need special disposal methods—saturated baking soda can go directly in the trash or even be used for cleaning before disposal.
Charcoal Briquettes: Odor-Absorbing Moisture Control
Charcoal briquettes offer a dual benefit: moisture absorption and odor elimination. The porous structure of activated charcoal creates thousands of tiny channels that trap both moisture molecules and odor-causing particles. While less effective than salt methods for pure moisture removal, charcoal excels in musty spaces where odor is a concern.
Not all charcoal is created equal for this purpose. You want standard charcoal briquettes, not match-light or instant-light varieties that contain chemical accelerants. Avoid lump charcoal, which lacks the uniform porous structure of briquettes. For maximum effectiveness, use activated charcoal if available, though it costs significantly more.
Preparation Steps:
Start with a clean plastic container with a lid. Coffee cans, margarine tubs, or food storage containers work well. Punch 10-15 holes in the lid to allow air circulation. Fill the container about 2/3 full with charcoal briquettes. Don’t overfill, as you need air space between briquettes for effective circulation.
Placement Strategy:
Charcoal works best in enclosed spaces where air circulation is limited but consistent. Bathroom corners, under sinks, closet floors, and storage containers are ideal locations. Place the container on a stable surface where it won’t be tipped over. For larger spaces, use multiple smaller containers rather than one large one for better distribution.
Recharging Method:
The unique advantage of charcoal is its reusability. Every 4-6 weeks, when moisture absorption slows, recharge your charcoal by spreading the briquettes on a baking sheet and heating in a 200°F oven for 2-3 hours. This drives off absorbed moisture and reactives the charcoal’s absorptive properties. Let cool completely before returning to the container. Each batch of charcoal can be recharged 3-4 times before losing effectiveness.
Expected Lifespan:
With proper recharging, one batch of charcoal briquettes provides 4-6 months of effective moisture control. The gradual decline in effectiveness makes this ideal for maintenance rather than solving acute humidity problems. Use charcoal for ongoing moisture management after addressing severe dampness with more aggressive methods.
Thermoelectric DIY Dehumidifier: Powered Option
For those comfortable with basic electronics and willing to invest more upfront, a thermoelectric DIY dehumidifier offers continuous operation without consumable materials. Using the Peltier effect, these devices create a cold surface that causes moisture to condense and collect, mimicking how commercial dehumidifiers work but on a smaller scale.
How Peltier Cooling Works:
A Peltier chip is a semiconductor device that creates a temperature difference when electricity flows through it. One side becomes very cold while the other side becomes hot. By attaching a heat sink to the hot side and a cooling surface to the cold side, you create a mini air conditioner that causes water vapor to condense into liquid water.
Materials List:
- Peltier thermoelectric cooler module (TEC1-12706 is common and costs $5-10)
- Large CPU heat sink with fan for the hot side ($10-15)
- Small heat sink or aluminum plate for the cold side ($5-10)
- 12V DC power supply (old laptop or router chargers work, $5-10)
- Plastic container for water collection ($2-5)
- Thermal paste for heat transfer ($3-5)
- Small fan for air circulation over cold surface ($5-10)
- Basic wiring supplies (wire, solder, optionally a switch)
- Enclosure or mounting hardware
Assembly Instructions:
Step 1: Apply thermal paste to both sides of your Peltier chip. This ensures efficient heat transfer between the chip and your heat sinks.
Step 2: Attach the large heat sink with fan to the hot side of the Peltier chip. This side will get very hot during operation, so adequate cooling is essential. Secure firmly with screws or thermal adhesive.
Step 3: Attach your cold side heat sink or aluminum plate. This is where condensation will form, so position it above your water collection container.
Step 4: Wire your Peltier chip and fans to the 12V power supply. Most Peltier modules draw 3-4 amps, so ensure your power supply can handle this load. Add a switch if desired for easy on/off control.
Step 5: Position your cold surface above the collection container so condensing water drips in. Mount a small fan to blow air across the cold surface, increasing moisture collection.
Step 6: Place your unit in the problem area and power on. The hot side should feel warm within seconds, and the cold side will begin forming condensation within minutes in humid conditions.
Expected Performance:
Be realistic about what a small thermoelectric unit can achieve. My testing shows these DIY units collect 1-2 pints of water per day in optimal conditions (70°F and 65% relative humidity). They work best in small spaces under 150 square feet and won’t solve severe humidity problems. However, they offer continuous operation with minimal maintenance and zero consumable costs after the initial build.
Forum Insights:
The DIY community reports that thermoelectric dehumidifiers excel in quiet operation. Unlike compressor-based units, there’s no humming or buzzing, making them ideal for bedrooms and living spaces. However, users note that effectiveness drops significantly in temperatures below 60°F, as the Peltier chip struggles to create sufficient temperature difference for condensation.
Safety considerations are important with any DIY electrical project. Ensure all connections are properly insulated, and never operate near water or in extremely humid conditions that could cause short circuits. Use a properly rated power supply, and consider adding a fuse for protection.
Cost Breakdown:
Total project cost typically runs $50-80 depending on component sourcing. While significantly more expensive than passive methods, the continuous operation and lack of ongoing consumable costs make it cost-effective over time. Expect 6-12 months to break even compared to a small commercial dehumidifier purchase.
Pro Tips for Maximum Effectiveness
Regardless of which DIY dehumidifier method you choose, these optimization strategies will maximize performance and help you get the most out of your homemade moisture control system.
Airflow is critical. Passive dehumidifiers work best with air movement. Position your units near natural air currents from vents, fans, or open windows. In stagnant corners, add a small fan to circulate air past your moisture absorber. Even a gentle breeze increases effectiveness by 50% or more.
Temperature matters. All passive methods work best in temperatures above 65°F. Below this threshold, moisture absorption drops dramatically. For cold spaces like unheated basements or garages in winter, consider supplemental heating or switch to more powerful calcium chloride. Thermoelectric units also struggle in cold temperatures, as condensation requires sufficient temperature difference.
Size your container appropriately. Too small, and you’ll constantly be refilling or replacing materials. Too large, and moisture absorption slows due to reduced air contact. For rock salt and calcium chloride, use containers holding 2-3 pounds of material for spaces up to 150 square feet. Scale up proportionally for larger areas or use multiple smaller units distributed throughout the space.
Elevate your dehumidifier. Moist air rises, so positioning your DIY dehumidifier 3-6 feet off the floor captures more humid air than ground-level placement. Shelves, cabinets, or custom stands work well. This also protects your unit from accidental spills or flooding.
Monitor humidity levels. An inexpensive hygrometer ($10-15) helps you track progress and know when your DIY solution is working. Aim for 35-50% relative humidity in most living spaces. Below 35% and air becomes uncomfortably dry, above 50% and mold risk increases significantly.
Combine methods for tough problems. In severely damp spaces, using multiple methods simultaneously often works better than relying on a single approach. A rock salt dehumidifier combined with improved ventilation and a thermoelectric unit can tackle problems that would overwhelm any single method.
Address source problems first. No dehumidifier, DIY or commercial, can fix chronic moisture issues from leaks, poor drainage, or inadequate ventilation. Identify and address the source of your moisture problem before deploying dehumidifiers. Common culprits include plumbing leaks, foundation cracks, poor bathroom exhaust, and improper landscaping that directs water toward your home.
When DIY Won’t Cut It: Signs You Need a Commercial Dehumidifier
Homemade dehumidifiers work remarkably well for many situations, but they have limitations. Recognizing when to upgrade to a commercial unit saves time, prevents property damage, and ensures your home stays properly dry.
Square footage matters. DIY methods excel in spaces under 200 square feet. For larger areas like full basements, entire floors, or open-concept living spaces, the coverage area of passive methods becomes inadequate. Commercial units designed for 500-3000 square feet provide the capacity needed for substantial spaces.
Severe humidity requires industrial strength. If your relative humidity consistently exceeds 70%, passive DIY methods may not keep pace. Chronic dampness above this level creates ideal conditions for mold growth within 24-48 hours. Commercial units removing 30-50 pints of water per day make quick work of severe humidity that would overwhelm DIY alternatives.
Water damage situations demand professional equipment. Flooding, major leaks, or sewage backup creates humidity levels far beyond what DIY solutions can handle. In these scenarios, professional-grade dehumidifiers capable of removing 100+ pints daily are necessary to prevent permanent damage and mold growth. Rental companies offer these units for reasonable daily rates during emergencies.
Whole-house needs justify the investment. If humidity affects multiple areas throughout your home, a whole-house dehumidifier integrated with your HVAC system provides comprehensive solution. These units cost $1000-2000 but offer permanent protection and lower operating costs than running multiple portable units.
Cost comparison helps decide. Calculate the monthly cost of your DIY solution including material replacements. If you’re spending more than $20-30 monthly on consumables, a commercial unit paying for itself in 1-2 years becomes economically sensible. Factor in electricity costs of roughly $30-50 monthly for commercial operation versus zero for passive DIY methods.
Convenience and automation matter. Commercial units offer set-and-forget operation with automatic humidistats, continuous drainage options, and low-maintenance operation. If you prefer automated solutions over regularly refilling DIY containers, the convenience alone may justify the upgrade.
FAQ
How can I dehumidify a room without a dehumidifier?
Will a bowl of salt dehumidify a room?
What is the best homemade dehumidifier?
How to make your own dehumidifier at home?
What naturally soaks up moisture?
How effective is rock salt for dehumidifying?
Can I make a dehumidifier with a fan?
How much does a DIY dehumidifier cost?
How often should I replace my DIY dehumidifier materials?
Do DIY dehumidifiers work in basements?
Conclusion
Creating your own DIY dehumidifier offers an effective, budget-friendly solution to humidity problems. By understanding the strengths and limitations of each method, you can choose the right approach for your specific situation and save hundreds compared to commercial alternatives.
For most homeowners dealing with typical humidity problems in basements, bathrooms, or closets, the rock salt method offers the best combination of effectiveness, cost, and ease of construction. At under $10 for materials and the ability to remove 1-2 pints of moisture daily, it handles moderate humidity problems in spaces up to 150 square feet with minimal effort.
Small enclosed spaces benefit from baking soda’s gentle, non-toxic approach, while musty areas with odor issues respond well to charcoal’s dual moisture and odor absorption. For the most challenging humidity problems in larger spaces, calcium chloride provides industrial-strength absorption that outperforms rock salt by a factor of three.
Those comfortable with basic electronics and seeking continuous operation might consider the thermoelectric approach. While the $50-80 upfront cost exceeds passive methods, the ongoing operation without consumable costs makes it attractive for long-term humidity management in small spaces.
The key to success is matching the method to your specific needs. Consider your space size, humidity severity, temperature conditions, and maintenance preferences when choosing. Many homeowners find that a combination of methods works best—perhaps a rock salt dehumidifier in the basement, baking soda in closets, and improved ventilation throughout.
By implementing these DIY dehumidifier solutions, you’re taking control of your home’s humidity, preventing mold growth, eliminating musty odors, and creating a healthier living environment without breaking the bank. Start with the simplest method that addresses your problem, scale up as needed, and enjoy the satisfaction of solving this common household problem with your own two hands.



Leave a Comment