
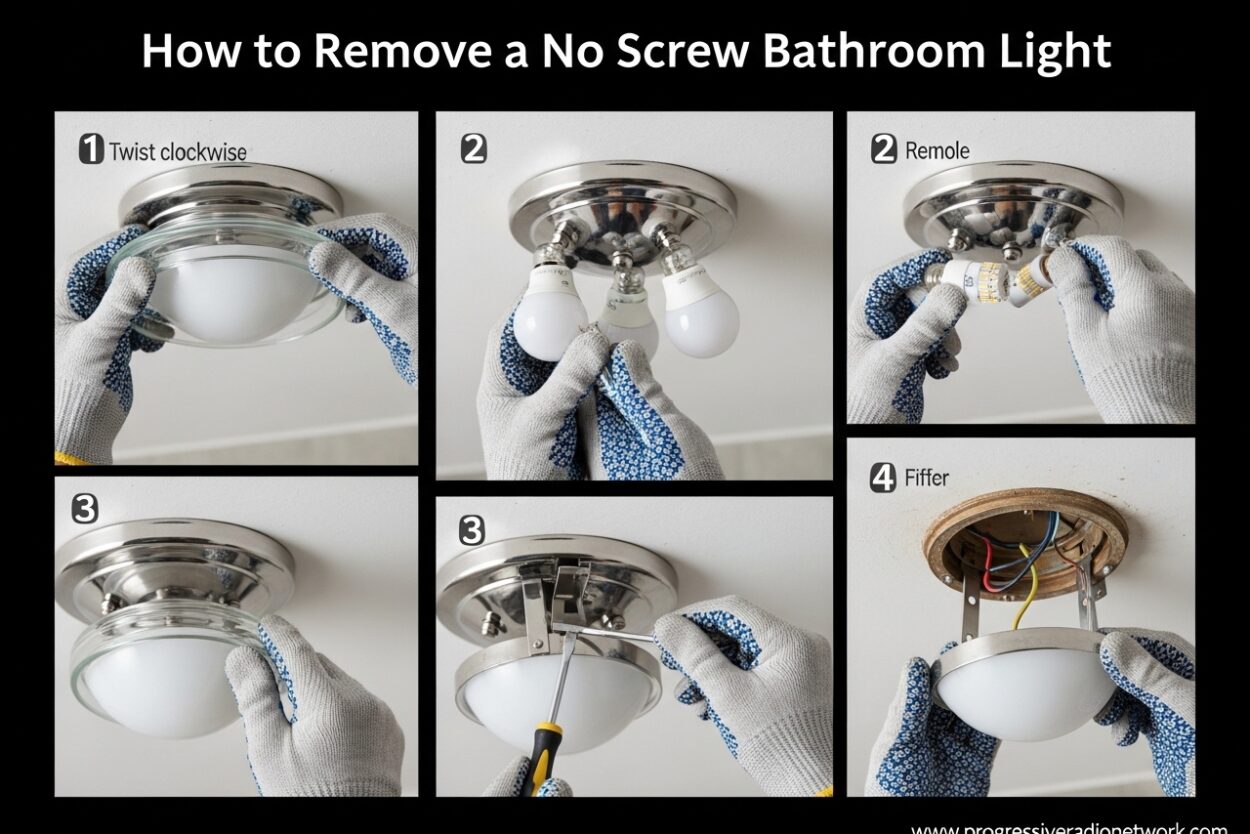
Let me start with a confession: I spent twenty minutes poking at my bathroom ceiling light before realizing it had zero visible screws. The dome looked fused to the base somehow, and I genuinely thought I was losing my mind. If you’ve been there, you’re not alone. Removing a no screw bathroom light fixture is one of those tasks that looks simple until you’re standing on a stepladder, frustrated and confused.
The good news is these fixtures aren’t mysterious once you know what you’re working with. There are four common mechanisms, and each has a specific release technique. This guide walks you through every type, with step-by-step instructions so you can get that cover off and get on with your project.
Important safety note: Always turn off the power at your circuit breaker before attempting to remove any light fixture. Test that the light doesn’t turn on after switching off the breaker. If you’re not comfortable working with electrical systems, hire a licensed electrician.
Quick Reference: Four Types of No-Screw Bathroom Light Fixtures
Before diving into specific steps, here’s a comparison of the four mechanisms you’ll encounter. Use this to identify which type you have before starting.
| Fixture Type | Mechanism | Removal Action | Difficulty |
|---|---|---|---|
| Notch/Groove | Rotating slots that lock into place | Twist counterclockwise 1/4 turn | Easy |
| Spring-Loaded | Hidden metal clips under the rim | Press up, then pull down | Moderate |
| Slotted Connectors | Decorative finial holds slotted base | Unscrew finial, then lift cover | Easy |
| Flush Mount | Pressure-fit dome with tension bars | Push up and rotate, or pry gently | Moderate |
How to Identify Your Fixture Type
Before you start pulling or twisting, take thirty seconds to examine the fixture. Each type has distinct visual characteristics that will save you time and prevent frustration.
For notch or groove mechanisms, look for small slots or indents around the rim where the dome meets the base. These slots align with tabs on the mounting bracket. You’ll typically see a subtle seam line.
Spring-loaded fixtures often have a seamless appearance. The hidden clips push outward against the dome rim. If you gently pry at the edge with a plastic putty knife, you might see the metal clips become visible.
Slotted connectors are the easiest to spot. Look for a decorative center knob called a finial. This finial screws into a central post and holds the glass shade or dome in place.
Flush mount fixtures sit directly against the ceiling with no gap. The entire dome or cover is held by tension bars or a twist-lock mechanism hidden under the decorative edge.
How to Remove a Notch/Groove Bathroom Light
Notch or groove mechanisms work like a twist-lock system. The dome has slots that fit over mounting tabs, and a quarter-turn locks everything in place. Reddit users report that applying a little more force when twisting counterclockwise usually does the trick.
Step 1: Turn off power at the circuit breaker and verify the light doesn’t turn on.
Step 2: Locate the seam where the dome meets the ceiling base. You should see small indents or slots around the perimeter.
Step 3: Grip the dome firmly with both hands. Apply steady downward pressure to keep the base steady.
Step 4: Twist the dome counterclockwise about 1/4 turn. You should feel or hear the slots releasing from the mounting tabs.
Step 5: Once all slots release, lower the dome carefully. Set it aside in a safe place.
Reassembly tip: Align the slots on the dome with the mounting tabs. Push up slightly while twisting clockwise until you feel the slots snap into place.
How to Remove a Spring-Loaded Bathroom Light
Spring-loaded mechanisms use metal clips hidden under the dome rim. These clips press outward, creating tension that holds the cover in place. The technique requires pushing up first to release the tension, then pulling down.
Step 1: Switch off power at the breaker and confirm the light doesn’t respond.
Step 2: Examine the edge of the dome where it meets the base. You may see a thin gap.
Step 3: Insert a plastic putty knife gently into the gap at one point on the rim. This protects the finish from scratches.
Step 4: Push the putty knife slightly inward and upward. This compresses the spring clip inside.
Step 5: While maintaining upward pressure, slide your other hand under the dome rim on the opposite side.
Step 6: Push up with your hand while pulling down gently with the putty knife motion. The clip should release with a small snap.
Step 7: Repeat around the rim for additional clips, then remove the dome.
Two-person technique: For heavy fixtures, have one person push up from below while another steadies the ladder. One Reddit user noted that jiggling slightly before pulling helps when clips catch the edges.
Reassembly tip: Position the dome, then press firmly around the entire rim until all clips snap back into position. Work around the perimeter evenly to seat the fixture properly.
How to Remove a Slotted Connectors Bathroom Light
Slotted connectors feature a decorative center finial that holds everything together. The finial screws into a central threaded post, and the dome or glass shade has slots that fit over positioning pins.
Step 1: Cut power at the breaker and verify the light is off.
Step 2: Look for the decorative center knob at the very top or bottom of the fixture. This is the finial.
Step 3: Grip the finial firmly and turn it counterclockwise. It should unscrew from the central post.
Step 4: Once the finial is removed, hold the glass shade or dome with one hand.
Step 5: Lift the shade slightly to clear the positioning pins, then pull it away from the base.
Step 6: Set the shade down on a soft surface to avoid scratches or breakage.
Reassembly tip: Some fixtures have rubber O-rings or spacers under the finial. Note their order and orientation before removal. When reassembling, hand-tighten the finial until snug.
How to Remove a Flush Mount Bathroom Light
Flush mount fixtures sit directly against the ceiling with no visible gap. They use tension bars or hidden clips to stay in place. Sometimes old paint seals the edge, making removal trickier.
Step 1: Turn off the circuit breaker and test that power is disconnected.
Step 2: Check if there’s a decorative edge or trim ring around the fixture. Some have small set screws visible on the side.
Step 3: If the fixture seems stuck and won’t move, score around the edge with a utility knife to break any paint seal. One forum user found this helped significantly with fixtures that had been painted over.
Step 4: For fixtures with tension bars, push the dome upward while twisting counterclockwise simultaneously. The tension bars will release from their slots.
Step 5: For fixtures with hidden clips, work a plastic putty knife around the perimeter. Release each clip as you go.
Step 6: Once all pressure points release, lower the fixture carefully. These covers can be heavy, so maintain a firm grip.
Reassembly tip: Align the fixture’s mounting holes with the ceiling bracket. Push up while rotating clockwise until seated. If your fixture has set screws, tighten them evenly on each side.
Common Mistakes to Avoid When Removing No-Screw Bathroom Lights
After reviewing dozens of forum posts and real user experiences, I found five mistakes that come up over and over. Avoiding these will save you time and prevent damage.
Mistake 1: Skipping the power check. Not turning off electricity before working on a fixture is dangerous and can cause shorts or shocks. Always verify power is off at the breaker.
Mistake 2: Using metal tools on the fixture. Screwdrivers and metal putty knives can scratch finishes and damage glass. Use a plastic putty knife or a wooden dowel instead.
Mistake 3: Pulling straight down without twisting. Many screwless fixtures require a quarter-turn or slight rotation before releasing. Pulling straight down often leaves you frustrated and straining the fixture.
Mistake 4: Applying too much force to glass domes. Glass shades are fragile. Forcing a stuck dome can cause it to crack or shatter. Work gently, use the techniques above, and score paint seals when needed.
Mistake 5: Trying to do it alone with heavy fixtures. Large flush mount fixtures can be awkward and heavy. Having a second person hold the cover while you work prevents drops and injuries.
How to Remove a Stuck Light Bulb from a Bathroom Fixture
Sometimes the challenge isn’t removing the fixture cover but getting a burned-out bulb out of the socket. Bulbs can seize in place over time, especially in damp bathroom environments.
The duct tape method works well for most stuck bulbs. Create a handle by folding a strip of duct tape into a loop, sticky side out. Press the sticky side firmly onto the stuck bulb. Then grip the tape loop and turn counterclockwise. The added grip from the tape gives you more torque without grinding the bulb further into the socket.
A rubber glove technique offers similar leverage. Put on a rubber kitchen glove and grip the bulb directly. The rubber provides friction that helps you get a solid grip. Turn counterclockwise to remove.
If the bulb base has broken off inside the socket, stop and call an electrician. Removing a shattered bulb base from a live or potentially live socket is not a DIY job. A professional can safely disconnect power and complete the removal.
When to Call a Professional Electrician
While most no-screw bathroom light removal is straightforward, some situations need professional help. Call an electrician if you encounter aluminum wiring in older homes, if the fixture is sealed and part of a can light housing, if wires are corroded or damaged, or if the circuit breaker keeps tripping when you restore power.
A licensed electrician has the tools and training to handle these edge cases safely. Your safety is worth more than the cost of a service call.
FAQ
How do you remove a ceiling light that has no visible screws?
To remove a ceiling light with no visible screws, first identify the mechanism type. Most screwless fixtures release by twisting counterclockwise about 1/4 turn, pressing in spring clips, or unscrewing a decorative center finial. Always turn off power at the circuit breaker before starting. Use a plastic putty knife to release clips gently if needed.
How do I unclip a bathroom light?
For spring-loaded bathroom lights, insert a plastic putty knife at the rim edge to release the hidden metal clip. Push inward and upward to compress the spring, then pull down gently. Work around the perimeter to release all clips. The dome or cover should then come free.
Can you change a bulb in a sealed bathroom light?
Yes, you can change bulbs in most sealed bathroom lights. Sealed fixtures have either a removable cover (dome, glass shade, or finial) or a bulb that accessible from below. Remove the cover using the appropriate technique for your fixture type, then replace the bulb and reassemble.
How to remove cover from bathroom ceiling light?
Removing a bathroom ceiling light cover depends on the mechanism. Notch/groove covers twist off with a 1/4 turn counterclockwise. Spring-loaded covers release by pressing up while pulling down. Slotted connectors require unscrewing the center finial first. Flush mount covers may need pressure applied while twisting or gentle prying around the perimeter.
Conclusion
Now you have a complete guide for removing a no screw bathroom light fixture. The key is identifying the mechanism type first: notch/groove, spring-loaded, slotted connectors, or flush mount. Each has a specific release technique, but all follow logical patterns.
Always turn off power before starting. Use plastic tools instead of metal to protect finishes. Work carefully around glass domes, and don’t hesitate to use the two-person technique for heavy fixtures. If you encounter stuck bulbs, try the duct tape or rubber glove method before calling an electrician.
With these steps, you can confidently remove any screwless bathroom light cover and move forward with your project. Whether you’re changing a bulb, upgrading to LED, or installing a new fixture entirely, you’re now equipped with the knowledge to get the job done safely.

Leave a Comment