
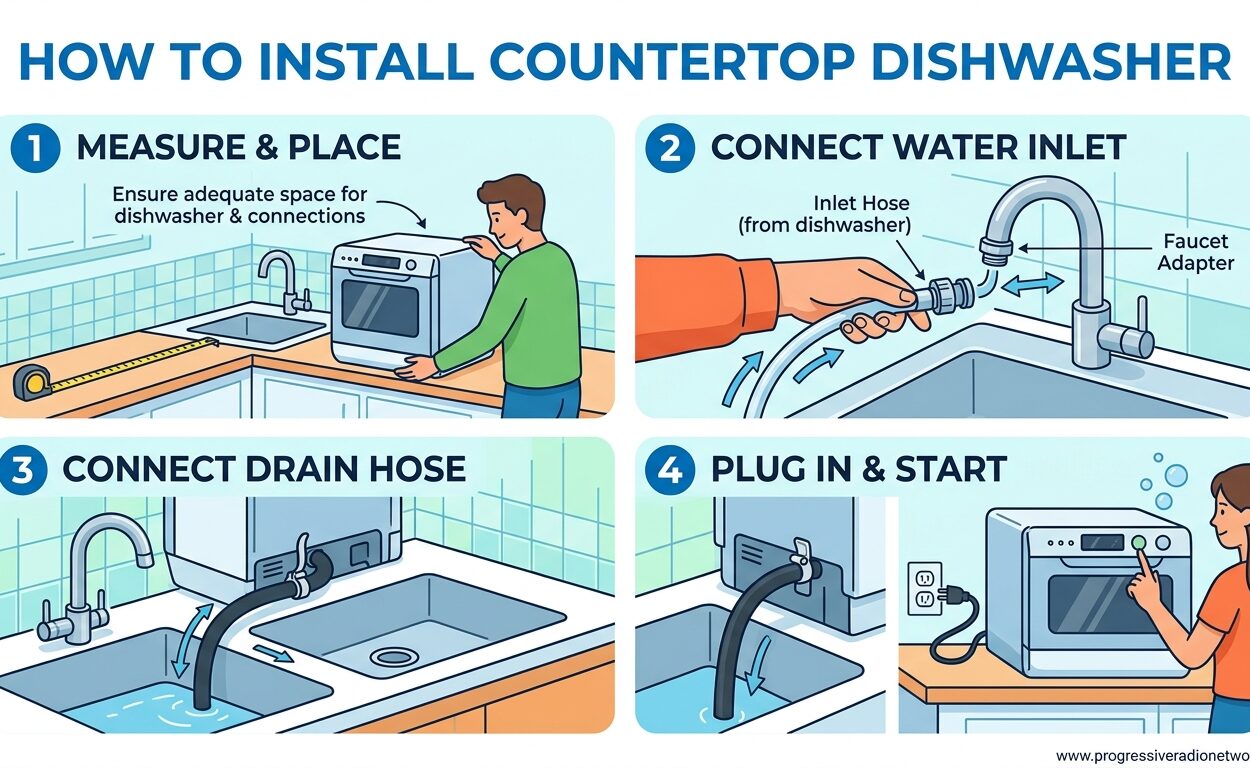
Installing a countertop dishwasher is a practical solution for anyone living in a small apartment, rental property, or home with limited kitchen space. These compact appliances deliver the convenience of automated dishwashing without requiring permanent plumbing modifications or sacrificing valuable cabinet space.
I’ve installed countertop dishwashers in various kitchen setups over the years, from tight apartment galley kitchens to RVs and even office breakrooms. The process is straightforward once you understand your faucet type and the specific requirements of your chosen model. Most installations can be completed in under 30 minutes with basic tools.
This guide covers everything you need to know about how to install a countertop dishwasher, including water connection methods, drainage setup, mounting options for different countertop materials, and troubleshooting common issues that DIY installers encounter.
What is a Countertop Dishwasher
A countertop dishwasher is a compact, portable dishwashing appliance designed to sit on your kitchen counter or workspace. Unlike traditional built-in dishwashers that require permanent installation under your counter, countertop models connect temporarily to your sink faucet for water supply and drain directly into your sink basin.
These units typically measure 17-22 inches wide, 16-18 inches deep, and 17-21 inches tall. Most models accommodate 4-6 place settings, making them ideal for singles, couples, or small families. The countertop dishwasher has gained popularity in 2026 as more people downsized their living spaces and sought flexible kitchen solutions.
Types of Countertop Dishwashers
Before you begin the countertop dishwasher installation process, it’s important to understand which type you have. There are two main categories:
Faucet-Connect Models: These connect directly to your kitchen faucet using an adapter hose. They’re the most common type and require no permanent plumbing modifications. The water connection is made when you want to run a wash cycle, then disconnected afterward.
Water Tank Models: These feature a built-in reservoir (typically 3-5 liters) that you manually fill with water. They don’t require any faucet connection, making them ideal for situations where faucet access is limited or restricted. However, they have limited capacity and require manual refilling for each wash cycle.
Some models offer both connection options, giving you flexibility depending on your situation. When choosing where to install a countertop dishwasher, consider which type works best for your lifestyle and kitchen configuration.
Tools and Materials Needed
Gathering the right tools before you start will make your countertop dishwasher installation much smoother. Here’s what you’ll typically need:
Essential Tools:
- Adjustable wrench (10-14 inch)
- Phillips and flathead screwdrivers
- Scissors or utility knife
- Level (small torpedo level works best)
- Towels or rag for cleanup
- Pliers (needle-nose for tight spaces)
Materials Usually Included:
- Faucet adapter (varies by faucet type)
- Inlet hose (connects to faucet)
- Outlet/drain hose
- Mounting brackets or screws
- Drain hose clamp or holder
Optional but Helpful:
- Plumber’s tape (Teflon tape)
- Extension cord (if outlet isn’t nearby)
- Small bucket (for testing water flow)
- Flashlight (for under-sink visibility)
Pre-Installation Checklist
Before starting your countertop dishwasher installation, complete this quick checklist to avoid surprises mid-process:
Kitchen Requirements:
- Countertop space at least 22 inches wide and 18 inches deep
- Nearby electrical outlet (GFCI recommended for wet areas)
- Sink faucet with removable aerator (for faucet-connect models)
- Sink depth of at least 6-7 inches for drainage
- Clear path from countertop to sink for hoses
Faucet Compatibility Check:
Not all faucets work with standard faucet adapters. Check your faucet type before purchasing:
- Standard threaded faucet: Most compatible (remove aerator, screw on adapter)
- Pull-out spray faucet: May require special adapter
- Threadless faucet: Requires creative solutions (covered in troubleshooting)
- Gooseneck/high-arc faucet: Check for adequate clearance
Countertop Material Considerations:
Your countertop material affects how you’ll secure the dishwasher:
- Laminate/Formica: Can be drilled for mounting screws
- Wood/Butcher block: Can be drilled, but seal holes to prevent water damage
- Granite/Marble/Quartz: DO NOT drill – use adhesive mounting or side-mount brackets
- Concrete: Use adhesive mounting methods only
How to Install Countertop Dishwasher: Step-by-Step Guide
Step 1: Choose the Right Location
Placement is crucial for both functionality and safety. Position your countertop dishwasher as close to the sink as possible while maintaining these clearances:
- At least 2 inches from backsplash for ventilation
- At least 1 inch from side walls for heat dissipation
- Within reach of both faucet and electrical outlet
- Level surface (use shims if needed)
I recommend placing the dishwasher on the side of your dominant hand for easier loading and unloading. If you have a corner sink placement, the dishwasher typically goes on the left side to avoid interference with other countertop activities.
Tip: If counter space is extremely limited, some users install a countertop dishwasher under sink cabinets with proper ventilation modifications. This requires careful measurement and may not work for all cabinet configurations.
Step 2: Prepare Your Faucet
For faucet-connect models, you’ll need to attach the adapter. Here’s how:
- Remove the aerator: Unscrew the aerator from your faucet tip by hand or with pliers (wrap with cloth to protect finish)
- Check threads: Inspect both faucet threads and adapter for debris or damage
- Apply plumber’s tape: Wrap 2-3 layers of Teflon tape clockwise around the faucet threads (prevents leaks)
- Attach adapter: Screw the faucet adapter onto the faucet by hand first, then tighten 1/4 turn with wrench (don’t overtighten)
- Test connection: Turn on water briefly to check for leaks around the adapter
Note: Some newer faucets have non-standard thread sizes. If the included adapter doesn’t fit, you may need a universal adapter kit available at hardware stores or directly from the dishwasher manufacturer.
Step 3: Connect the Water Supply
With the adapter in place, connect the inlet hose from your countertop dishwasher:
- Locate inlet hose: Find the inlet hose on the back of your dishwasher (usually marked with blue tape or labeled “inlet”)
- Connect to adapter: Screw the hose connector onto the faucet adapter
- Hand-tighten: Tighten by hand first, then use wrench for an additional 1/8 turn only
- Check o-ring: Ensure the rubber o-ring is seated properly in the connector
- Route hose: Arrange the hose so it doesn’t kink or create a trip hazard
Important: Never leave the water connection unattended while the dishwasher is running. The faucet adapter is designed for temporary connection during wash cycles only.
Step 4: Set Up the Drainage Hose
Proper drainage setup is essential to prevent water damage and ensure efficient operation:
- Locate drain hose: Find the outlet hose (usually larger diameter, marked with gray/black tape or labeled “drain”)
- Position in sink: Place the drain hose end into your sink basin
- Secure hose: Use the included clip or holder to keep the drain hose in place
- Check height: Ensure the drain hose doesn’t sit below the sink drain opening (prevents backflow)
- Test placement: Run water briefly to confirm proper drainage flow
Best Practice: Some models include a special bracket that attaches to the sink edge or backsplash to hold the drain hose securely. This prevents the hose from falling out during operation and keeps it positioned above the drain line for proper flow.
Step 5: Secure the Dishwasher
While some countertop dishwashers are designed to remain portable, securing your unit prevents tipping and vibration during operation:
For Wood/Laminate Countertops:
- Use the included mounting bracket kit
- Mark drill holes through the bracket template
- Drill pilot holes (smaller than screw diameter)
- Secure bracket with screws, then clip dishwasher onto bracket
For Granite/Quartz/Stone Countertops:
- NEVER drill into stone countertops (risk of cracking)
- Use adhesive mounting strips included with some models
- Or use side-mount brackets that attach to cabinet sides instead of countertop
- Consider non-slip rubber pads as a minimal security measure
For Rental Properties:
- Use non-permanent mounting methods only
- Double-sided adhesive strips work well for temporary installation
- Non-slip rubber mats provide stability without leaving marks
Step 6: Test Your Installation
Before running a full cycle, test your setup:
- Plug in unit: Connect to grounded outlet
- Turn on faucet: Open hot water tap at sink (not at dishwasher)
- Check connections: Inspect all hose connections for leaks
- Run test cycle: Start with a quick rinse cycle (no dishes needed)
- Monitor operation: Watch for proper water fill, washing, and drainage
- Check for leaks: Look under and around the unit during operation
If everything runs smoothly without leaks, your installation is complete. If you notice any issues, refer to the troubleshooting section below.
Water Connection Methods
Understanding your water connection options helps you choose the best method for your situation:
Standard Faucet Connection: This is the most common method for countertop dishwasher installation. The included adapter screws onto your faucet after removing the aerator. It works with most standard kitchen faucets and provides reliable water flow. This connection is temporary – you attach it when running a cycle and remove it afterward.
Permanent Water Line: Some advanced DIY users install a permanent water supply line under the sink, similar to a traditional dishwasher installation. This involves tapping into the existing water supply line and installing a dedicated valve. While convenient, this method requires plumbing skills and may not be suitable for rental properties.
Water Tank Models: If your faucet is incompatible or you prefer not to connect to plumbing, water tank models offer an alternative. You manually fill the reservoir with water for each cycle. This gives you complete placement flexibility but limits you to the tank’s capacity (typically 1-2 wash cycles per fill).
Special Adapter Solutions: For pull-out spray faucets or non-standard configurations, universal faucet adapter kits can bridge compatibility gaps. These kits include multiple thread adapters and can accommodate unique faucet designs found in modern kitchens.
Drainage Setup Options
Proper drainage is just as important as water supply for successful countertop dishwasher operation:
Direct Sink Drainage: The simplest method routes the drain hose directly into your sink basin. This works well for most installations and requires no permanent modifications. The included hose clip or bracket keeps the drain hose positioned above the sink’s drain opening to prevent backflow.
Standpipe Connection: Some countertop dishwashers can connect to a standpipe – a vertical pipe that connects to your home’s drainage system. This is more common in laundry room setups but can work in kitchen configurations where available. This method keeps your sink free during operation.
Under-Sink Drain Connection: Advanced installations may tap into the garbage disposal or drain pipe under the sink. This requires a Y-connector and creates a more permanent setup. While convenient, this method requires plumbing knowledge and isn’t recommended for rental situations.
Drain Hose Height Considerations: Regardless of method, the drain hose must maintain proper height. If positioned too low, water can siphon out prematurely. If too high, the pump may struggle to push water out. Follow your manufacturer’s specifications for optimal drain height.
Mounting Options by Countertop Material
Different countertop materials require different mounting approaches:
Laminate Countertops: Laminate surfaces (Formica, Wilsonart, etc.) allow for traditional screw mounting. The included mounting bracket can be secured directly to the countertop using the provided screws. Drill pilot holes first to prevent the laminate from chipping. This provides the most secure installation possible.
Butcher Block/Wood Countertops: Wood surfaces can accept screw mounting but require additional precautions. After drilling pilot holes and securing the bracket, apply a waterproof sealant around the screw holes to prevent water damage. Wood is susceptible to swelling and warping from repeated moisture exposure, so sealing is essential.
Granite Countertops: Granite and other natural stones should NEVER be drilled for dishwasher mounting. The risk of cracking the stone is too high. Instead, use adhesive mounting strips (included with many models) or side-mount brackets that attach to cabinet sides. Some users also use high-quality double-sided mounting tape designed for heavy objects.
Quartz and Engineered Stone: Like granite, quartz countertops should not be drilled. The resin binders in engineered stone can weaken around drill holes, and the risk of surface damage is high. Use the same non-invasive mounting methods recommended for granite – adhesive strips or side brackets.
Concrete Countertops: While concrete can be drilled, it requires special masonry bits and carries chip-out risks. Adhesive mounting is the safer choice for concrete surfaces. If drilling is necessary, use a hammer drill with a carbide bit and apply gentle, consistent pressure.
Permanent vs Portable Installation
Deciding between permanent and portable setup depends on your living situation and preferences:
Portable Installation: This is the default setup for most countertop dishwashers. You connect the water when needed, run a cycle, then disconnect and store the hoses. This approach offers maximum flexibility and is ideal for renters or those who may move frequently. The dishwasher can be relocated to different counters or even stored away when not in use.
Semi-Permanent Installation: Some users create a dedicated space for their countertop dishwasher and leave it connected to water and drain continuously. This requires a splitter at the faucet (allowing both sink and dishwasher access) and a more permanent drain setup. You gain convenience but lose the ability to use that sink section normally while the dishwasher is connected.
Permanent Installation: Advanced DIY enthusiasts may plumb their countertop dishwasher into the home’s water supply and drain system permanently. This eliminates faucet connection hassles but requires plumbing skills and permanent modifications to your kitchen. This approach is not recommended for rental properties and may void some manufacturer warranties.
Troubleshooting Common Installation Issues
Faucet Adapter Compatibility Issues
One of the most common problems during countertop dishwasher installation is faucet adapter incompatibility. Standard adapters fit most faucets, but modern kitchen fixtures often feature unique designs:
Pull-Out Spray Faucets: These faucets have a detachable spray head that connects via a hose under the counter. The spray head connection point typically won’t accept a standard dishwasher adapter. Solution: Use a universal adapter kit that connects to the supply line under the sink, or choose a water tank model dishwasher instead.
Threadless Faucets: Some contemporary faucets lack external threads entirely. Forum discussions on Reddit’s r/Plumbing confirm this is a common frustration. Solution: Flexible PVC tubing can connect the faucet outlet to the dishwasher inlet, or use a water tank model that bypasses the faucet entirely.
Non-Standard Thread Sizes: Not all manufacturers use standard 15/16″ threads. If your adapter doesn’t fit, measure your faucet diameter and purchase a compatible adapter from a hardware store or the dishwasher manufacturer directly.
Water Connection Leaks
Leaks at the water connection point are frustrating but usually easy to fix:
Loose Connections: Ensure all connections are hand-tightened plus 1/4 turn with wrench. Overtightening can damage threads or crack plastic components.
Missing or Damaged O-Ring: The rubber o-ring in the hose connector creates the watertight seal. If it’s missing, cracked, or deformed, replace it. Most hardware stores carry universal o-ring kits.
Worn Faucet Threads: Older faucets may have worn or corroded threads that prevent proper sealing. Plumber’s tape can help, but severely damaged threads may require faucet replacement.
Drainage Problems
Drainage issues can cause poor wash performance or water damage:
Hose Falls Out of Sink: The drain hose must be secured with the included clip or bracket. If your model didn’t include one, purchase a universal hose clip or use a heavy rubber band around the faucet to hold it in place.
Poor Drainage Flow: If water drains slowly, check for kinks in the drain hose and ensure the outlet isn’t positioned below the sink drain level. The drain hose should loop above the sink drain opening to prevent siphoning.
Standing Water in Unit: Some water remaining after a cycle is normal, but excessive water indicates a drain problem. Check that the drain hose isn’t blocked and that the sink drain itself isn’t clogged.
Countertop Mounting Challenges
Difficulty securing the dishwasher to your countertop can lead to vibration and movement:
Drilling Not an Option: For stone countertops or rental properties where drilling isn’t possible, use industrial-strength adhesive mounting strips. Some users report success with heavy-duty double-sided tape designed for appliances.
Unit Slides During Operation: If your dishwasher moves during cycles, check that all leveling feet are properly adjusted. Non-slip rubber pads under each corner can also improve stability without permanent installation.
Vibration Issues: Excessive vibration often indicates an unstable surface. Ensure your countertop is level and that the dishwasher sits flush against the surface. Some movement is normal during pump operation, but excessive shaking suggests a stability problem.
Electrical Connection Issues
Power problems prevent the dishwasher from operating at all:
Outlet Not Grounded: Countertop dishwashers require a grounded outlet for safety. Use a three-prong plug only in properly grounded outlets. Never use a three-prong adapter with two-prong outlets.
Extension Cord Usage: While extension cords can work temporarily, they’re not recommended for permanent use. If you must use one, choose a heavy-duty cord rated for the dishwasher’s amperage (typically 10-12 amps) and keep it as short as possible.
GFCI Tripping: If your countertop dishwasher trips a GFCI outlet, there may be a ground fault or moisture issue. Ensure all connections are dry and that the unit isn’t sitting in water. Persistent tripping indicates a problem that requires professional service.
Frequently Asked Questions
Do countertop dishwashers have to be plumbed in?
No, countertop dishwashers don’t require permanent plumbing. Most models connect temporarily to your sink faucet using an adapter. Water tank models require no plumbing connections at all – you simply fill the built-in reservoir manually. This flexibility makes countertop dishwashers ideal for rentals and apartments.
Are tabletop dishwashers easy to install?
Yes, tabletop dishwashers are designed for easy DIY installation. Most units can be set up in 15-30 minutes with basic tools. The process involves connecting a faucet adapter, hooking up the inlet and drain hoses, and plugging into an electrical outlet. No special plumbing skills are required for standard faucet-connect models.
How is a dishwasher attached to a countertop?
Countertop dishwashers attach using several methods depending on your countertop material. For wood or laminate surfaces, mounting brackets screw directly into the counter. For granite, quartz, or stone surfaces where drilling isn’t an option, adhesive strips or side-mount brackets secure the unit. Some models simply rely on their weight and non-slip feet for stability.
Do portable dishwashers need a drain?
Yes, all countertop dishwashers require drainage. Most models drain directly into your sink basin through a discharge hose. The drain hose must be positioned above the sink’s drain opening to prevent backflow. Some advanced installations can connect to a standpipe or under-sink drain line, but direct sink drainage is most common.
Can I put a countertop dishwasher under my sink?
Yes, some users install countertop dishwashers under sink cabinets, but this requires careful planning. The space must accommodate the dishwasher’s height, allow proper ventilation, and provide access to the sink for water connection. Not all cabinet configurations work, and the dishwasher may need to be pulled out during operation for faucet access.
How much do plumbers charge to install a new dishwasher?
Professional installation for a traditional built-in dishwasher typically costs $150-$300, including materials and labor. However, countertop dishwashers are designed for DIY installation and rarely require professional help. If you need permanent plumbing modifications for a countertop model, expect to pay $100-$200 for a plumber’s visit.
What if my faucet doesn’t have threads?
Threadless faucets require creative solutions for countertop dishwasher connection. Options include using flexible PVC tubing to bridge the faucet outlet to the dishwasher inlet, installing a universal adapter kit that connects to supply lines under the sink, or choosing a water tank model that bypasses faucet connection entirely. Reddit’s DIY community frequently discusses this challenge.
Can I install a countertop dishwasher in a rental?
Yes, countertop dishwashers are perfect for rental properties because they require no permanent modifications. Use non-invasive mounting methods like adhesive strips or non-slip pads instead of drilling. The temporary faucet connection can be removed when you move. Water tank models are especially rental-friendly since they don’t require any faucet connection at all.
Conclusion
Learning how to install a countertop dishwasher opens up new possibilities for convenient dishwashing in small spaces. These compact appliances deliver genuine cleaning performance without requiring permanent plumbing modifications or valuable cabinet space. Whether you’re in a small apartment, rental property, or simply need additional dishwashing capacity, a countertop dishwasher can be an excellent solution.
The installation process is straightforward for most DIY enthusiasts. Start by checking your faucet compatibility and countertop material, gather the necessary tools, and follow the step-by-step guide above. Most installations take less than 30 minutes from start to finish, and you’ll be washing dishes the same day you bring your unit home.
For tricky installations involving non-standard faucets or stone countertops where drilling isn’t an option, the solutions covered in the troubleshooting section will help you work around common challenges. Remember that water tank models offer complete flexibility if faucet connection proves too difficult for your setup.
While countertop dishwashers are designed for DIY installation, don’t hesitate to contact a professional if you encounter issues beyond your comfort level. A licensed plumber can handle complex water supply modifications or permanent drain connections if you decide to upgrade from the standard portable setup.
With proper installation and regular maintenance, your countertop dishwasher will provide years of reliable service, making daily cleanup easier in your compact kitchen space.




Leave a Comment