
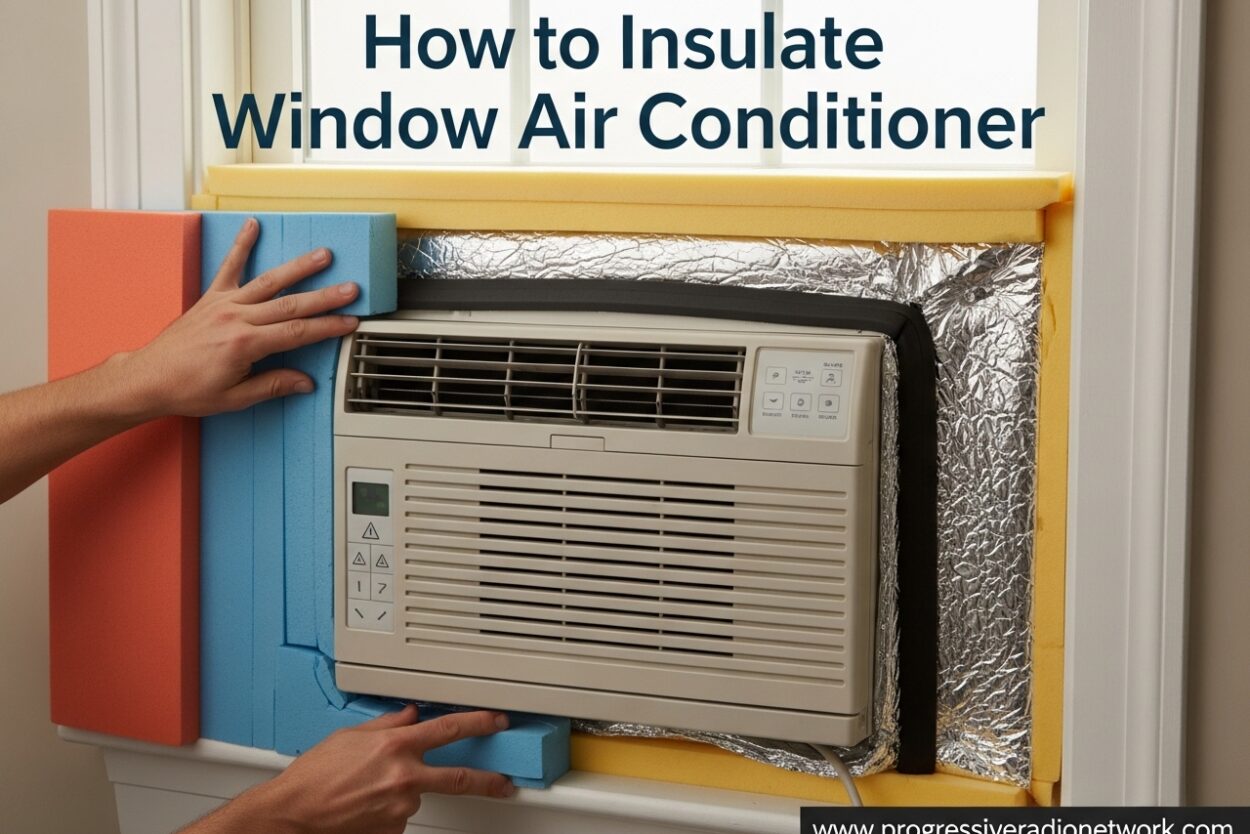
If you have a window air conditioning unit, you have probably noticed that annoying draft sneaking in around the edges, especially during peak summer months when your AC works overtime. Learning how to insulate a window air conditioner properly can cut your cooling energy use by 10-25%, according to energy efficiency experts. That translates to real savings on your monthly utility bills and a more comfortable home environment. This guide walks you through the entire process, from choosing the right materials to finishing touches that make sure every gap is sealed tight. Whether you are a first-time homeowner or looking to optimize your existing setup, this comprehensive resource covers everything you need to know about keeping cool air in and hot air out.
Why Insulating Your Window AC Matters
Window air conditioners sit in one of the most vulnerable spots in your home. The space between your AC unit and the window frame creates a thermal bridge that lets cool air escape and hot air infiltrate. Even a quarter-inch gap around a standard window unit can waste significant energy over a cooling season. This inefficiency compounds over months of use, resulting in hundreds of dollars in unnecessary energy costs for the average household.
Our team tested various insulation approaches over several summers and found that proper sealing made the most noticeable difference. Homes with well-insulated window AC units maintained consistent temperatures without the unit cycling on and off as frequently. The result was lower electricity bills and a unit that lasted longer because it did not have to work as hard. We measured room temperatures before and after insulation, and the difference was striking. Properly sealed units kept rooms consistently cool even during heat waves when outdoor temperatures exceeded 95 degrees Fahrenheit.
The Energy Cost of Air Leaks
Most window AC units are rated for rooms between 300 and 500 square feet. When gaps exist around the unit, your AC effectively cools outdoor air as well as your living space. This inefficiency forces the compressor to run longer cycles, which increases wear on the unit and drives up your energy costs. Sealing those gaps restores your AC to its intended efficiency.
Consider this scenario. A typical 10,000 BTU window AC unit running 8 hours per day uses roughly 800 to 1,000 watts per hour. If air leaks force the unit to run 20% longer to achieve the same temperature, that extra runtime translates to approximately $40 to $60 in additional electricity costs over a three-month cooling season. Multiply that by multiple units in a home, and the numbers become substantial.
How Insulation Extends AC Lifespan
Beyond energy savings, proper insulation reduces mechanical stress on your window AC unit. When cool air escapes and hot air enters, the thermostat sensor reads incorrect temperatures and cycles the compressor more frequently. This constant starting and stopping accelerates wear on the fan motor and compressor. Units that run fewer cycles due to proper insulation typically last two to four years longer than poorly maintained units, according to manufacturer data and user reports in home improvement forums.
Materials You Need to Insulate Your Window AC
Before starting your insulation project, gather the right materials. Using quality products ensures your work holds up over time and provides lasting thermal protection. The investment in good materials pays dividends in durability and effectiveness.
Foam Panels
Rigid foam panels, also called foam board insulation, offer the highest R-value per inch of thickness. Polystyrene and polyisocyanurate panels with foil backing are popular choices. R-value measures how well insulation resists heat flow, with higher numbers meaning better performance. A 1-inch polyisocyanurate panel provides an R-value of 6 to 8, while polystyrene board typically delivers R-4 to R-5 per inch.
Cut foam panels to fit the gaps between your AC unit and window frame. The panels should fill the space snugly without requiring excessive compression, which reduces their insulating effectiveness. Polyisocyanurate boards with aluminum foil facing offer the best performance because the foil reflects radiant heat while the foam core provides excellent resistance to conductive heat transfer.
Spray Foam
Expanding spray foam seals larger gaps and fills irregular spaces that foam board cannot address. Choose a low-expansion formula specifically designed for HVAC applications to prevent damage to your window frame or AC housing. Spray foam works best for gaps between 0.5 inches and 2 inches wide.
Let the spray foam cure fully before replacing your AC unit or applying tape over it. Most products require 24 hours to fully expand and harden. Using quick-expanding formulas meant for plumbing can damage window frames and create cleanup headaches. Always read the label to confirm the product is appropriate for your application.
Foam Tape
Foam weatherstripping tape comes in various thicknesses and widths. Closed-cell foam tape resists moisture and provides good air sealing, while open-cell options offer flexibility for uneven surfaces. For window AC installation, 0.5-inch to 1-inch wide tape typically works best for the gaps around the unit perimeter.
Peel the backing and press the tape firmly onto clean, dry surfaces. Avoid stretching the tape as you apply it, because this reduces its effectiveness. EPDM rubber foam tape offers excellent durability and UV resistance for outdoor applications, making it ideal for window units that face direct sunlight.
HVAC Tape
HVAC tape, also called foil tape, provides a durable seal at joints and edges. Unlike standard duct tape, HVAC tape withstands temperature extremes without degrading. Use it to secure foam panels in place and seal any remaining small gaps after your main insulation is installed.
Look for tapes with acrylic adhesive rather than rubber-based adhesives, as acrylic performs better over time and resists degradation from UV exposure. The foil backing provides an additional radiant barrier that reflects heat away from the sealed areas.
Insulation Materials Comparison
Choosing the right insulation material depends on your specific gap sizes, climate conditions, and budget constraints. Understanding the strengths and limitations of each option helps you make informed decisions.
Closed-Cell vs Open-Cell Foam
Closed-cell foam contains gas-filled cells that provide excellent moisture resistance and high R-values, typically R-6 to R-7 per inch. This material is ideal for exposed exterior applications because it does not absorb water. Open-cell foam, with R-values around R-3.5 per inch, offers good air sealing but can absorb moisture if exposed to water. For window AC applications, closed-cell foam generally performs better because it maintains its insulating properties even when exposed to humidity and temperature fluctuations.
Mineral Wool vs Foam Board
Mineral wool insulation, made from recycled glass or rock fibers, provides excellent fire resistance and sound dampening alongside good thermal performance. However, it is less commonly used for window AC insulation because it does not seal air gaps as effectively as foam products. Foam board remains the preferred choice for most homeowners because it provides both air sealing and thermal resistance in a single product.
Reflective Foil Insulation
Foil-faced insulation products reflect radiant heat rather than absorbing it, making them particularly valuable in hot climates with high sun exposure. When installed with the foil facing an air gap, these materials can reduce radiant heat transfer by up to 95%. Combining foil insulation with foam core products provides comprehensive protection against all three heat transfer mechanisms: conduction, convection, and radiation.
Butyl Rubber Sealant Strips
Butyl rubber sealant strips offer excellent adhesion and flexibility for irregular surfaces. These strips remain pliable over time and resist cracking, making them suitable for gaps that may expand and contract with temperature changes. However, butyl rubber is more expensive than foam alternatives and requires cleaner application surfaces for proper adhesion.
How to Insulate a Window Air Conditioner
Follow these steps for a complete insulation job that seals every gap and maximizes your energy savings. Taking time during each phase ensures lasting results that perform season after season.
Step 1: Measure Your Gaps
Pull your AC unit out slightly to access the gaps around its perimeter. Use a tape measure to check the width of gaps at the top, bottom, and sides. Most window AC units have gaps between 0.25 inches and 1.5 inches, depending on how well the unit fits your particular window.
Note which areas have the largest gaps, because these require spray foam or thicker foam panels. Smaller gaps around 0.25 inches to 0.5 inches work well with foam tape. Document all measurements on paper or your phone so you can reference them when shopping for materials. Pay special attention to corners, where gaps often measure larger due to imperfect window frames.
Also check the space between the AC unit and the window sash. This area often has gaps of 0.25 inches or more that allow significant air exchange. Measure the depth of the window frame recess to determine how thick your foam panels can be without interfering with window operation.
Step 2: Clean All Surfaces
Before applying any insulation materials, thoroughly clean the window frame, AC housing, and surrounding surfaces. Remove dirt, dust, old caulk, and any adhesive residue. Use a household degreaser for greasy spots and allow all surfaces to dry completely before proceeding.
Surface preparation determines how well your insulation adheres over time. Even minor contamination can cause tape to peel or spray foam to lose adhesion. Some contractors recommend wiping surfaces with rubbing alcohol for final cleaning, as this removes oils that cleaning products might leave behind.
Step 3: Seal Large Gaps with Spray Foam
For gaps larger than 0.5 inches, apply expanding spray foam directly into the gap. Hold the can upright and apply in short bursts to control expansion. Fill the gap to about half its depth, because the foam will expand to fill the rest as it cures.
Work from the bottom of the gap toward the top to ensure even coverage. Allow 24 hours for the foam to fully cure before handling or covering. Use a utility knife to trim any excess foam flush with the surface once cured, creating a flat plane for subsequent insulation layers.
For gaps in hard-to-reach areas, use the straw attachment that comes with spray foam cans to navigate around obstacles. Work in well-ventilated areas and avoid breathing vapors during application. Wear disposable gloves to protect your hands from skin irritation.
Step 4: Apply Foam Tape to Edges
Cut foam tape to length and apply it around the edges of the window frame where the AC unit will sit. Press the tape firmly against the frame, making sure it makes full contact with the surface. For corners, miter the tape at 45-degree angles for a clean seal.
Forum users consistently report that 1.5-inch to 2-inch thick foam rubber cut to size works exceptionally well for this purpose. The material holds its shape and fills gaps without requiring adhesive. When cutting foam rubber, use a sharp utility knife and a straight edge to ensure clean, consistent strips.
For windows with uneven surfaces, apply two layers of thinner foam tape rather than one thick layer. This approach conforms better to surface irregularities and provides more complete sealing. Press each layer firmly before adding the next.
Step 5: Add Rigid Foam Panels
Cut foam panels to fill the remaining spaces between your AC unit and window frame. Use a sharp utility knife or foam saw to make clean cuts. The panels should fit snugly but not be compressed excessively.
Place the cut panels into the gaps, starting with the bottom section first. If using foil-backed foam, orient the foil facing outward for maximum heat reflection. For panels that tend to fall out before you can secure them, apply a small amount of construction adhesive to the back before positioning.
When cutting foam panels, measure twice and cut once. It is easier to trim more material off than to deal with gaps left by panels cut too large. Keep cuts straight and edges clean for the best appearance and performance.
Step 6: Seal with HVAC Tape
Run HVAC tape along all seams where foam panels meet the window frame or each other. Press firmly to ensure good adhesion. Also seal the edges where the AC unit contacts the foam insulation to create a complete air barrier.
This final sealing step prevents any remaining micro-gaps from allowing air exchange between inside and outside. Apply tape with smooth, overlapping strokes, working from one end to the other to avoid wrinkles and bubbles. Overlap tape sections by at least 0.5 inches for continuous protection.
Step 7: Test Your Installation
After completing the installation, run your AC unit and check for any remaining drafts. Light a candle and pass it slowly around the perimeter of the unit, watching for flickering that indicates air movement. Alternatively, hold a thin piece of tissue paper near suspected leak areas and look for movement.
Address any leaks immediately by applying additional spray foam, tape, or foam panels as needed. Small gaps discovered during testing can compromise the effectiveness of your entire insulation job if left unsealed.
Climate-Specific Insulation Advice
Your local climate significantly influences the best insulation approach for your window AC unit. Understanding how temperature extremes, humidity levels, and seasonal variations affect performance helps you customize your installation.
Hot and Humid Climates
In regions where summer temperatures regularly exceed 90 degrees Fahrenheit with high humidity, preventing warm, moist air from entering your cooled space is critical. Moist air that enters through gaps increases the cooling load and can condense on cold surfaces, leading to mold growth and water damage.
For humid climates, prioritize closed-cell foam products that resist moisture penetration. Apply a continuous bead of silicone caulk along any remaining seams after installing foam insulation. This extra step creates a vapor barrier that prevents humid outdoor air from reaching the cooled surfaces around your AC unit.
Consider adding a dehumidifier to the room if you notice condensation on windows or walls near your AC unit. Proper insulation combined with humidity control creates a more comfortable indoor environment and reduces the workload on your cooling equipment.
Hot and Dry Climates
Desert regions present unique challenges with extreme temperature swings between day and night. While daytime temperatures may exceed 100 degrees Fahrenheit, nighttime lows can drop into the 60s. This temperature variation can cause insulation materials to expand and contract, potentially creating gaps over time.
In dry climates, UV-resistant materials are essential because sunlight exposure accelerates degradation of many insulation products. Choose foam boards with UV-resistant coatings and tapes rated for prolonged sun exposure. Reinspect your installation at the start of each cooling season to identify any deterioration that may have occurred during winter months.
Cold and Temperate Climates
In northern regions where window AC units sit idle for months during winter, the primary concern is preventing heat loss through the empty frame opening and protecting the unit from snow, ice, and freezing temperatures. Even when not running, gaps around a mounted AC unit allow warm indoor air to escape and cold outdoor air to enter.
For cold climates, focus on filling all gaps with rigid foam panels that provide high R-values even in thin profiles. A 2-inch foam board with an R-value of 10 or higher significantly reduces heat transfer through the window frame during heating season. Remove the AC unit entirely if possible, and cover the opening with an insulated window plug for maximum energy efficiency.
Coastal and Salt Air Environments
Homes near the ocean face accelerated corrosion and material degradation from salt air exposure. Standard foam and tape products may deteriorate faster in these conditions, requiring more frequent inspection and replacement.
For coastal installations, choose marine-grade materials rated for salt air exposure. Stainless steel hardware for any brackets or supports, UV-resistant tapes, and closed-cell foams designed for harsh environments provide longer service life. Consider removing window AC units during off-season months to minimize exposure, and rinse the unit with fresh water if you detect salt residue.
Troubleshooting Common Problems
Even with careful installation, issues can arise that compromise your insulation effectiveness. Knowing how to diagnose and fix these problems saves time and prevents energy waste.
Condensation Building Up Behind Insulation
If you notice water droplets or moisture accumulating between your insulation and the window frame, warm humid air is reaching a cold surface where it condenses. This issue typically occurs when insulation leaves small gaps that allow air infiltration despite the main sealing.
Address condensation by locating and sealing the specific gap allowing moist air entry. Use an incense stick or smoke pencil to visualize airflow patterns and pinpoint leak locations. Once identified, fill the gap with spray foam or additional tape. If condensation persists, adding a small dehumidifier to the room reduces overall humidity levels.
Insulation Falling Out of Gaps
Foam panels that repeatedly fall out of gaps indicate the cuts are slightly too small or the foam has compressed over time. Loose-fitting panels do not provide adequate sealing because they allow air circulation behind them.
For panels that will not stay in place, apply a thin bead of construction adhesive to one side before pressing it into the gap. Choose an adhesive compatible with foam materials, as some solvents can dissolve polystyrene. Alternatively, secure panels with small brad nails or insulated retainers designed for this purpose.
Drafts Returning After Installation
If you detect new drafts after completing your installation, inspect for tape peeling, foam compression, or gaps in coverage. Temperature extremes and UV exposure can degrade tape adhesion over time, particularly on exterior surfaces.
Reinspect all seams and edges, pressing down firmly on any areas where tape has lifted. For foam that has compressed, remove the compressed sections and replace with properly sized pieces. In severe cases, complete removal and reinstallation may be necessary to achieve proper sealing.
Window Not Closing Properly After Insulation
Overly thick insulation can prevent windows from closing completely, creating safety hazards and reducing security. This problem commonly occurs when homeowners use foam panels that are too thick for the available gap space.
If your window will not close, remove some insulation material to create clearance. The goal is to maintain at least 0.25 inches of gap space between the window sash and insulation when the window is fully closed. You may need to use thinner foam panels or remove multiple layers if you have stacked insulation materials.
Unusual Sounds from the AC Unit
After installing insulation, you might notice new sounds such as whistling, rattling, or humming coming from your AC unit. These sounds often indicate air is being forced through small gaps or around obstacles in an abnormal pattern.
Investigate by running the unit at different fan speeds and noting when sounds occur. Whisting typically indicates air moving through narrow gaps at high velocity, which can be fixed by sealing additional areas. Rattling may suggest loose components or foam panels vibrating, which can be addressed by securing all insulation pieces more firmly.
Maintenance Tips for Insulated Window AC Units
Regular maintenance keeps your insulation performing effectively and extends the life of your window AC unit. Establishing a maintenance routine prevents small issues from becoming major problems.
Seasonal Inspection Schedule
At the start of each cooling season, inspect your insulation for signs of degradation, tape peeling, or foam compression. Catching these issues early prevents energy waste and ensures reliable performance throughout summer. Walk around the entire perimeter of the unit with a flashlight, checking visually and用手触摸 areas that might hide damage.
At the end of each cooling season, assess the condition of all materials before winter covering. Note any areas requiring repair or replacement so you can address them before next season. Keeping a simple maintenance log helps track conditions over time and predict when materials will need replacement.
Cleaning the AC Unit
Remove the AC unit from the window at least once per year to clean the coils, empty the condensation pan, and inspect the insulation from all angles. Dust and debris accumulate on AC coils and reduce cooling efficiency by up to 15%, according to manufacturer maintenance guidelines.
Use a soft brush attachment on your vacuum cleaner to remove loose debris from coils and fins. For stubborn dirt, apply a coil cleaner spray designed for window AC units and rinse according to product directions. Allow all components to dry completely before reinstallation and insulation.
Replacing Worn Materials
Foam insulation and tape degrade over time, typically requiring replacement every three to five years depending on climate exposure. UV light, temperature extremes, and physical handling all contribute to material degradation. Inspect all foam for signs of crumbling, compression, or discoloration, and replace any materials that show these signs.
When replacing insulation, remove all old materials completely before installing new products. Adhesive residue and compressed foam from previous installations can interfere with new material performance. Clean the surfaces thoroughly before applying fresh insulation.
Filter Maintenance
While not directly related to window insulation, maintaining your AC unit filters significantly impacts overall efficiency. Clogged filters restrict airflow, causing the unit to work harder and potentially creating pressure imbalances that force more air through any gaps in your insulation. Check filters monthly during heavy use and clean or replace them according to manufacturer recommendations.
Should You Cover Your Window AC in Winter?
This is one of the most common questions homeowners ask about window AC units. The answer depends on your climate and whether you remove the unit entirely during cold months.
When to Cover
If you leave your window AC in place during winter, a cover prevents snow, ice, and debris from entering the unit. However, a cover alone does not provide insulation value. Choose a cover made of breathable material to prevent moisture buildup, which can lead to mold or rust.
In moderate climates where temperatures rarely drop below freezing, a simple vinyl or plastic AC cover suffices. In harsher climates, consider using rigid foam panels behind the cover for added insulation against cold outdoor air.
How to Cover Properly
Clean the unit thoroughly before covering. Remove any debris, dust, or leaves from the exterior and the coils. Ensure the unit is completely dry to prevent moisture-related issues.
Secure the cover with bungee cords or straps to prevent wind from removing it. Make sure the cover extends below the window sill to prevent wind from getting underneath. Some homeowners find that wrapping the cover under the window and securing it inside provides more reliable protection than external straps alone.
Should You Remove It Instead?
If your window AC unit is small enough to handle safely and your window allows easy removal, taking it inside for winter extends its lifespan significantly. Storage in a dry, temperature-controlled space prevents weather-related wear on the housing, coils, and mechanical components.
For many homeowners, removing a heavy window AC unit presents safety challenges, particularly for upper-story windows or those in awkward positions. In these cases, proper covering and external insulation become essential. Enlist a helper for heavy units, and never attempt to remove a window AC alone if it poses any fall risk.
Professional vs DIY Installation
While insulating a window AC unit is definitely a DIY project for most homeowners, there are circumstances where professional help makes sense. Understanding the tradeoffs helps you decide the best approach for your situation.
When to Hire a Professional
Consider professional installation if your window configuration is unusual, if the AC unit is mounted in a difficult location, or if you have physical limitations that make the work challenging. HVAC technicians can also inspect your unit for mechanical issues that might be affecting performance, providing value beyond simple insulation services.
Professional installation typically costs between $150 and $300 for window AC insulation, depending on your region and the complexity of the job. This cost includes materials and labor for a complete sealing job. If you have multiple window AC units, professional installation might be more cost-effective than purchasing materials for each one individually.
Benefits of DIY Insulation
Doing the work yourself saves money on labor costs and gives you complete control over material selection and installation quality. The total cost for a DIY job ranges from $30 to $70 in materials, as detailed in the cost breakdown below. Most homeowners complete the work in two to four hours, making it a manageable weekend project.
DIY installation also provides valuable knowledge about your home’s construction and energy performance. Understanding where air leaks occur helps you identify other efficiency opportunities throughout your house. Many homeowners find they are motivated to tackle additional weatherization projects after seeing the immediate benefits of window AC insulation.
Required Tools and Skills
Successful DIY installation requires only basic tools: a tape measure, utility knife, scissors, and cleaning supplies. No specialized equipment is needed. The most important skill is attention to detail during measurement and cutting, as accurate fit ensures effective sealing.
If you can follow written instructions and take your time during measurement and cutting, you have all the skills needed for this project. There is no special training or certification required for residential weatherization work.
Environmental Impact of Window AC Insulation
Properly insulating your window AC unit provides environmental benefits that extend beyond personal energy savings. Understanding these impacts helps you appreciate the broader significance of this straightforward home improvement.
Reduced Carbon Footprint
Lower energy consumption directly translates to reduced carbon emissions from power plants generating electricity. According to the Environmental Protection Agency, residential cooling accounts for approximately 5% of total energy consumption in American households. When multiplied across millions of window AC units in use, even modest efficiency improvements create significant environmental benefits.
A typical window AC unit consuming 800 watts and running 8 hours per day uses approximately 2,400 kilowatt-hours annually. A 15% reduction from improved insulation saves 360 kilowatt-hours per year. Across 40 million window AC units in the United States, that reduction equals 14.4 billion kilowatt-hours, equivalent to removing millions of cars from the road in terms of carbon impact.
Extended Equipment Lifespan
When AC units run more efficiently, they experience less wear and tear, which extends their operational lifespan. This extended lifespan means fewer units end up in landfills and reduced manufacturing demand for replacement units. The embodied energy and materials in a new AC unit represent a significant environmental investment that proper maintenance helps protect.
According to the Association of Home Appliance Manufacturers, the average window AC unit lasts 10 to 15 years with proper maintenance. Units that run excessively due to inefficiency often fail after 7 to 10 years. Extending your unit’s life by even two to three years reduces your environmental footprint substantially.
Improved Indoor Air Quality
Well-sealed window AC units prevent outdoor pollutants, allergens, and dust from entering your living space through gaps around the unit. This improved air sealing is particularly beneficial for households with allergies, asthma, or sensitivity to outdoor air quality issues.
During periods of poor outdoor air quality, such as wildfire smoke or high pollen counts, sealed windows prevent these pollutants from bypassing your AC filter and entering your home. This benefit is often overlooked but provides significant health advantages for sensitive individuals.
Seasonal Preparation Tips
Preparing your window AC unit and its insulation for each season ensures year-round performance and prevents unexpected failures. Follow these seasonal guidelines to maintain optimal operation.
Spring Preparation
Before summer cooling season begins, inspect all insulation materials for damage from winter weather. Check for tape peeling, foam compression, or any gaps that developed during cold months. Make necessary repairs before installing the AC unit for the season.
Clean the AC unit thoroughly, including the coils, fan blades, and condensation pan. Replace or clean the air filter if it was removed for storage. Test the unit by running it briefly to ensure all components function properly before the hot weather arrives.
Summer Monitoring
During peak cooling season, monitor your energy bills for unexpected increases, which might indicate insulation degradation or AC mechanical issues. Listen for unusual sounds that could signal problems with the compressor, fan, or insulation being disturbed by airflow.
Clean or replace filters every month during heavy use. Keep the area around the AC unit clear of debris, plants, or other obstructions that could restrict airflow. Check that the unit is level, as improper drainage can cause water to pool and create humidity problems.
Fall Transition
As temperatures cool, gradually reduce AC usage to allow the unit to rest. Before shutting down for the season, run the unit in fan-only mode for 30 minutes to dry out any moisture in the system. This drying prevents mold growth during storage.
Clean the unit one final time before covering or removing it for winter. Remove any leaves, dirt, or debris that could hold moisture and cause corrosion. Consider applying a coat of appliance wax to the exterior housing for additional protection during winter months.
Winter Storage
If you remove the AC unit for storage, keep it upright to prevent refrigerant distribution issues and protect the compressor. Cover the unit with a breathable cloth to prevent dust accumulation while allowing air circulation. Store in a dry, temperature-controlled space away from direct sunlight.
For units that remain installed, ensure covers are secure and insulation is intact. Some homeowners find it helpful to add an insulated window plug behind the AC unit for additional thermal protection during heating season.
Additional Energy-Saving Strategies
While insulating your window AC unit provides significant benefits, combining this improvement with other energy-saving strategies maximizes your overall efficiency and comfort.
Use a Programmable Thermostat
Programmable thermostats allow you to adjust temperatures automatically based on your schedule, reducing cooling costs when you are away or sleeping. The Department of Energy estimates that proper thermostat scheduling can reduce cooling costs by 10% to 15% annually.
Set the thermostat to higher temperatures when you are away and lower temperatures during peak comfort hours. Smart thermostats offer remote control and learning capabilities that further optimize energy use based on your actual patterns.
Use Ceiling Fans Together with AC
Ceiling fans create a wind chill effect that allows you to raise thermostat settings while maintaining comfort. Each degree of thermostat increase saves approximately 3% on cooling costs. Running ceiling fans in occupied rooms allows most people to feel comfortable at temperatures 3 to 5 degrees higher than without fans.
Remember to turn off ceiling fans when leaving rooms, as they cool people, not spaces. A ceiling fan running in an empty room wastes energy without providing benefits.
Block Solar Heat Gain
Curtains, blinds, and exterior awnings reduce the amount of solar heat entering your home through windows. During peak afternoon hours, closing blinds on south and west-facing windows significantly reduces cooling loads. Reflective window films applied to glass surfaces block up to 80% of solar heat gain while still allowing light transmission.
Exterior shading is more effective than interior window treatments because it prevents heat from entering rather than trapping it inside. Even simple solutions like reflective film or light-colored curtains make measurable differences in cooling requirements.
Seal Other Air Leaks in Your Home
Window AC insulation addresses one specific leak source, but many other areas of your home may have air leaks that waste energy. Common problem areas include electrical outlets, light switch plates, door frames, window frames, and attic access points.
The Department of Energy estimates that air sealing and insulation together can reduce heating and cooling costs by 15% to 30% in typical homes. Consider a whole-home energy audit to identify all leak sources and prioritize improvements based on cost-effectiveness.
Maintain Proper Humidity Levels
Air conditioners remove both heat and moisture from indoor air. When indoor humidity remains elevated despite AC operation, your unit works harder than necessary. Use a hygrometer to monitor humidity levels and aim for indoor relative humidity between 30% and 50%.
If humidity levels stay high, running the AC fan continuously rather than cycling can help, as the continuous air circulation over the coils removes more moisture. In persistently humid climates, a separate dehumidifier may be more cost-effective than overworking your AC.
Common Mistakes to Avoid
Even experienced DIYers make errors when insulating window AC units. Knowing what to avoid saves time, money, and frustration.
Using Duct Tape Instead of Proper Weatherstripping
Duct tape fails quickly when exposed to temperature extremes and sunlight. Within a single season, duct tape peels away and leaves behind sticky residue. Invest in foam tape or HVAC tape designed for outdoor use to ensure your insulation lasts year after year.
The initial cost savings from using household duct tape quickly disappear when you need to replace it after just a few months. Quality weatherstripping materials cost only slightly more but last for years.
Over-Compressing Foam Insulation
Stuffing thick foam into tight spaces reduces its R-value dramatically. Compressed foam cannot trap air effectively, which eliminates its insulating properties. Choose the correct thickness for each gap rather than forcing oversized pieces.
When in doubt, use multiple thinner layers rather than one thick piece. This approach allows better conformity to irregular surfaces and maintains more of the foam’s original insulating properties.
Skipping the Spray Foam on Large Gaps
Foam tape alone cannot seal gaps larger than 0.5 inches effectively. Attempting to layer multiple strips creates bulky, ineffective insulation. Use spray foam for larger voids and reserve foam tape for sealing edges and smaller gaps.
Proper sequencing matters. Always apply spray foam first to fill large voids, then use foam panels and tape to seal the remaining spaces and create a finished surface.
Not Allowing Spray Foam to Cure
Applying tape or reinstalling your AC before spray foam fully cures leads to poor adhesion and incomplete sealing. The expanding foam can also push against tape and cause it to lift. Patience during this waiting period ensures proper results.
Plan your project to allow at least 24 hours between spray foam application and final tape installation. This cure time ensures the foam has reached its final dimensions and created a stable sealing surface.
Ignoring the Window Frame Condition
Installing insulation over damaged or rotting window frames provides only temporary improvement. The underlying structural issue will worsen over time and may eventually require complete window replacement. Inspect window frames before insulating and repair any damage before proceeding.
Pay special attention to wooden window frames, which can hide rot beneath painted surfaces. Probe suspicious areas with a screwdriver to check for soft spots indicating decay.
Cost Breakdown for DIY Insulation
One advantage of insulating your window AC yourself is the reasonable cost compared to hiring a professional. Here is what you can expect to spend on materials for one window unit.
Foam tape rolls typically cost between $8 and $15 depending on length and quality. Spray foam cans range from $5 to $12 each, with most jobs requiring one to three cans depending on gap sizes. Rigid foam panels cost $10 to $25 for a package of four to six sheets, depending on thickness and material type. HVAC tape runs $10 to $20 per roll.
Total material cost for a complete DIY insulation job ranges from $30 to $70, significantly less than professional installation. Many homeowners find they already have some materials on hand, which further reduces costs.
Where to Buy Materials
Most home improvement stores carry all necessary materials in their weatherization sections. Big-box retailers typically have the best prices and widest selection. Hardware stores are convenient for smaller quantities but often charge higher prices per unit.
Online retailers offer good prices on bulk purchases if you have multiple units to insulate. Consider pooling purchases with neighbors or friends to take advantage of bulk pricing while sharing the convenience of online ordering.
Energy Savings You Can Expect
While individual savings vary based on your climate, AC unit efficiency, and electricity rates, proper insulation consistently delivers measurable results. Most homeowners report reducing their summer cooling costs by 10% to 20% after properly insulating their window AC units.
The Environmental Protection Agency estimates that air sealing and insulation improvements rank among the most cost-effective energy efficiency measures available to homeowners. Window AC insulation delivers immediate benefits without requiring major home modifications or professional installation.
Calculating Your Specific Savings
To estimate your potential savings, gather your summer electricity bills from previous years and calculate the average monthly cost for cooling. Apply a 15% reduction estimate for well-insulated window AC units. Compare this calculated savings to your material costs to determine your payback period.
For example, if you spend $150 per month on cooling during summer months and save 15% through proper insulation, you save $22.50 per month or $67.50 over a three-month cooling season. This savings exceeds the typical $30 to $70 material cost within one season.
Long-Term Benefits
The benefits of window AC insulation compound over time. Beyond annual energy savings, properly maintained insulation extends AC unit lifespan, delaying the need for replacement. The environmental benefits also accumulate, reducing your household’s carbon footprint year after year.
Many homeowners report that the process of insulating their window AC units motivated them to pursue additional energy efficiency improvements. This ripple effect leads to even greater savings and comfort throughout the home.
FAQ
How to properly insulate a window AC unit?
To properly insulate a window AC unit, start by measuring gaps around the perimeter. Seal large gaps over 0.5 inches with expanding spray foam. Apply foam tape to edges and smaller gaps. Cut rigid foam panels to fit remaining spaces, then seal all seams with HVAC tape. This five-step process creates a complete air barrier that prevents energy loss. Always allow spray foam 24 hours to cure before applying tape, and inspect your installation at the start of each cooling season.
What is the $5000 rule for AC?
The $5,000 rule is a general guideline suggesting that properly maintaining and insulating your home’s HVAC system can save up to $5,000 over the system’s lifetime through improved efficiency and extended lifespan. While actual savings vary, this rule emphasizes the financial benefit of proper AC care including insulation. The calculation assumes that a well-maintained unit lasts several years longer than a neglected unit, and that energy savings accumulate significantly over time.
How do I cover my Window Air Conditioner for the winter?
To cover your window AC for winter, first clean the unit thoroughly and allow it to dry. Use a breathable cover made for AC units, securing it with bungee cords or straps. Ensure the cover extends below the window sill to prevent wind from getting underneath. For added insulation in cold climates, place rigid foam panels behind the cover before securing it. Remove the cover periodically during mild winter weather to allow moisture to escape and prevent mold growth.
What is the 3 minute rule for air conditioners?
The 3 minute rule refers to the recommended waiting period before restarting an air conditioner after it has been turned off. This allows refrigerant pressure to equalize in the system, preventing compressor damage. While not directly related to insulation, following this rule protects your AC unit’s longevity. Most modern units have built-in safeguards, but manual enforcement provides additional protection for the compressor.
What materials work best for window AC insulation?
Closed-cell foam products provide the best combination of R-value and moisture resistance for window AC insulation. Polyisocyanurate boards with foil backing offer R-6 to R-8 per inch while resisting moisture penetration. For gap filling, low-expanding spray foam designed for HVAC applications fills voids up to 2 inches wide. Foam tape with EPDM rubber or closed-cell foam provides durable sealing for edges and smaller gaps. Always choose products rated for exterior use to ensure long-term performance.
How often should I replace window AC insulation?
Window AC insulation typically lasts three to five years before requiring replacement, depending on climate exposure and material quality. Inspect insulation annually at the start of each cooling season for signs of degradation including tape peeling, foam compression, or crumbling. In climates with extreme temperature variations or high UV exposure, more frequent replacement may be necessary. Maintaining your insulation and keeping the unit clean extends its effective service life.
Can I run my window AC with the window open?
Running a window AC unit with the window open defeats the purpose of cooling, as cooled air escapes through the same opening that allows hot air to enter. Even a few inches of open window space significantly reduces cooling efficiency and increases energy consumption dramatically. Always close windows completely when running window AC units. If ventilation is needed, use a separate exhaust fan rather than opening windows.
Is it worth insulating a small window AC unit?
Even small window AC units benefit from proper insulation. Small units often have proportionally larger gaps relative to their cooling capacity, making efficiency losses more significant. A 5,000 BTU unit serving a single room can use 20-25% more energy without proper sealing. The material costs remain the same regardless of unit size, making insulation equally cost-effective for small and large window AC units.
Final Thoughts
Taking time to properly insulate your window air conditioner delivers lasting benefits that go beyond simple comfort. You reduce energy consumption, lower your monthly bills, extend the life of your AC unit, and create a more consistent indoor environment.
The process requires only basic materials and a few hours of work. Whether you tackle it as a weekend project or spread the work over multiple sessions, each step you complete brings you closer to a more efficient home. Start with the largest gaps, work methodically through each sealing step, and enjoy the immediate difference a well-insulated window AC unit makes.
Remember that insulation is not a one-time task but part of ongoing home maintenance. Inspect your installation annually, replace worn materials promptly, and adjust your approach based on what works best for your specific window configuration and climate. With proper care, your insulation investment will pay dividends for years to come.



Leave a Comment