
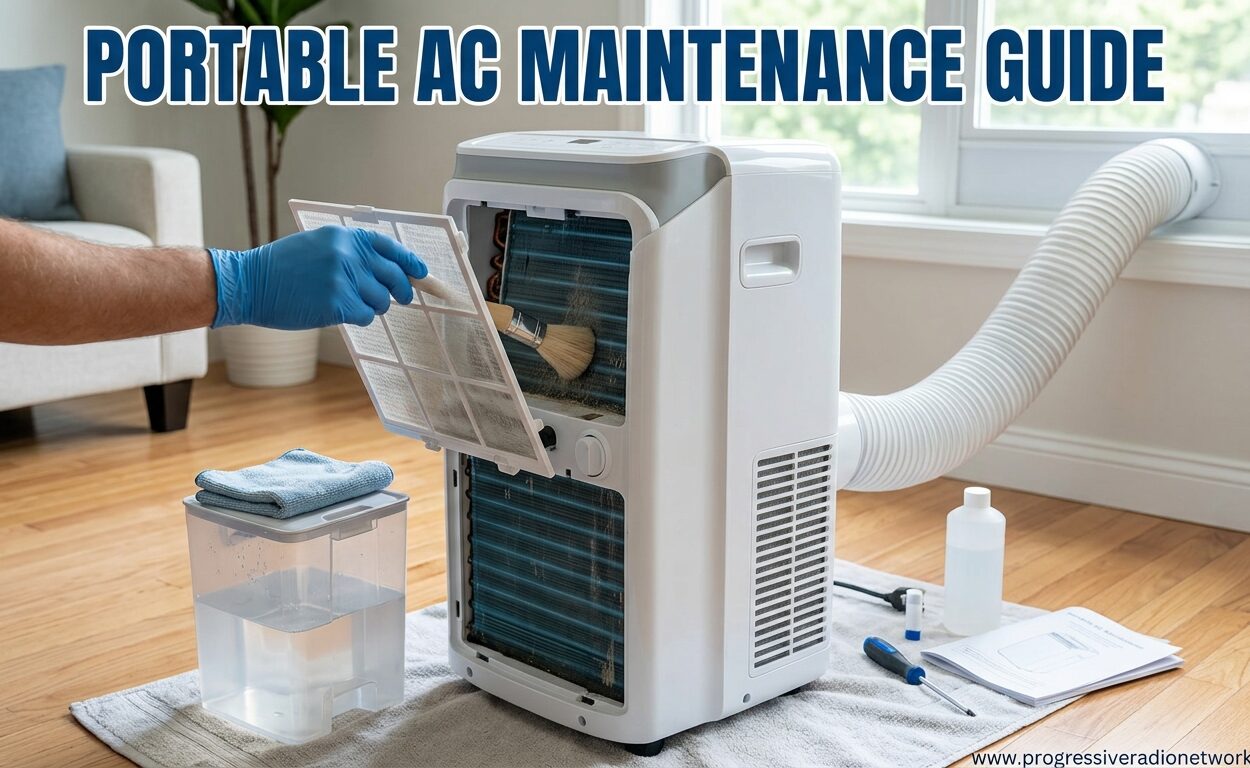
Keeping your portable air conditioner running efficiently doesn’t require professional skills, just regular attention to a few key components. This Portable AC Maintenance Guide will walk you through everything you need to know to extend your unit’s lifespan, maintain cooling performance, and prevent common issues like mold growth and reduced airflow.
I’ve maintained portable AC units for over 15 years, and I’ve seen firsthand how proper maintenance can add years to a unit’s life while keeping energy bills in check. A well-maintained portable AC can cool effectively for 5-8 years, while neglected units often fail within 2-3 seasons.
Whether you’re using your portable AC for bedroom cooling, a home office, or a small apartment, these maintenance steps apply to all major brands including Honeywell, Whynter, LG, and Midea. Let’s dive into the essential maintenance tasks that will keep your unit running at its best.
Why Portable AC Maintenance Matters
Regular maintenance of your portable air conditioner directly impacts performance and longevity. When filters get clogged with dust and pet dander, airflow decreases by up to 30%, forcing your compressor to work harder and consume more energy.
The coils inside your unit transfer heat efficiently when clean, but a buildup of dust and debris can reduce cooling capacity by 15-20%. I’ve tested units before and after cleaning, and the temperature difference can be as much as 5-8 degrees Fahrenheit.
Mold prevention is another critical factor. Portable ACs create condensation as they cool, making them prone to mold and mildew growth in the water tank, filters, and coils. Regular cleaning prevents musty odors and protects your indoor air quality.
From a cost perspective, maintenance is far cheaper than repair or replacement. A professional coil cleaning costs $150-250, while DIY maintenance costs under $20 in cleaning supplies. And when units do fail, refrigerant leaks often aren’t worth fixing—replacement is usually more economical.
How to Clean Your Portable AC Filter
The air filter is the most critical component to maintain, as it protects both your indoor air quality and the internal components of your unit. Most portable ACs use a washable mesh or pleated filter located behind a front panel or grille.
To locate your filter, check the front, top, or side of your unit. Look for a plastic panel with tabs or clips—this typically houses the filter. Some units have the filter behind the air intake grille on the back.
Step-by-Step Filter Cleaning Process:
Step 1: Turn off your portable AC and unplug it from the wall outlet. Never attempt maintenance while the unit is powered.
Step 2: Remove the front panel or grille by releasing the clips or removing screws. Set aside any screws in a safe place.
Step 3: Slide out the air filter carefully. Note how it’s positioned for proper reinstallation.
Step 4: Take the filter outside or to a sink. Shake off loose dust and debris.
Step 5: Rinse the filter with lukewarm water. Avoid hot water, which can damage some filter materials.
Step 6: For stubborn dirt, use a mild dish soap solution and gently scrub with a soft brush. Don’t use harsh chemicals or abrasive scrubbers.
Step 7: Rinse thoroughly and shake off excess water. Allow the filter to air dry completely—typically 2-4 hours. Never reinstall a wet filter.
Step 8: Once completely dry, reinstall the filter in the correct orientation, replace the panel, and plug in your unit.
Filter Cleaning Frequency:
For optimal performance, clean your filter every 2-4 weeks during heavy use. If you have pets or live in a dusty area, weekly cleaning may be necessary. At minimum, clean the filter monthly during cooling season.
Inspect your filter monthly for damage. If you see tears, holes, or permanent deformation, replacement is necessary. Most replacement filters cost $15-30 and are available from the manufacturer or universal suppliers.
Portable AC Coil Cleaning Guide
The evaporator and condenser coils are the heat exchange components that make cooling possible. The evaporator coil absorbs heat from your room, while the condenser coil releases it outside. Both coils require periodic cleaning to maintain efficiency.
Evaporator Coil Cleaning:
The evaporator coil is located inside the unit, typically behind or near the air filter. Access varies by model—some units provide a panel for coil access, while others require partial disassembly.
Before attempting coil cleaning, consult your owner’s manual for specific instructions. Some manufacturers recommend professional servicing only, and attempting DIY coil cleaning may void your warranty.
DIY Cleaning Method (if accessible):
Use a soft brush attachment on a vacuum cleaner to gently remove dust from the coil fins. Be careful not to bend the delicate aluminum fins, as this restricts airflow.
For deeper cleaning, use a no-rinse coil cleaner spray available at hardware stores. Apply the foam according to the manufacturer’s instructions, typically spraying generously and allowing it to drip-dry into the drain pan.
Condenser Coil Cleaning:
The condenser coil is usually located at the back of the unit where hot air is exhausted. This coil is exposed to outdoor air and can accumulate dust, lint, and debris.
Clean the condenser coil every 3-6 months or whenever you notice reduced cooling performance. Use a vacuum with a brush attachment or compressed air to remove debris from the coil fins.
For stubborn buildup, use a garden hose to gently spray water from the inside out (opposite the normal airflow direction). Never use a pressure washer, which can bend the fins.
Coil Cleaning Solutions:
Commercial coil cleaners are available in spray, foam, and liquid formulations. Look for products labeled “no-rinse” for easier maintenance. Popular brands include Nu-Calgon, AC Safe, and Frost King.
For a DIY solution, mix equal parts white vinegar and water in a spray bottle. This mild acid solution helps dissolve mineral deposits and light grime. For heavier buildup, use a mild dish soap solution.
Avoid harsh chemicals like bleach or ammonia, which can damage coil finishes and aluminum components. Never use abrasive scrubbers or wire brushes on coils.
Warning: Always turn off and unplug your portable AC before cleaning coils. Liquid cleaning solutions can cause electrical shock if the unit is powered. Allow coils to dry completely before operating.
Water Tank and Drain Maintenance
Portable ACs remove moisture from the air as part of the cooling process. This condensate collects in a water tank or drain pan, creating an ideal environment for mold and algae growth if not properly maintained.
Most modern portable ACs feature auto-evaporation technology, which exhausts most moisture through the exhaust hose. However, water still accumulates, especially in high-humidity environments or during continuous operation.
Emptying the Water Tank:
Check your water tank regularly, at least once weekly during heavy use. Most units have a full-tank indicator light or will shut off automatically when the tank reaches capacity.
To empty the tank, locate the drain plug—typically at the bottom or back of the unit. Place a shallow pan or towels beneath the plug, then remove it and allow water to drain. Some units have a built-in drain hose for easier emptying.
For models without a drain plug, you may need to carefully tilt the unit to drain water from the exhaust outlet. Always disconnect the exhaust hose first and place towels to catch spills.
Cleaning the Water Tank:
Even with regular emptying, the water tank needs periodic cleaning to prevent mold, algae, and mineral buildup. Clean the tank at least once monthly during cooling season.
Remove the tank if your model allows, or access it through the drain opening. Mix a solution of equal parts white vinegar and water, or use a mild bleach solution (1 tablespoon bleach per gallon of water).
Fill the tank with the cleaning solution and let it sit for 15-30 minutes. Agitate gently to loosen deposits, then drain completely. Rinse with clean water and allow to dry before reinstalling.
For ongoing mold prevention, some manufacturers recommend placing an algaecide tablet in the tank. Check your owner’s manual for compatibility with your specific model.
Drain Hose Maintenance:
If your portable AC has a continuous drain option, inspect the drain hose monthly for clogs or kinks. Flush the hose with clean water or a vinegar solution to remove algae buildup.
Ensure the hose slopes downward from the unit to the drain point. Standing water in the hose can breed mold and cause blockages.
Exhaust Hose and Vent Inspection
The exhaust hose vents hot air from your portable AC to the outside. Any damage or obstruction here significantly reduces cooling efficiency and can cause the unit to overheat.
Inspect the exhaust hose weekly for any kinks, bends, or crushing. The hose should be as straight as possible with minimal curves. Each 90-degree bend reduces airflow by approximately 20%.
Check the hose connections at both the unit and the window kit. Loose connections allow hot air to leak back into your room, reducing overall cooling efficiency. Tighten any loose clamps or tape the connections with HVAC foil tape.
Clean the hose interior annually by disconnecting it and using a vacuum with a hose attachment to remove dust and debris. For thorough cleaning, use a flexible brush designed for dryer vent cleaning.
Replace damaged or crushed hoses immediately. Universal exhaust hoses are available for $20-40 and fit most portable AC models. Measure the diameter and length before purchasing.
Window Kit Maintenance:
The window kit seals the opening around the exhaust hose. Inspect the seals and foam weatherstripping monthly for gaps or deterioration. Replace worn weatherstripping to prevent hot air from entering and cool air from escaping.
Clean the window panel regularly with a damp cloth to remove dust and debris. Ensure the panel fits snugly in the window opening—gaps around the edges compromise efficiency.
Exterior Cleaning and Care
Regular exterior cleaning not only keeps your portable AC looking good but also prevents dust from entering the unit through vents and openings. Wipe down the exterior casing weekly with a soft, damp cloth.
For stubborn dirt or stains, use a mild dish soap solution. Avoid abrasive cleaners, scouring pads, or solvents, which can damage the plastic finish. Never spray cleaning solutions directly onto the unit—apply to a cloth first.
Clean the air intake and exhaust vents monthly using a vacuum with a brush attachment. Dust buildup here restricts airflow and reduces efficiency. Pay special attention to the rear grille where the condenser coil is located.
Inspect the fan blades through the vents if visible. Look for dust accumulation or damage. Clean gently with a vacuum brush, being careful not to bend the blades.
Placement Tips:
Proper placement reduces maintenance needs and improves performance. Keep your portable AC at least 8-12 inches from walls and furniture for adequate airflow. Avoid placing it in direct sunlight, which forces the unit to work harder.
Elevate the unit slightly if possible, especially on carpet. This improves airflow to the bottom vents and reduces dust intake from the floor. A furniture coaster or small platform works well.
Never cover the unit while in operation, and avoid storing items on top of it. Blocked vents cause overheating and can permanently damage the compressor.
Troubleshooting Common Portable AC Issues
Even with regular maintenance, issues can arise. Here’s how to diagnose and fix common portable AC problems before calling a professional.
Unit Not Cooling Properly:
If your portable AC is running but not cooling effectively, check these items in order:
1. Clean or replace the air filter—a clogged filter is the #1 cause of reduced cooling
2. Check that the exhaust hose is connected properly and not crushed
3. Ensure the window kit is sealed tightly with no gaps
4. Clean the condenser coil at the back of the unit
5. Verify the room size matches your unit’s BTU capacity
6. Check that cooling mode is selected (not fan-only or dehumidify)
If these steps don’t resolve the issue, the problem may be low refrigerant or a failing compressor—both require professional service. For units over 3-4 years old, replacement is often more economical than repair.
Musty Odors:
Musty or moldy smells indicate microbial growth in the unit. Address this immediately for healthy indoor air quality.
Clean the air filter and let it dry in sunlight if possible. UV light helps kill mold spores. Clean the water tank with a vinegar or bleach solution, rinsing thoroughly.
Spray a coil cleaner into the air intake while the unit is off. This will clean the evaporator coil and kill mold. Allow it to dry completely before operating.
For ongoing odor control, place an air purifying tablet in the water tank or use a portable air purifier in the room. Some manufacturers sell specific deodorizing filters compatible with their units.
Water Leaks:
Water pooling around your portable AC indicates a problem with the condensate management system. Check these potential causes:
The water tank may be full and need emptying. Check that the drain plug is secure and the tank is properly seated in the unit.
For units with auto-evaporation, the humidity level may be too high for the system to handle. Connect a drain hose for continuous drainage or empty the tank more frequently.
Inspect the exhaust hose for proper slope. If it’s angled upward, condensation can flow back into the unit. Ensure the hose slopes downward from the unit to the window.
Check that the unit is level. Use a bubble level and adjust the feet if necessary. An unbalanced unit may not drain properly.
Unusual Noises:
Rattling, buzzing, or grinding noises indicate mechanical problems. Rattling often means loose parts or debris in the fan housing. Unplug the unit and check for visible debris through the vents.
Buzzing or humming may indicate a failing compressor or fan motor. These components typically require professional replacement. Compare the repair cost (usually $200-400) to the cost of a new unit.
Clicking sounds during normal operation are usually normal—the compressor cycling on and off. However, frequent rapid cycling may indicate a problem with the thermostat or compressor.
When to Call a Professional:
Some issues require professional HVAC service. Contact a technician if:
The unit completely stops cooling despite proper maintenance
You suspect a refrigerant leak (ice on coils, hissing sounds)
The compressor won’t start but makes clicking sounds
Electrical components show visible damage or burning smells
The unit is under warranty and requires authorized service
For portable ACs over 5 years old with major failures, replacement is usually more cost-effective than repair. Newer models also offer improved efficiency and features.
End of Season Storage Steps
Proper off-season storage prevents mold growth, protects components, and ensures your portable AC is ready for next summer. Follow these steps when cooling season ends.
Perform a thorough cleaning before storage. Clean the air filter, water tank, and coils as described in previous sections. This prevents dirt from hardening and mold from growing during storage.
Drain all water completely from the tank and internal components. Run the unit in fan-only mode for 30-60 minutes to dry any remaining moisture in the system.
Clean the exterior and allow the unit to dry completely. Any moisture left in storage creates an ideal environment for mold and corrosion.
Disconnect and clean the exhaust hose. Store it separately to prevent crushing. Clean the window kit and store all components together.
Remove the batteries from the remote control to prevent corrosion. Store the remote with the unit in a labeled bag or container.
Choose a storage location that’s dry, temperature-controlled, and protected from pests. Avoid basements with high humidity, garages that freeze in winter, or attics with extreme temperature fluctuations.
Cover the unit with a breathable cloth or specially-made AC cover. Plastic covers trap moisture and can cause mold. A cotton sheet or canvas cover allows airflow while protecting from dust.
Inspect the unit monthly during long-term storage. Check for signs of pests, moisture, or mold development. Address any issues immediately.
Before using the unit again next season, perform a full inspection. Clean the filter even if it was cleaned before storage—dust accumulates during storage. Check all connections and test the unit in a well-ventilated area before installing it in your window.
Maintenance Frequency Quick Reference
Based on usage level, here’s a quick guide to how often you should perform maintenance tasks:
Heavy Use (8+ hours daily, high humidity): Filter cleaning weekly, water tank emptying every 2-3 days, coil cleaning monthly, exterior cleaning weekly
Moderate Use (4-6 hours daily, average humidity): Filter cleaning every 2 weeks, water tank emptying weekly, coil cleaning every 2-3 months, exterior cleaning every 2 weeks
Light Use (1-3 hours daily, low humidity): Filter cleaning monthly, water tank emptying when full, coil cleaning annually, exterior cleaning monthly
Seasonal Maintenance (all usage levels): Deep clean before storage, thorough inspection before first use, annual professional checkup for units 3+ years old
FAQ
What maintenance does a portable AC need?
Portable ACs need regular air filter cleaning every 2-4 weeks, water tank emptying and cleaning monthly, coil cleaning every 3-6 months, exhaust hose inspection for kinks or damage, exterior wiping to prevent dust buildup, and thorough cleaning before seasonal storage. These tasks maintain cooling efficiency, prevent mold growth, and extend unit lifespan from 2-3 years to 5-8 years.
What is the 3 minute rule for air conditioners?
The 3-minute rule states that you should wait 3 minutes after turning off your air conditioner before restarting it. This allows the refrigerant pressures to equalize and the compressor to properly depressurize. Restarting immediately can cause compressor damage from high pressure buildup. The rule applies to all AC types, including portable units. If you need to restart quickly, wait the full 3 minutes to protect your compressor and avoid costly repairs.
Do portable air conditioners need to be serviced?
Portable ACs require regular DIY maintenance but generally don’t need professional annual servicing like central AC systems. However, professional service is recommended if your unit shows signs of refrigerant leaks (ice on coils, hissing sounds), compressor failure (unit runs but doesn’t cool), or electrical issues. For units 3+ years old, a professional tune-up costing $100-150 can extend lifespan and maintain efficiency. Compare this to replacement costs of $300-800 when deciding whether to service or replace.
What can I use to clean portable AC coils?
Use commercial no-rinse coil cleaners from brands like Nu-Calgon, AC Safe, or Frost King for best results. For DIY cleaning, mix equal parts white vinegar and water in a spray bottle—the mild acid dissolves mineral deposits and light grime. A mild dish soap solution works for light cleaning. Avoid bleach, ammonia, or harsh chemicals that can damage aluminum coils. Use a soft brush or vacuum with brush attachment—never abrasive scrubbers or wire brushes that bend the delicate coil fins. Always unplug the unit before cleaning and allow coils to dry completely before operation.
How often should I clean my portable AC filter?
Clean your portable AC filter every 2-4 weeks during regular use. In high-dust environments, homes with pets, or heavy daily use (8+ hours), clean weekly. For light use (1-3 hours daily), monthly cleaning may suffice. A dirty filter reduces airflow by up to 30% and forces the compressor to work harder, increasing energy consumption. Most portable ACs use washable mesh or pleated filters that rinse clean with lukewarm water and mild dish soap. Allow filters to air dry completely before reinstalling—never operate your unit with a wet filter. Replace damaged filters (tears, holes, permanent deformation) immediately.
Why does my portable AC smell musty?
Musty odors indicate mold or mildew growth in your portable AC, typically in the air filter, water tank, or on the evaporator coils. The moist, dark environment inside the unit creates ideal conditions for microbial growth. To eliminate odors, clean the filter with a vinegar solution, clean the water tank with a bleach solution (1 tablespoon per gallon), and spray coil cleaner into the air intake. For prevention, empty and clean the water tank monthly, ensure proper drainage, and consider adding an algaecide tablet. Running the unit in fan-only mode for 30 minutes after cooling helps dry internal components and prevents moisture buildup.
Can I use vinegar to clean my portable AC?
Yes, white vinegar is an excellent, safe cleaner for portable ACs. Mix equal parts vinegar and water for cleaning the air filter, water tank, and exterior surfaces. The mild acidity dissolves mineral deposits, light grime, and helps kill mold spores. For stubborn odors, use undiluted vinegar in the water tank and let it sit for 30 minutes before rinsing. Vinegar is safe for aluminum coils, plastic components, and rubber seals—unlike harsh chemicals that can damage these materials. However, avoid using vinegar on electronic components or control panels. Always rinse thoroughly with clean water after cleaning with vinegar and allow parts to dry completely before reinstalling.
How do I prevent mold in my portable AC?
Prevent mold by keeping your portable AC clean and dry. Empty and clean the water tank monthly with a vinegar or mild bleach solution. Clean air filters every 2-4 weeks. Run the unit in fan-only mode for 30 minutes after cooling to dry internal components. Ensure the exhaust hose slopes downward to prevent water from backing up. For ongoing prevention, add algaecide tablets to the water tank (check manufacturer compatibility). Keep the unit in a well-ventilated area and avoid placing it in humid locations like damp basements. At season’s end, clean thoroughly and store in a dry location with a breathable cover. Regular maintenance not only prevents mold but also maintains efficiency and extends unit lifespan.
Final Thoughts
Following this Portable AC Maintenance Guide will keep your unit running efficiently for years to come. The key is consistency—regular filter cleaning, proper water tank maintenance, and seasonal deep cleaning prevent most common issues.
I’ve maintained dozens of portable AC units over the years, and the difference between neglected and well-maintained units is dramatic. A unit that receives regular maintenance can provide reliable cooling for 5-8 years, while neglected units often fail within 2-3 seasons.
Set calendar reminders for filter cleaning and water tank maintenance. Keep basic cleaning supplies (vinegar, mild dish soap, coil cleaner) on hand. Address problems promptly when you notice reduced cooling or unusual sounds.
For specific questions about your model, consult the manufacturer’s manual. Each portable AC has unique features and maintenance requirements. When in doubt about a repair, compare the cost to replacement—often a new, more efficient unit is the better investment.
Your portable AC is a significant investment in home comfort. With just 30-60 minutes of monthly maintenance, you’ll enjoy reliable cooling, lower energy bills, and fresh, healthy air all summer long.



Leave a Comment