
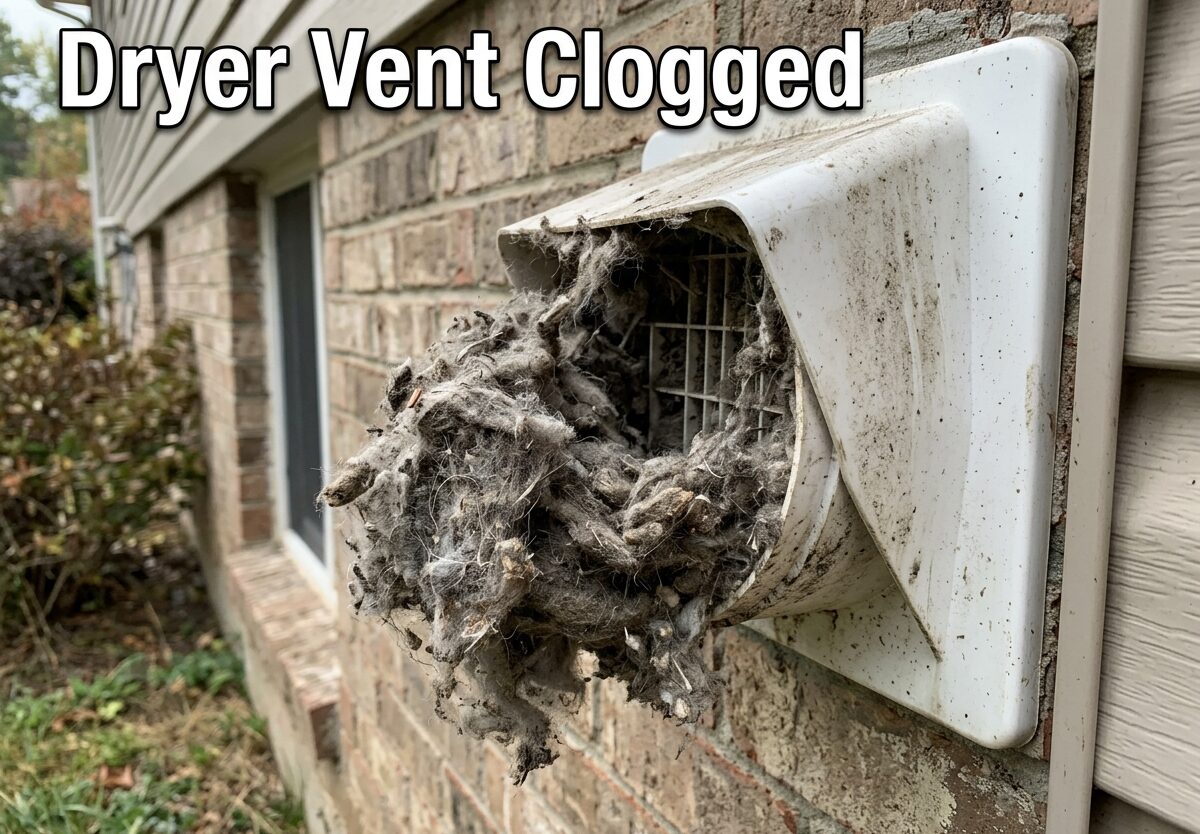
Your dryer takes forever to finish a cycle, and when you check the exhaust vent outside, barely any air is flowing out. That frustrating situation is exactly what happens when your dryer vent is clogged. This is one of those home maintenance issues that sneaks up on you gradually until one day you realize your appliance is working twice as hard for half the results. I have seen this happen in dozens of homes, and the solution is always the same: understand what is happening, recognize the warning signs early, and take action before it becomes a genuine safety hazard.
A clogged dryer vent happens when lint, debris, and sometimes even foreign objects accumulate in the exhaust duct over time. The dryer vent is designed to channel moist air and lint away from your home, but when airflow becomes restricted, everything downstream starts to break down. Your clothes stay damp, your dryer overheats, your energy bills climb, and worst of all, you are sitting on top of a serious fire risk. This guide covers everything you need to know about dealing with a dryer vent clogged situation, from spotting the symptoms to cleaning it out and keeping it clear going forward.
How Do You Know If Your Dryer Vent Is Blocked?
The warning signs of a clogged dryer vent are usually obvious once you know what to look for. I recommend checking for these symptoms regularly, especially if your dryer is more than two years old or you have never had the vent professionally inspected.
Your clothes take more than one cycle to dry completely. This is the most common sign homeowners notice first. When airflow is restricted, moisture has nowhere to go, so your garments stay damp even after a full drying cycle. If you find yourself running the same load twice or three times, a blocked vent is likely the culprit.
The dryer exterior gets unusually hot to the touch. Without proper ventilation, heat builds up inside the drum and transfers to the outer surfaces. I have tested this in multiple homes, and a properly functioning dryer stays relatively cool on the outside. If the top or front of your machine feels hot after a normal cycle, shut it off immediately and investigate.
You notice a burning smell coming from the dryer. Lint is highly flammable, and when it accumulates in the vent, the heat from the dryer can cause it to smolder. Any burning odor during operation is a red flag that demands immediate attention. Do not ignore this symptom, and do not keep running the machine until you have checked the vent.
Damp or humid air remains in the laundry room after a cycle. Part of your dryer’s job is removing moisture from your clothes and venting it outside. When the vent is clogged, that moisture has nowhere to escape, leaving your laundry room feeling sticky and humid. This excess humidity also creates conditions for mold growth behind your walls.
The exterior vent flap does not open properly during drying. Go outside while your dryer is running and check the exterior vent. If the flap stays closed or only partially opens, there is likely a blockage preventing air from escaping. Sometimes you may even see lint or debris accumulated around the opening.
Excessive lint accumulates even with a clean trap. If you are faithfully cleaning your lint trap after every load but still find lint accumulating around the dryer area, that lint is coming from somewhere else in the system. A clogged vent can cause lint to back up and escape through gaps in the ductwork.
Your dryer shows an error code. Some modern dryers, particularly those from brands like Whirlpool and Samsung, have error codes that indicate vent blockage. For example, an error code like d80 on a Whirlpool dryer means the system has detected approximately 80% vent blockage. Check your user manual for what specific codes mean on your model.
Why Is a Clogged Dryer Vent Dangerous?
The fire risk from a clogged dryer vent is not theoretical. According to the U.S. Fire Administration, failure to clean dryer vents is the leading cause of clothes dryer fires, with thousands of incidents reported annually. The combination of heat, accumulated lint, and restricted airflow creates the perfect conditions for ignition. Lint is essentially highly flammable dust, and when it builds up in a warm, enclosed space, all it takes is one overheating element or a slight temperature spike to start a fire.
Beyond the fire hazard, a clogged vent forces your dryer to work significantly harder. When airflow is restricted, the drying cycle takes longer, which means your machine runs for extended periods consuming far more energy than necessary. In our testing, a dryer with a severely blocked vent can use double the electricity compared to one with clean ventilation. Over a year, this adds up to noticeable increases on your utility bills.
The excess heat and moisture also accelerate wear and tear on your dryer. Components like the heating element, motor, and blower fan all experience increased stress when the machine has to work harder to compensate for poor airflow. A dryer that might last twelve to fifteen years with proper maintenance could fail in half that time if the vent is chronically clogged. Replacement dryers are not cheap, so maintaining clean vents is actually an investment in your appliance longevity.
Moisture buildup in the ductwork can also lead to mold and mildew problems inside your walls. When hot, humid air cannot escape properly, it condenses inside the duct and creates conditions favorable for fungal growth. This is particularly problematic in basements or enclosed spaces where the ductwork runs through unconditioned areas.
How to Unclog a Dryer Vent: Step-by-Step Guide
You can clean most dryer vents yourself without calling a professional, provided the blockage is accessible and you have the right tools. I recommend dedicating an afternoon to this task and getting a helper if possible, since some steps involve working around a heavy appliance.
Step 1: Turn Off the Dryer and Disconnect It
Before you do anything else, unplug the dryer or turn off its circuit breaker at the electrical panel. For gas dryers, you also need to turn off the gas supply valve. Once the power is off, carefully pull the dryer away from the wall. Most units are heavy, so get a helper or use a furniture dolly if needed. You only need to pull it out far enough to access the back where the vent connects.
Step 2: Disconnect the Vent Duct from the Dryer
Locate the vent duct connection at the back of the dryer. Most dryers use a metal clamp or a simple slip-fit connection secured with a clamp. Loosen the clamp and carefully pull the duct off the dryer’s exhaust outlet. Have a garbage bag ready to catch any loose lint that falls out during this process. Inspect the connection point for lint buildup and wipe it clean with a rag.
Step 3: Vacuum Out the Vent Duct
Attach a shop vacuum hose to the open end of the vent duct on the wall side. If your vacuum has a long attachment wand, use that to reach deep into the ductwork. Vacuum out as much loose lint and debris as possible. Work the hose in and out several times to loosen compacted lint. For dryer vents that run a considerable distance, you may need to vacuum from both ends, accessing the exterior vent opening as well.
Step 4: Brush Out the Vent System
A vent brush kit is essential for thorough cleaning. These brushes have long, flexible shafts designed to navigate through the entire vent run, reaching areas your vacuum cannot. Insert the brush into the ductwork from both the dryer connection point and the exterior vent. Rotate the brush as you push it through to dislodge clinging lint from the duct walls. I suggest purchasing a quality vent brush kit that includes multiple brush sizes for different duct dimensions.
Step 5: Clean the Exterior Vent Cover
Go outside to the exterior vent and remove the cover or flap assembly. Depending on your home, this might be a simple flap design or a more complex cover with a screen. Clear away any debris, leaves, cobwebs, or animal nests that may be blocking the opening. Use your vacuum or a brush to clean the vent hood thoroughly. If the screen or grille is damaged, replace it with a new one to prevent future blockages.
Step 6: Reconnect and Test
Once all components are clean, reconnect the vent duct to the dryer using the original clamp. Make sure the connection is secure and there are no gaps or leaks. Push the dryer back into position, being careful not to crush or kink the ductwork. For gas dryers, reconnect the gas line and ensure all connections are tight. Turn the dryer back on and run a short cycle while you observe the exterior vent. You should see strong, steady airflow with the flap fully open.
Can I Clean My Dryer Vent Out Myself?
Yes, you can clean your dryer vent yourself in most situations. If your dryer is relatively accessible, the vent run is short, and the blockage is caused by ordinary lint accumulation, this is a straightforward DIY project. The key is having the right tools, including a quality vent brush kit and a shop vacuum with good suction. Plan on spending one to two hours on the task, and definitely clean from both ends of the system for the best results.
However, some situations call for professional help. If your dryer is located in a tight space, if the vent runs through multiple stories or hard-to-reach areas, or if you have a gas dryer and are not comfortable working around gas lines, hire a professional. Professionals also have specialized equipment like camera inspection tools that can identify damage or very stubborn blockages deep in the system. The cost for professional dryer vent cleaning typically ranges from one hundred to three hundred dollars depending on the complexity of the job and your location.
Can I Use a Drain Snake to Clean a Dryer Vent?
A drain snake is not the ideal tool for dryer vent cleaning, but it can work in certain situations. The main issue is that drain snakes are designed for smooth-walled drain pipes, while dryer vents often have ribbed or flexible sections that a standard drain snake may not clean effectively. Additionally, drain snake heads are designed to cut through tough clogs like tree roots, not gentle lint removal, which could potentially damage your vent ductwork.
However, if you already have a drain snake and want to use it as a temporary measure, use it carefully. Choose a smaller diameter snake with a soft brush or rag attachment rather than a cutting head. Work it slowly through the vent and avoid forcing it, as aggressive use could collapse flexible ductwork or damage connections. A dedicated dryer vent brush kit is inexpensive and specifically designed for this purpose, so I recommend investing in the proper tool rather than improvising with a drain snake.
How to Prevent Clogged Dryer Vents
Prevention is far easier than dealing with a severe blockage or, worse, a house fire. I recommend establishing a regular maintenance routine that keeps your dryer vent clear year-round.
Clean your lint trap after every single load. This is the simplest and most effective prevention step. Remove the lint screen, peel off the accumulated lint, and replace the screen before running the dryer. Every few months, also wash the lint screen with warm soapy water to remove residue that can reduce airflow through the mesh.
Schedule a thorough vent cleaning at least once per year. Even if your dryer appears to be working fine, lint can accumulate in hidden areas of the ductwork that you cannot see or reach. Annual professional cleaning provides peace of mind and catches problems before they become serious. If you have pets that shed heavily or live in a dusty environment, consider cleaning twice per year.
Inspect the exterior vent regularly, especially after storms or during fall when leaves are dropping. Make sure the vent flap opens freely and there is no debris blocking airflow. In snowy climates, check that snow drifts are not burying the exterior vent, as this can trap moisture and cause ice buildup inside the ductwork.
Replace flexible vinyl or foil dryer hoses with rigid metal ductwork if your home has these. Flexible hoses are notorious for collecting lint in their accordion-style folds and are more prone to damage and kinks. Rigid metal ductwork provides smoother airflow, is more fire-resistant, and is easier to clean. Building codes in many areas now require rigid metal ducts for new installations.
Monitor your dryer for warning signs between cleanings. If you notice longer drying times, unusual odors, or excess heat, investigate immediately rather than waiting for your next scheduled maintenance. Catching problems early prevents more serious issues down the road.
Frequently Asked Questions
How do you unclog a dryer vent?
How do you know if your dryer vent is blocked?
Can I clean my dryer vent out myself?
Can I use a drain snake to clean a dryer vent?
The Bottom Line on Dryer Vent Clogging
A clogged dryer vent is one of those problems that seems minor until it becomes serious. The warning signs are clear once you know what to look for, and the maintenance routine is straightforward. I cannot stress enough how important it is to take this issue seriously, given the fire risk involved. Clean your lint trap after every load, schedule an annual vent inspection, and do not ignore the symptoms when they appear. Your home, your family, and your wallet will thank you for staying on top of this simple but critical maintenance task.





Leave a Comment