
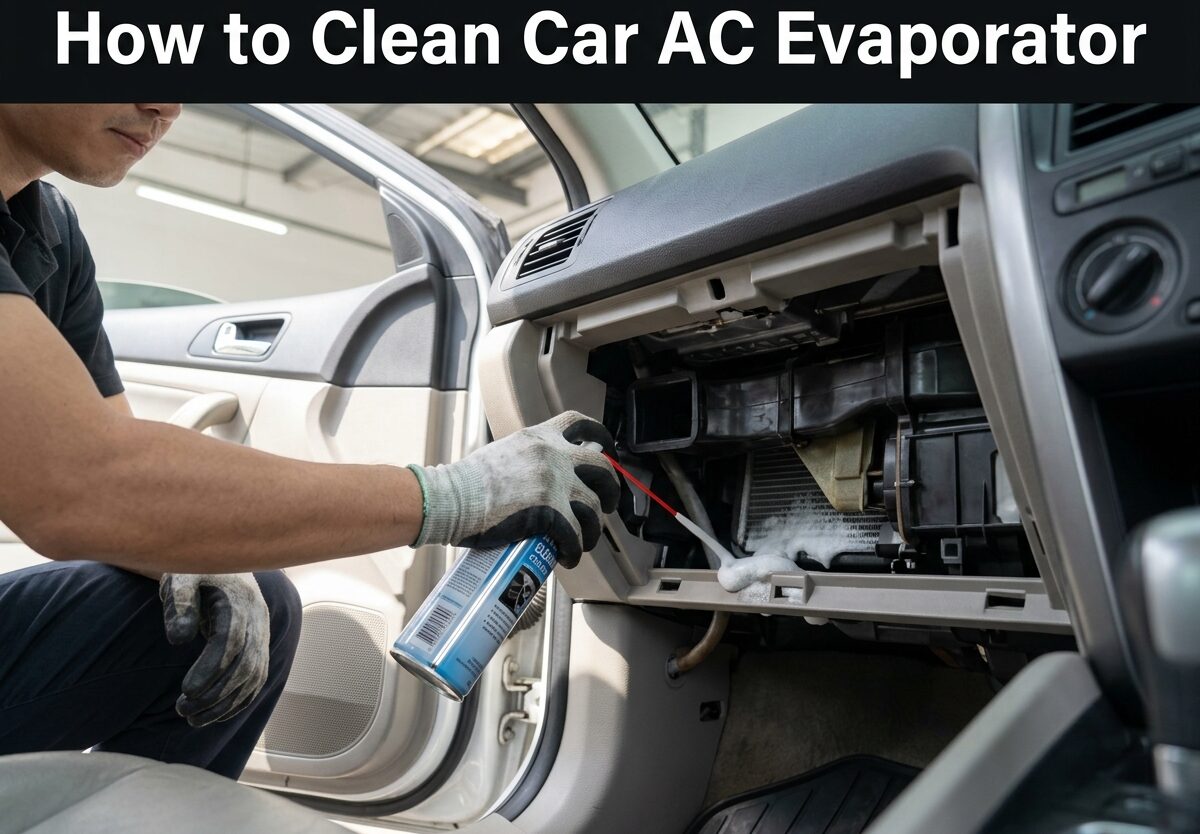
Learning how to clean car AC evaporator coils can save you hundreds of dollars in professional service fees while restoring your vehicle’s air conditioning to peak performance. When I first noticed that musty smell coming from my vents, I had no idea that a dirty evaporator was the culprit behind both the odor and my weak cooling.
Your car’s AC evaporator works constantly every time you run the air conditioning, absorbing heat and humidity from the cabin air. Over time, this damp environment becomes a breeding ground for mold, mildew, and bacteria buildup. The condensation that naturally forms on the evaporator coils mixes with dust and debris, creating a slimy coating that restricts airflow and affects cooling efficiency.
The good news is that you can clean your car’s AC evaporator yourself with the right tools and a bit of patience. I’ve cleaned evaporators on multiple vehicles over the years, and while some models are easier than others, the process follows the same basic principles. In this guide, I’ll walk you through everything you need to know to tackle this job safely and effectively.
What Is a Car AC Evaporator
A car AC evaporator is a small radiator-like component located inside your vehicle’s HVAC (heating, ventilation, and air conditioning) housing, typically behind the dashboard. It’s one of the most critical parts of your air conditioning system, responsible for absorbing heat from the air inside your cabin.
Here’s how it works: refrigerant flows through the evaporator coil as a cold, low-pressure liquid. When the blower motor pushes warm air from your cabin across these cold coils, two things happen simultaneously. First, the air loses its heat to the refrigerant, cooling down significantly. Second, moisture in the air condenses on the cold coils, removing humidity from your vehicle.
The evaporator is usually located deep inside the dashboard, making it somewhat challenging to access. On most vehicles, you’ll find it housed in the same plastic box that contains your heater core and blower motor. This assembly is typically situated behind the glove box on the passenger side of the vehicle, though some cars and trucks have different configurations.
The constant presence of moisture on the evaporator coils makes them vulnerable to biological growth. When dust, pollen, and other airborne particles get trapped in the condensation, they create a perfect food source for mold and bacteria. This is why regular cleaning is essential for maintaining both performance and air quality.
Warning Signs Your Evaporator Needs Cleaning
Recognizing when your evaporator needs attention can save you from more expensive repairs down the road. After working on dozens of vehicles, I’ve learned that there are several telltale signs that indicate it’s time to clean your AC evaporator.
The most obvious symptom is a musty, moldy smell when you first turn on your air conditioning. This odor is caused by microbial growth on the evaporator coils and is often strongest when the AC hasn’t been used for a while. If you notice that distinctive “dirty sock” smell, especially on hot days, your evaporator almost certainly needs cleaning.
Another common warning sign is reduced cooling performance. If your AC isn’t blowing as cold as it used to, or if the airflow feels weaker than normal, a dirty evaporator could be to blame. The buildup on the coils acts as insulation, preventing them from absorbing heat efficiently. I’ve seen cases where cleaning the evaporator restored cooling performance by over 30%.
You might also notice that your AC takes longer to cool down the cabin, or that it struggles to maintain a comfortable temperature on hot days. In severe cases, you may even see water leaking onto your passenger-side floorboard. This happens when the debris buildup blocks the evaporator’s drain tube, causing condensation to back up and overflow.
Unusual noises when the AC is running can also indicate problems. If you hear gurgling, hissing, or whistling sounds, it could mean that the evaporator is partially blocked or that debris is interfering with proper airflow.
Health Risks of a Dirty Evaporator
Beyond reduced performance and unpleasant odors, a dirty AC evaporator can pose genuine health risks to you and your passengers. The dark, damp environment of a neglected evaporator creates an ideal breeding ground for harmful microorganisms that get circulated throughout your vehicle’s cabin.
Mold spores growing on the evaporator coils can trigger allergic reactions and asthma attacks in sensitive individuals. I’ve spoken with several people who suffered from mysterious respiratory issues while driving, only to find that a contaminated AC system was the culprit. The constant recirculation of these spores in the confined space of a car cabin creates concentrated exposure levels.
Bacteria buildup is another serious concern. Studies have shown that car AC systems can harbor significant amounts of bacteria, including potentially harmful strains. When you turn on your AC, these microorganisms become airborne and can be inhaled by everyone in the vehicle. This is particularly concerning for anyone with compromised immune systems or chronic respiratory conditions.
The musty odor itself is more than just unpleasant. That smell is caused by microbial volatile organic compounds (MVOCs), which are gas byproducts of mold and bacterial growth. Breathing in these compounds can cause headaches, fatigue, and irritation to the eyes, nose, and throat. Long-term exposure to MVOCs may have more serious health effects that researchers are still studying.
For anyone who spends significant time driving, especially with passengers, maintaining a clean AC evaporator is an important part of overall vehicle maintenance. It’s not just about comfort—it’s about ensuring the air you breathe while driving is as clean and healthy as possible.
Tools and Supplies Needed
Before starting this project, you’ll want to gather all the necessary tools and supplies. Having everything ready beforehand will make the process much smoother and help you avoid frustrating interruptions. Based on my experience cleaning evaporators on various vehicles, here’s what you’ll typically need.
For cleaning supplies, you’ll need an evaporator cleaner specifically designed for automotive AC systems. There are several types available, including foam cleaners that expand to reach all surfaces, liquid sprays that coat the coils, and disinfectant treatments that kill microbial growth. I recommend having both a foam cleaner for deep cleaning and a disinfectant spray for final treatment.
You’ll also need protective gear, including safety glasses, gloves, and a dust mask or respirator. The cleaning chemicals and the debris you’ll be removing can be irritating to your eyes, skin, and lungs. I learned this lesson the hard way on my first evaporator cleaning job, so don’t skip this step.
For access and application, you’ll need a set of screwdrivers (both Phillips and flathead), socket wrenches, and possibly trim removal tools. Many vehicles have plastic clips and fasteners holding the dashboard components together, and having the right tools prevents damage during disassembly.
A flashlight or headlamp is essential for seeing into the dark spaces behind your dashboard. I prefer a headlamp because it keeps both hands free for working. You’ll also need some rags or shop towels for wiping up spills and cleaning up debris.
Optional but helpful items include a soft-bristle brush for gently agitating the evaporator fins, a vacuum cleaner with a hose attachment for removing loose debris, and a can of compressed air for blowing out hard-to-reach areas. Some people also use a turkey baster or squeeze bottle to apply cleaner in tight spaces.
Types of AC Evaporator Cleaners
Choosing the right cleaner for your car’s AC evaporator can make a significant difference in the effectiveness of your cleaning efforts. There are three main types of evaporator cleaners on the market, each with its own advantages and best-use scenarios. Understanding these differences will help you select the best product for your specific situation.
Foam cleaners are perhaps the most popular choice for DIY evaporator cleaning. Products like Kool-It and DWD2 create a thick foam that expands to coat every surface of the evaporator coils. The foam helps break down and lift away debris, then liquefies to drain out through the evaporator drain tube. In my experience, foam cleaners are excellent for reaching deep into the evaporator housing without requiring direct access to all surfaces. They’re particularly effective for vehicles where dashboard removal would be excessive.
Liquid spray cleaners offer a more straightforward application method. These typically come in aerosol cans with extension tubes that allow you to spray the cleaner directly onto the evaporator coils through access points. Liquid cleaners work by dissolving grime and killing microbial growth on contact. They’re faster-acting than foam cleaners and may be better suited for light cleaning jobs or maintenance treatments. However, they may not penetrate as deeply into tight spaces as expanding foam.
Disinfectant foggers and mists take a different approach. These products are designed to be sprayed into the air intake while the AC system is running, circulating the disinfectant throughout the entire HVAC system. They’re excellent for killing odor-causing bacteria and mold spores but don’t remove physical debris buildup. I’ve found that disinfectant foggers work best as a follow-up treatment after using a foam or liquid cleaner, or as a maintenance treatment between deeper cleanings.
Some professionals recommend combining methods—using a foam cleaner for deep cleaning, followed by a disinfectant treatment to ensure any remaining microorganisms are eliminated. This approach provides the most thorough cleaning but may be overkill for maintenance situations.
Safety Precautions Before You Start
Safety should always be your top priority when working on your vehicle, and cleaning the AC evaporator is no exception. Before you begin, there are several important precautions you need to take to protect yourself and avoid causing damage to your vehicle’s systems.
First and foremost, always disconnect the negative terminal of your battery before working on any electrical components. This prevents accidental short circuits and protects you from electrical shock. Many components around the HVAC system are electrically powered, and you don’t want to risk damaging them or causing airbag deployment on vehicles with passenger-side airbags.
Work in a well-ventilated area whenever possible. The cleaning chemicals you’ll be using can produce fumes that may be irritating or harmful if inhaled in confined spaces. If you’re working in a garage, open the doors and consider setting up a fan to circulate fresh air. I also recommend wearing a proper respirator mask rather than just a dust mask, especially when applying strong cleaning agents.
Protect your eyes and skin from contact with cleaning chemicals. These products can cause serious irritation and may contain harsh ingredients. Wear safety glasses and chemical-resistant gloves throughout the cleaning process. I once got some foam cleaner in my eye, and it was an experience I never want to repeat.
Be aware of your vehicle’s specific systems and components. Some vehicles have sensitive electronic modules or sensors located near the evaporator housing. Consult your service manual if you’re unsure about what’s behind the panels you’re removing. It’s also important to know if your vehicle has a cabin air filter and where it’s located, as this can affect access to the evaporator.
Finally, never insert tools or spray cleaners directly into the evaporator core with excessive force. The aluminum fins on the evaporator coil are delicate and easily damaged. Bent fins can permanently reduce airflow and cooling efficiency. If you need to brush the coils, use only a soft brush and gentle pressure.
How to Clean Car AC Evaporator: Step-by-Step Guide
Step 1: Locate the Evaporator Housing
The first step is to locate where your evaporator is positioned within your vehicle. On most cars, this means removing the glove box assembly to gain access to the HVAC housing. Start by emptying your glove box completely, then look for the retaining tabs or screws that hold it in place.
Many vehicles have a glove box that can be removed by squeezing the sides together to release the tabs, then lowering it down. Others may require you to remove screws from the hinges or disconnect a dampening arm. I’ve found that searching YouTube for your specific vehicle model and glove box removal can save significant time and frustration.
Once the glove box is out of the way, you should see the plastic HVAC housing. This large plastic box contains the evaporator, heater core, and blower motor. The evaporator is typically located on the passenger side of this housing, though exact positioning varies by manufacturer.
Step 2: Identify Access Points
Look for existing access points to the evaporator. Many vehicles have a small removable panel or cover designed specifically for evaporator access. This might be labeled or located near where the evaporator drain tube exits the housing. In some cases, manufacturers provide a small port specifically for applying cleaner.
If you don’t see an obvious access panel, you may need to remove additional components. Some vehicles require removal of the lower dashboard trim panel or center console components. I recommend taking photos as you disassemble anything, so you’ll know how everything goes back together later.
The goal is to find an opening that allows you to see at least part of the evaporator coil and insert your cleaning tube or spray nozzle. Even a small opening can be sufficient if you use a foam cleaner that expands to fill the space.
Step 3: Clear the Drain Tube
Before applying any cleaner, make sure the evaporator drain tube is clear. This small hose typically exits through the firewall on the passenger side and allows condensation to drain out of the HVAC housing. A clogged drain tube can cause water to back up into your vehicle and will prevent cleaning solutions from draining properly.
Locate the drain tube underneath your vehicle, usually on the passenger side near the firewall. You can often clear it simply by blowing compressed air through it or carefully using a flexible wire to break up any blockages. I’ve also had success using a wet/dry vacuum to suction out debris from the drain opening.
Test that the drain is flowing properly by pouring a small amount of water through the evaporator housing from above. You should see it drain out underneath the vehicle within a few seconds. If water backs up or doesn’t drain, continue working on clearing the blockage before proceeding.
Step 4: Apply the Evaporator Cleaner
Now it’s time to apply your chosen cleaner. If you’re using a foam cleaner, shake the can well and attach the extension tube if provided. Insert the tube as far as possible into the access point, aiming toward the center of the evaporator core. Apply the cleaner in short bursts, moving the tube around to cover different areas of the evaporator.
The foam will expand to fill the space, coating the evaporator coils and breaking down debris. You’ll likely see foam beginning to drain out through the drain tube underneath the vehicle—this is normal and shows that the cleaner is reaching all surfaces.
For liquid cleaners, spray the product generously over visible portions of the evaporator, working in sections to ensure complete coverage. Allow the cleaner to sit for the recommended time specified on the product instructions, typically 10-15 minutes. This gives the chemicals time to break down grime and kill microbial growth.
Step 5: Optional Brushing
If you have good access to the evaporator coils, you can gently brush them to help remove stubborn buildup. Use only a soft-bristle brush specifically designed for coil cleaning, and work in the direction of the fins rather than against them. Be extremely gentle—the aluminum fins bend easily and won’t straighten perfectly once damaged.
I’ve found that brushing is most effective for removing loose debris after the cleaner has had time to work. Focus on areas you can see clearly, and don’t try to force the brush into spaces where you can’t see what you’re doing. Some evaporators are more accessible than others, and you may need to skip this step depending on your vehicle.
Step 6: Rinse if Applicable
Check your cleaner’s instructions to see if rinsing is recommended. Some foam cleaners are designed to liquefy and drain without rinsing, while others may recommend flushing with water. If rinsing is specified, use clean water applied sparingly through the same access point.
A spray bottle filled with distilled water works well for this purpose. Spray enough water to flush away the loosened debris and cleaning solution, but avoid flooding the area. Watch for the water draining out underneath the vehicle, and continue until the drain water runs clear.
Be cautious not to use excessive water, as this can damage electronic components or cause other issues. Less is more when it comes to rinsing inside your dashboard.
Step 7: Allow to Dry Thoroughly
After cleaning, the evaporator needs time to dry completely before you reassemble everything and use the AC system. I recommend leaving the access panels off and allowing the area to air dry for at least several hours, ideally overnight if possible.
You can speed up the drying process by running the blower motor without the AC engaged. This circulates air through the system and helps evaporate any remaining moisture. Some people also use a fan to blow air into the access opening, though be careful not to blow debris into the system.
Proper drying is crucial because any remaining moisture will quickly lead to renewed microbial growth, undoing all your hard work. This is especially important in humid climates where evaporation takes longer.
Step 8: Apply Disinfectant Treatment
Once the evaporator is dry, applying a disinfectant treatment provides an extra layer of protection against future odor problems. Many professional detailers use this step to ensure long-lasting freshness. Products like Lysol or specialized AC disinfectants can be applied through the air intake while the system is running.
To do this, start your vehicle and turn on the AC to maximum with fresh air intake (not recirculation). Spray the disinfectant into the exterior air intake at the base of the windshield, where the cabin air filter is usually located. The system will draw the disinfectant through and circulate it throughout the HVAC housing.
Let the system run for 5-10 minutes with the windows open to allow proper ventilation. This treatment helps eliminate any remaining microbial spores and leaves behind a fresh scent that will last for weeks or months.
Step 9: Reassemble Components
Once everything is completely dry and treated, you can begin reassembling the components you removed. This is where those photos you took earlier come in handy. Replace any covers or access panels in reverse order of removal, making sure all fasteners are secure but not overtightened.
When reinstalling the glove box, be careful with the dampening arm if your vehicle has one. These can be tricky to reattach, and forcing them can break the plastic. Reconnect your battery last, after all other components are back in place.
Alternative Cleaning Methods
Sometimes accessing the evaporator directly isn’t practical, or you may want to try less invasive methods first. There are several alternative approaches that can be effective, depending on your specific situation and vehicle design.
The drain tube method involves spraying cleaner up through the evaporator drain hose from underneath the vehicle. This can work well if you have good access to the drain and use a foam cleaner that expands upward. The challenge is that the cleaner may not reach all areas of the evaporator, and results can be inconsistent. In my experience, this method is hit-or-miss but worth trying before disassembling your dashboard.
The air intake spray method is another less invasive option. By spraying disinfectant or cleaner into the exterior air intake while the AC is running, you can treat portions of the evaporator without removing anything. This approach is primarily effective for odor control rather than deep cleaning, but it’s certainly the easiest method to attempt.
Some DIY enthusiasts drill a small access hole in the HVAC housing specifically for evaporator cleaning. While effective, I hesitate to recommend this approach because it creates a permanent modification that could affect the system’s operation or warranty. If you choose this route, be extremely careful about placement and seal the hole properly afterward.
Post-Cleaning Verification and Maintenance
After completing the cleaning process, it’s important to verify that your efforts were successful and take steps to prevent future problems. Start by running your AC system and checking for any remaining musty odors. A properly cleaned evaporator should produce clean, fresh-smelling air with no hint of mold or mildew.
Test the cooling performance by letting the AC run for 10-15 minutes and comparing the output temperature to what you remember from before the cleaning. You should notice stronger airflow and colder air, especially if your evaporator was significantly dirty.
This is also an excellent time to replace your cabin air filter if your vehicle is equipped with one. A dirty filter can quickly re-contaminate your freshly cleaned evaporator and restrict airflow. Most cabin filters are easily accessible from behind the glove box and should be replaced annually or more frequently in dusty conditions.
To prevent future buildup, consider running your AC on fresh air intake rather than recirculation when possible. Recirculation mode can create more humidity inside the system, promoting microbial growth. You should also try to run the AC for at least a few minutes every week, even in cool weather, to keep the system circulating and prevent stagnation.
Some experts recommend turning off the AC but leaving the blower running for the last few minutes of your drive. This helps dry the evaporator before you park, reducing the moisture available for mold growth. Small habits like this can significantly extend the time between professional cleanings.
Troubleshooting Common Problems
Even after a thorough cleaning, you may encounter some issues. If you still notice a musty odor, the problem may be elsewhere in the system. The cabin air filter, floor mats, or even moisture in the headliner can harbor mold and create smells. In some cases, you may need to repeat the cleaning process or try a different cleaner.
If your AC still isn’t cooling properly after cleaning the evaporator, the issue may be with another component like the compressor, condenser, or refrigerant level. An evaporator cleaning addresses only one potential cause of poor cooling. I recommend having a professional perform a pressure test to identify any other issues.
Water leaks onto the passenger floor after cleaning usually indicate that the drain tube is still clogged or that the cleaning created additional blockage. Try clearing the drain again using compressed air or a wet/dry vacuum. In rare cases, the evaporator housing itself may be cracked or damaged, allowing water to escape.
Knowing when to call a professional is important. If you’re not comfortable working around dashboard components, or if your vehicle requires extensive disassembly to access the evaporator, professional service may be worth the cost. Additionally, if cleaning doesn’t resolve your issues, a technician can diagnose whether you have a more serious problem requiring evaporator replacement.
Frequently Asked Questions
Can a car AC evaporator be cleaned?
Yes, a car AC evaporator can be cleaned using specialized cleaners designed for automotive AC systems. Foam cleaners that expand through the evaporator housing are most effective for DIY cleaning without dashboard removal. Professional service may be needed for vehicles with difficult access.
How to tell if a car AC evaporator is clogged?
Signs of a clogged AC evaporator include musty odors when the AC turns on, reduced cooling performance, weak airflow from vents, and water leaking onto the passenger floorboard. The AC may also take longer to cool down the cabin or struggle on hot days.
How to flush an AC evaporator in a car?
Flush an AC evaporator by applying foam cleaner through an access point behind the glove box, allowing it to expand and coat all surfaces, then letting it drain through the evaporator drain tube. Some cleaners require rinsing with water afterward. Always ensure the drain tube is clear before flushing.
How do I fix smelly AC in my car?
Fix smelly car AC by cleaning the evaporator with foam cleaner to remove mold and bacteria, replacing the cabin air filter, and applying a disinfectant treatment through the air intake. Running the fan without AC for the last few minutes of driving helps prevent future odors by drying the evaporator.
How often should I clean my car AC evaporator?
Clean your car AC evaporator every 1-2 years as preventive maintenance, or sooner if you notice musty odors or reduced cooling performance. Vehicles driven in dusty or humid climates may need more frequent cleaning. Replace the cabin air filter annually for best results.
Conclusion
Learning how to clean car AC evaporator coils is a valuable skill that can save you money while improving your driving comfort and health. A dirty evaporator affects more than just cooling performance—it can create health issues through mold spores and bacteria circulating in your cabin air.
The cleaning process may seem intimidating at first, but most DIYers can successfully tackle this job with patience and the right supplies. Start with the least invasive methods and work your way up to more extensive disassembly only if needed. Remember that proper drying and preventive maintenance are just as important as the cleaning itself.
If you’re unsure about any aspect of this process, or if your vehicle requires extensive dashboard removal, don’t hesitate to consult a professional. The cost of professional service is often reasonable compared to the time and potential frustration of complex dashboard disassembly.
By following this guide and maintaining your AC system regularly, you can enjoy fresh, cold air from your car’s air conditioning for years to come. There’s nothing quite like the satisfaction of fixing an issue yourself and knowing the job was done right.




Leave a Comment