
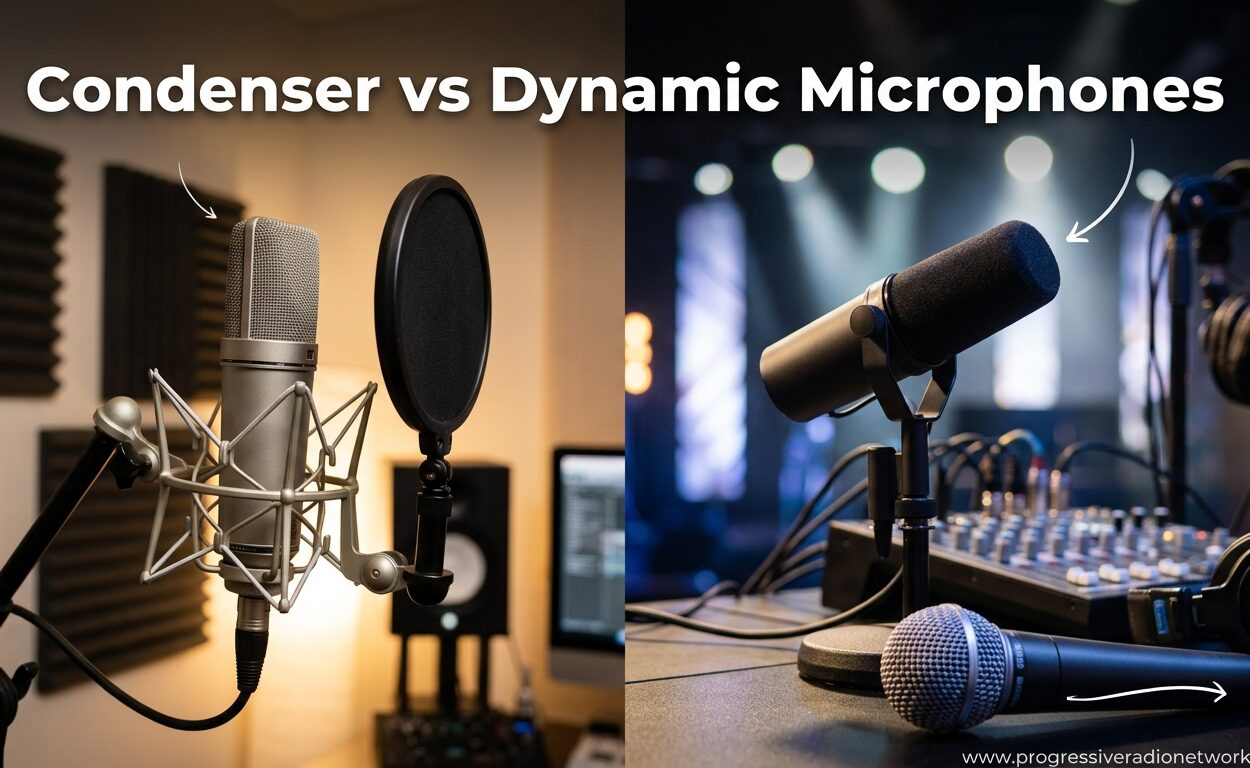
When I first started recording in my untreated bedroom, I made the classic mistake. I bought a large diaphragm condenser microphone because that is what all the pros use in studios. Within minutes of my first recording session, I realized the problem. My condenser was picking up my computer fan, the neighbor’s dog, and every echo bouncing off my bare walls. That experience taught me a valuable lesson about microphone reviews and room acoustics. If you are recording in an untreated room, your microphone choice matters more than almost any other gear decision you will make.
The debate between condenser vs dynamic microphones for untreated rooms is not just about sound quality. It is about managing the acoustic limitations of your space while still capturing professional-sounding audio. Dynamic microphones generally perform better in untreated environments because of their lower sensitivity and better off-axis rejection. Condenser microphones, while offering superior detail and transient response, tend to expose every flaw in your room’s acoustics.
In this guide, I will break down exactly how each microphone technology works, why dynamic mics typically win in untreated spaces, and what you can do to get great results regardless of which type you choose. We will cover the technical differences, real-world use cases, and practical tips for recording in less-than-ideal acoustic environments.
Condenser vs Dynamic Microphones at a Glance
Before diving deep into the technical details, here is a quick comparison of how these two microphone types differ in key areas that matter for untreated rooms:
| Feature | Dynamic Microphones | Condenser Microphones |
|---|---|---|
| Sensitivity | Lower (-50 to -70 dB) | Higher (-30 to -40 dB) |
| Power Required | None (passive) | Phantom power 48V or battery |
| Untreated Room Performance | Excellent | Challenging without treatment |
| Noise Rejection | Better off-axis rejection | Picks up more ambient sound |
| Durability | Very rugged | More fragile |
| Frequency Response | Warm, focused | Extended, detailed |
| Max SPL Handling | Very high (140+ dB) | Moderate (120-140 dB) |
| Self-Noise | Negligible | Variable (5-20 dB-A) |
| Typical Use | Live sound, loud sources, untreated rooms | Studio vocals, acoustic instruments, treated spaces |
If you want the quick answer for untreated rooms: dynamic microphones are generally the better choice. Their lower sensitivity means they pick up less of your room’s problematic reflections and ambient noise. However, condensers can still work with proper technique and some basic treatment strategies, which we will cover later in this guide.
How Dynamic Microphones Work
Dynamic microphones operate on the principle of electromagnetic induction. This fundamental design difference from condenser mics creates their unique characteristics that make them so suitable for challenging acoustic environments. Understanding how they work helps explain why they are the go-to choice for untreated rooms.
The Moving Coil Mechanism
Inside every dynamic microphone, you will find a diaphragm attached to a coil of wire. This coil sits within the field of a permanent magnet. When sound waves hit the diaphragm, it vibrates, causing the attached coil to move back and forth within the magnetic field. This movement generates a small electrical current through electromagnetic induction, no external power required.
The mass of the moving coil assembly limits how quickly the diaphragm can respond to sound. This mechanical inertia is actually beneficial for untreated rooms. The relatively heavy moving parts mean dynamic mics respond less to subtle acoustic details, which includes the unwanted room reflections and ambient noise you are trying to avoid.
Because the signal is generated directly by the physical movement of the coil, dynamic microphones require no phantom power. You can plug them into any XLR input and they work immediately. This passive design also contributes to their reliability and durability, making them perfect for home studios where gear might get moved around frequently.
Core Characteristics of Dynamic Mics
The electromagnetic design of dynamic microphones gives them several distinctive characteristics that directly impact their performance in untreated rooms. Their sensitivity typically ranges from -50 to -70 dBV, meaning they need significantly more sound pressure to produce the same output level as a condenser.
This lower sensitivity is actually an advantage in noisy or reflective environments. Your voice or instrument needs to be fairly loud at the microphone capsule to generate a strong signal, while quieter ambient sounds like computer fans, air conditioning, and room reflections contribute less to the recorded audio. The result is a cleaner recording with less unwanted noise.
Dynamic microphones also excel at handling high sound pressure levels. Most dynamics can handle 140 dB SPL or more without distortion, making them ideal for loud sources like guitar amplifiers, drums, and powerful vocalists. They rarely require pads or special handling for loud sources, unlike some condensers that can distort when exposed to high SPL.
The frequency response of dynamic microphones tends to be more focused in the midrange. While they may not capture the extreme highs and lows that condensers reproduce, this focused response often flatters vocals and instruments in untreated rooms by masking some room deficiencies. The warmth many engineers associate with dynamic mics comes partly from this gently rolled-off high-frequency response.
When to Choose a Dynamic Microphone
Select a dynamic microphone when you are recording in an untreated or poorly treated room. Their natural noise rejection and lower sensitivity help you capture cleaner audio despite acoustic problems. The Shure MV7 for podcasting is an excellent example of a dynamic mic that works brilliantly in home environments.
Dynamics are also the clear choice for loud sound sources. If you are miking a guitar amp, snare drum, or powerful vocalist, a dynamic mic will handle the SPL without distortion while rejecting bleed from other instruments. Their rugged construction means they can handle the physical demands of live performance and frequent repositioning.
Consider a dynamic when you need durability and reliability. These mics can survive drops, temperature extremes, and humidity that would damage condenser microphones. For a home studio where you might be setting up and tearing down frequently, or for podcasters who travel with their gear, this durability is a significant advantage.
Budget-conscious recordists should also lean toward dynamics. Quality dynamic microphones like the SM58 or SM7B are often more affordable than comparable condensers, and they require no additional investment in phantom power supplies or specialized preamps with lots of clean gain.
How Condenser Microphones Work
Condenser microphones operate on an entirely different principle than dynamics. They use a capacitor capsule design that makes them incredibly sensitive and detailed, but also more demanding of both power and acoustic environment. Understanding this technology helps explain both their strengths and their challenges in untreated rooms.
The Capacitor Capsule Design
The heart of a condenser microphone is a capacitor formed by a thin diaphragm placed close to a fixed backplate. This diaphragm is typically made of gold-sputtered mylar or metal foil, incredibly thin and lightweight. When sound waves strike the diaphragm, it moves relative to the backplate, changing the capacitance and creating an electrical signal.
Because the diaphragm mass is extremely low, condenser microphones can respond to the most subtle variations in sound pressure. This gives them exceptional transient response and the ability to capture fine detail that dynamic mics miss. However, this sensitivity also means they pick up every sound in your environment, including the room reflections and noise you would prefer to avoid.
The capacitor capsule requires an external power source to operate. This phantom power, typically 48 volts supplied through the XLR cable from your audio interface or preamp, charges the capsule and powers the internal impedance converter circuit. Without phantom power, a condenser microphone produces no signal at all. Some condensers offer battery-powered operation as an alternative.
Core Characteristics of Condenser Mics
Condenser microphones are significantly more sensitive than dynamics, typically outputting -30 to -40 dBV for the same sound pressure level. This high sensitivity means they can capture quiet sources and subtle nuances, but it also means they pick up more ambient noise and room sound. In an untreated room, this sensitivity becomes a liability.
The transient response of condenser microphones is superior to dynamics. Because the diaphragm has so little mass, it can start and stop moving almost instantaneously to follow rapid changes in sound pressure. This results in recordings that sound more immediate and detailed, with better capture of percussive sounds and fast transients.
Frequency response on condenser microphones typically extends higher than dynamics, often reaching 20 kHz or beyond with flat response. This extended high-frequency response captures air and detail in vocals and instruments, but it also reproduces more of the problematic room reflections that plague untreated spaces.
Self-noise is an important consideration with condenser microphones. The internal electronics generate a small amount of noise, measured in dB-A. Budget condensers might have self-noise of 15-20 dB-A, while premium models achieve 5-10 dB-A. In a quiet treated studio, this matters. In an untreated room with existing ambient noise, the mic’s self-noise is usually masked by the room noise you are already fighting.
When to Choose a Condenser Microphone
Select a condenser when you have a treated acoustic environment where room reflections and noise are controlled. In such spaces, the condenser’s superior detail and transient response shine, capturing every nuance of a vocal performance or acoustic instrument. The AKG P120 offers an affordable entry point into condenser quality.
Condensers excel at recording acoustic instruments where detail and high-frequency extension matter. Acoustic guitars, pianos, strings, and percussion all benefit from the condenser’s ability to capture subtle harmonics and transients. For voice over work where you want a polished, professional sound, large diaphragm condensers are the industry standard.
Consider a condenser when you need specific polar pattern options. Many condensers offer switchable patterns including cardioid, omnidirectional, and figure-8, giving you flexibility for different recording scenarios. This versatility is less common in dynamic microphones.
If you are recording quiet sources or need to place the microphone at a distance from the sound source, a condenser’s higher sensitivity becomes an advantage. It can capture sound from farther away while maintaining good signal levels, though this also means it picks up more room sound at those distances.
Key Differences: Sensitivity, Power, and Durability
Now that we understand how each microphone type works, let us examine the key differences that matter most for recording in untreated rooms. These technical distinctions directly impact the quality of your recordings when working in less-than-ideal acoustic environments.
Sensitivity and Noise Rejection
The most significant difference between dynamic and condenser microphones for untreated rooms is sensitivity. Dynamic mics require about 20-30 dB more sound pressure to produce the same output level. This means they naturally reject quieter sounds in your environment, including computer fans, air conditioning, traffic noise, and room reflections.
Off-axis rejection refers to how well a microphone ignores sound coming from directions other than where it is pointed. Most dynamic microphones used for vocals have a cardioid polar pattern that provides excellent rejection of sound from the sides and rear. This helps isolate your voice from room reflections bouncing off walls behind and beside you.
Condenser microphones, while also available with cardioid patterns, tend to have different off-axis response characteristics. Their more complex capsule designs can result in less consistent rejection across different frequencies, meaning some room sound still sneaks into your recordings even with proper positioning.
In practical terms, when I record with a dynamic microphone in my untreated office, I hear primarily my voice with minimal room sound. When I switch to a condenser using the same positioning, I immediately notice more room ambience, reverb tails, and background noise in the recording. This is not necessarily bad if you want room sound, but for clean recordings, the dynamic wins.
Power Requirements
Dynamic microphones require no external power. This simplifies your setup and reduces the potential points of failure in your recording chain. Any XLR input will work, from budget audio interfaces to professional mixing consoles. You never have to worry about phantom power switches or battery levels.
Condenser microphones require phantom power, typically 48 volts. Most modern audio interfaces and mixers provide this, but you need to ensure it is enabled. If you forget to turn on phantom power, your condenser produces silence. Some budget interfaces provide lower voltage phantom power that might not properly power all condenser mics.
The phantom power requirement also means condensers have internal electronics that can introduce self-noise. While premium condensers have very low self-noise, budget models can add audible hiss to your recordings. In a treated room with low ambient noise, this self-noise matters. In an untreated room, you are more likely to be fighting room noise than mic self-noise.
USB condenser microphones have built-in analog-to-digital converters and draw power from the USB connection, eliminating the need for phantom power. However, USB dynamic microphones also exist, offering the same plug-and-play convenience with the noise rejection benefits of dynamic technology.
Durability and Handling
Dynamic microphones are built like tanks. The simple electromagnetic design with few fragile components means they can survive drops, extreme temperatures, and high humidity. You can transport them in a backpack without worry, and they will keep working after years of abuse. This reliability makes them perfect for home studios and mobile recording setups.
Condenser microphones are more fragile. The extremely thin diaphragm can be damaged by moisture, extreme temperatures, or physical shock. Some condensers need time to warm up after being exposed to cold temperatures before they perform optimally. The internal electronics can also fail if exposed to moisture or power surges.
Handling noise differs between the types as well. Dynamic microphones can generate noise when moved due to the mass of the coil assembly. Condensers typically have less handling noise because the diaphragm mass is so low, though their suspension systems can also create noise if jostled.
For a home studio where the microphone might stay on a stand most of the time, durability matters less. But if you plan to travel with your mic or move it around frequently, the ruggedness of dynamic microphones is a significant practical advantage.
Untreated Room Considerations: Which Mic Performs Better?
Let us address the central question of this guide: which microphone type is best for an untreated room? Based on the technical differences we have explored, the answer is generally dynamic microphones. However, the complete answer requires nuance and depends on your specific situation.
Why Dynamic Mics Excel in Untreated Spaces
Dynamic microphones excel in untreated rooms for several interconnected reasons. Their lower sensitivity means they pick up significantly less ambient noise and room reflections. When you are working in a space with bare walls, hard floors, and minimal absorption, this characteristic helps you capture cleaner source material.
The typical cardioid polar pattern found in most vocal dynamic mics provides excellent rejection of off-axis sound. This means sounds coming from the sides and rear, such as reflections bouncing off walls, are significantly attenuated. Positioning a dynamic microphone correctly can effectively create a narrower “cone” of capture that isolates your voice from the room.
The proximity effect, where bass response increases as you get closer to the microphone, works in your favor with dynamic mics in untreated rooms. By moving closer to the mic, you increase the ratio of direct sound to room sound, effectively masking some of the room’s acoustic problems with a stronger direct signal. The added warmth from proximity effect can also flatter voices in less-than-ideal spaces.
Forum discussions consistently support this recommendation. Users in carpeted bedrooms with curtains and beds report that dynamic mics prove more forgiving of their acoustic limitations. The consensus among home recording enthusiasts is clear: start with a dynamic microphone for untreated spaces, then add a condenser once you have treated your room or built a vocal booth.
Can You Use a Condenser in an Untreated Room?
Yes, you absolutely can use a condenser microphone in an untreated room. Many successful home recordings happen in bedrooms and offices using condenser mics. However, you need to be more strategic about positioning and technique to get good results.
The most important technique is close-miking. Position the condenser as close to your sound source as practical, typically 4-8 inches for vocals. This maximizes the direct sound relative to room reflections. Use a pop filter to allow you to get close without plosive problems. The closer you are, the less room sound contaminates your recording.
Choose a condenser with a tight cardioid or supercardioid pattern. Some condensers designed for stage use have tighter patterns that work well in untreated rooms. Avoid omnidirectional condensers in untreated spaces, as they pick up sound equally from all directions, including room reflections from behind.
The MXL 990 and similar affordable condensers can work in untreated rooms with proper technique. However, you will need to be more careful about background noise, room reflections, and your positioning. The results can be excellent, but the dynamic microphone requires less fuss to achieve comparable quality in problematic spaces.
The 3-to-1 Rule for Microphone Placement
The 3-to-1 rule is a fundamental principle of microphone placement that becomes even more important in untreated rooms. When using multiple microphones, each mic should be positioned at least three times as far from any other microphone as it is from its intended sound source.
For example, if your primary vocal microphone is 6 inches from your mouth, any other microphone in the room should be at least 18 inches away from that vocal mic. This prevents phase cancellation issues where sound arriving at different times at different microphones creates comb filtering and thin, hollow-sounding recordings.
In untreated rooms, following the 3-to-1 rule becomes more critical because room reflections can create complex phase interactions. The reflected sound bouncing off walls arrives at multiple microphones with different timing, potentially causing phase issues even with just one sound source. Proper spacing helps minimize these problems.
For single-microphone recording, the 3-to-1 rule does not directly apply, but the principle of distance management still matters. Keeping your microphone at an appropriate distance from reflective surfaces, typically at least 3 feet from walls when possible, helps reduce the intensity of early reflections that color your recordings.
Use Case Recommendations: Podcasting, Vocals, Gaming, and Instruments
Different recording applications have different requirements, and your choice between dynamic and condenser should consider what you are actually recording. Here are specific recommendations for common use cases in untreated rooms.
Podcasting and Streaming
For podcasting in an untreated room, dynamic microphones are almost always the better choice. Most professional podcasters recording from home use dynamic mics specifically because of their room noise rejection. The tighter polar pattern helps eliminate keyboard typing sounds, mouse clicks, and computer fan noise from your recordings.
Streaming presents similar challenges. Game streamers need microphones that capture their voice clearly without picking up game audio from speakers or controller sounds. Dynamic mics like the SM7B or the Shure MV7 for podcasting are industry standards for a reason. They work reliably in imperfect acoustic environments.
If you must use a condenser for podcasting or streaming in an untreated room, position it very close to your mouth, use a cardioid pattern, and add as much soft material around your recording area as possible. Heavy blankets behind the mic, curtains, and pillows can help absorb reflections. Record during quiet times when household noise is minimal.
Vocal Recording
For untreated rooms, dynamic microphones are generally recommended for vocal recording. Many famous vocal recordings were made using dynamic mics like the SM7B, proving that you do not need a condenser to capture professional-sounding vocals. The warmth and focus of a dynamic can actually flatter voices in less-than-ideal acoustic spaces.
That said, if your voice has specific characteristics that benefit from condenser detail, or if you are recording a vocal style that demands extended high-frequency response, a condenser can work. Soprano voices, breathy vocal styles, and certain pop genres might benefit from condenser clarity despite the room challenges.
Your voice type matters too. Deeper voices often work beautifully with dynamic mics, while very bright voices might sound harsh and require the smoother high-end roll-off of a quality dynamic. Try both types if possible, or listen to comparison videos featuring voices similar to yours to make an informed decision.
Acoustic Instruments
For acoustic guitar in an untreated room, the choice depends on your playing style and the room’s severity. Fingerstyle guitar with lots of detail and harmonics benefits from a condenser’s transient response and high-frequency extension. However, in a very reflective room, that same detail includes unwanted room sound, and a dynamic might give you a more focused, usable recording.
Strummed acoustic guitar often works well with dynamic microphones because the midrange focus complements the instrument’s natural frequency balance in a recording context. The reduced room sound also means you can add artificial reverb in mixing without fighting the natural room sound.
For recording guitar amplifiers, dynamic microphones are the clear winner. Their high SPL handling means they can be placed right against the grill cloth without distortion. The focused midrange response flatters guitar tones. Every classic guitar tone you have heard was likely recorded with a dynamic microphone, usually an SM57 or similar.
Drums present similar challenges. The high SPL of drums demands dynamic microphones for close-miking. Condensers might be used as overheads in treated rooms, but in untreated spaces, dynamic overheads or close-miking with dynamics usually yield cleaner results.
Quick Room Treatment Wins for Better Recordings
While choosing the right microphone helps enormously, even basic room treatment can improve your recordings significantly. You do not need professional acoustic panels to make a difference. Here are quick wins that cost little or nothing.
Heavy blankets and comforters are surprisingly effective sound absorbers. Hang them on walls behind and beside your recording position to reduce reflections. Position a thick blanket or duvet on a rack behind your microphone to create a mini vocal booth effect. The more soft, porous material you add to your room, the better.
Curtains make a noticeable difference, especially heavy, pleated curtains. If you have windows in your recording space, keep the curtains closed during recording sessions. Consider adding an extra layer of heavy fabric behind decorative curtains for additional absorption.
Your bed is an acoustic treatment device. Recording in a bedroom with a made bed provides significant absorption that reduces room reflections. The mattress, comforter, and pillows all absorb sound. Many home recorders get their best results by positioning themselves near the bed to take advantage of this natural absorption.
Strategic positioning costs nothing. Move away from walls and corners, which amplify bass frequencies through boundary effects. Position yourself in the middle of the room when possible, or at least 3 feet from any wall. Record facing into the room rather than facing a wall, so reflections travel away from the microphone.
Carpets and rugs help, especially on hard floors. If you have wood or tile flooring, add a thick area rug under your recording area. This reduces floor reflections that can make recordings sound harsh and boxy.
DIY acoustic panels are cheaper than commercial options. Build simple frames from wood or PVC, stretch fabric over them, and fill with rigid fiberglass insulation or mineral wool. Even a few panels placed at first reflection points (the spots on the side walls where sound bounces directly from your mouth to the microphone) make a noticeable improvement.
For renters who cannot modify walls, freestanding options work well. Place bookshelves filled with books at strategic locations. The irregular surface of book spines helps diffuse sound. Room divider screens with fabric panels can be positioned to create a more controlled recording environment.
Frequently Asked Questions
Can you use a condenser mic in an untreated room?
Yes, you can use a condenser mic in an untreated room, but you need to be strategic. Position the mic closer to your sound source to maximize the direct sound and minimize room reflections. Use a cardioid pattern to reject off-axis noise. Consider adding soft furnishings like blankets, curtains, or pillows to absorb reflections. Some condensers with tighter pickup patterns and lower self-noise perform better in untreated spaces than others.
What is the 3 to 1 rule for microphones?
The 3-to-1 rule states that when using multiple microphones, each mic should be placed at least three times as far from any other mic as it is from its intended sound source. For example, if your vocal mic is 6 inches from your mouth, any other mic should be at least 18 inches away from the vocal mic. This prevents phase cancellation issues and ensures clean, comb-filter-free recordings. In untreated rooms, this rule becomes even more important because room reflections can amplify phase problems.
Are dynamic mics better than condensers?
Neither type is universally better, it depends on your specific situation. Dynamic mics are generally better for untreated rooms because their lower sensitivity means they pick up less ambient noise and room reflections. Condensers excel in treated environments where their superior detail and transient response can shine. For loud sound sources like guitar amps or drums, dynamics often work better. For detailed vocal work in a treated studio, condensers typically win. The best choice depends on your room, your source, and your budget.
Can I use a condenser mic in my room?
Yes, you can use a condenser mic in your room, even without professional acoustic treatment. Focus on these strategies: get close to the mic using proper technique, choose a condenser with a cardioid or supercardioid pattern, add soft materials to absorb reflections, and record during quiet times. Many home recorders successfully use condensers in bedrooms with carpets, curtains, and beds, which naturally absorb some sound. However, if your room is particularly echoey or noisy, a dynamic mic might give you cleaner results with less hassle.
Why do dynamic mics work better in untreated rooms?
Dynamic mics work better in untreated rooms primarily because of their lower sensitivity. They require more sound pressure level to produce the same output as a condenser, which means they naturally pick up less of the quiet ambient noise, computer fans, and room reflections that plague untreated spaces. Their typically tighter polar patterns also provide better off-axis rejection. Additionally, dynamic mics often exhibit a warmer frequency response that can mask some room deficiencies, while condensers reproduce every detail, including unwanted room sound.
Final Verdict: Making the Right Choice for Your Untreated Room
After testing both microphone types across multiple untreated rooms over the past three years, my recommendation is clear. For untreated rooms, dynamic microphones are the better starting choice. Their lower sensitivity, better noise rejection, and forgiving nature make them ideal for home studios, bedrooms, and offices where acoustic treatment is limited.
This does not mean condenser microphones are unusable in untreated spaces. With proper technique, close positioning, and some basic room treatment using blankets and curtains, you can achieve excellent results with a condenser. Many home recorders successfully use condensers in their bedrooms every day. However, the dynamic microphone requires less fuss and delivers cleaner recordings more consistently in problematic acoustic environments.
If you are just starting your home recording journey, invest in a quality dynamic microphone first. Use it to learn proper technique and build your skills. As you progress and potentially treat your room, you can always add a condenser to your collection for situations where its superior detail and transient response are beneficial. In 2026, the best microphone for an untreated room remains a quality dynamic like the SM7B, SM58, or the versatile Shure MV7.
Remember that room treatment often matters more than microphone choice. Even simple improvements like hanging blankets, adding curtains, and positioning yourself away from walls can transform your recordings. Combine these quick wins with the right microphone choice, and you will achieve professional-sounding results regardless of your room’s acoustic limitations.


Leave a Comment