
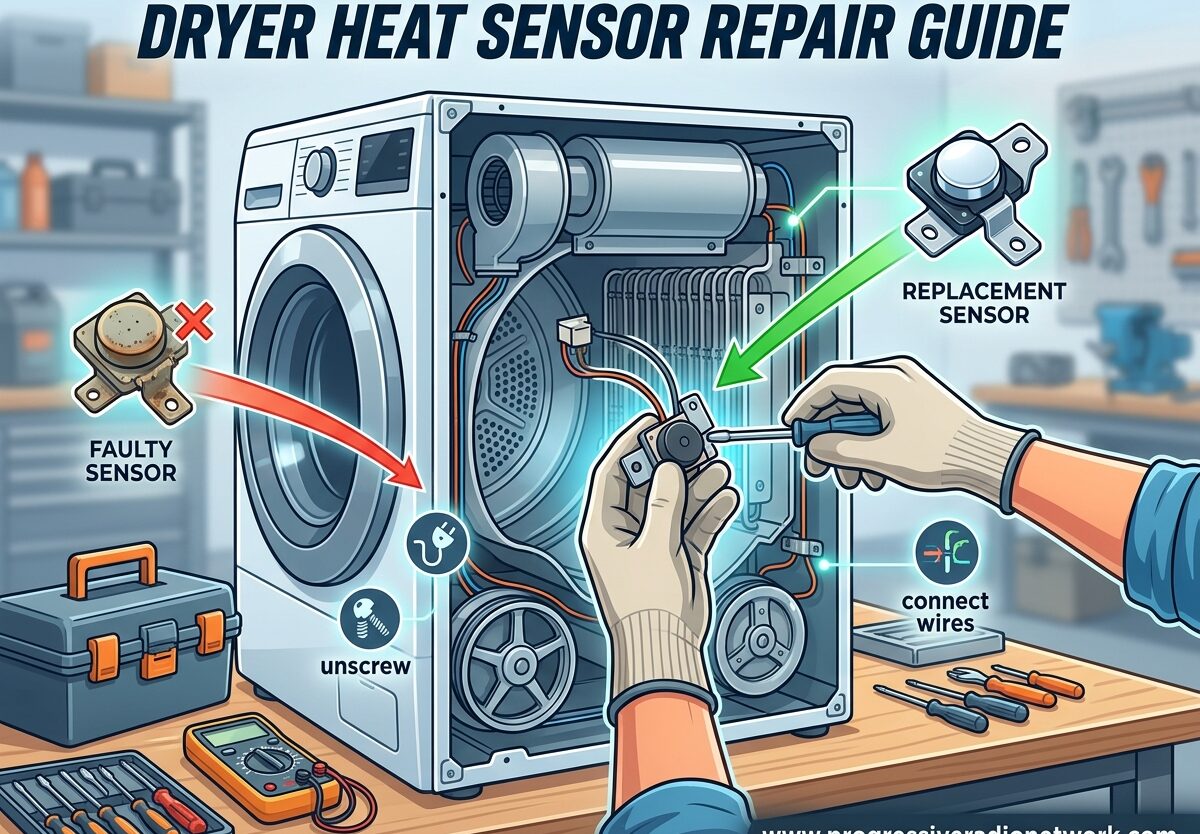
Your dryer stopped heating properly and you’re wondering if the heat sensor is to blame. You’ve come to the right place. This dryer heat sensor repair guide will walk you through everything you need to know about diagnosing, testing, and replacing a faulty dryer temperature sensor.
I’ve repaired dozens of dryers over the years, and heat sensor issues account for about 30% of all heating problems. The good news? This is usually a straightforward DIY repair that costs under $50 and takes less than an hour.
Understanding Dryer Heat Sensors
A dryer heat sensor, also called a thermistor, is a small device that monitors the temperature inside your dryer drum. As air passes over the sensor, it sends resistance readings to the control board, which regulates the heating element to maintain the right temperature.
When the thermistor fails, your dryer can’t properly regulate heat. This causes clothes to remain damp, triggers error codes, or makes the dryer shut off unexpectedly mid-cycle.
Types of Dryer Sensors
Many people confuse the different sensors in their dryer. Here’s what you need to know:
Heat Sensor (Thermistor): Measures air temperature and tells the control board when to turn the heating element on or off. This is what we’re focusing on in this guide.
Moisture Sensor: Metal bars inside the drum that detect moisture levels in clothes. These don’t affect heating but determine cycle length.
Flame Sensor (Gas Dryers Only): Detects whether the burner is lit. This is different from the thermistor and is only found in gas models.
Gas vs Electric Dryer Sensors
Electric and gas dryers both use thermistors, but they’re located in different places. In electric dryers, the heat sensor is typically near the heating element housing. In gas dryers, it’s usually on the blower housing or exhaust duct. The testing and replacement process is essentially the same for both types.
Signs Your Dryer Heat Sensor Is Failing
Before replacing any parts, it’s important to confirm the heat sensor is actually the problem. Here are the most common symptoms of a faulty dryer thermistor:
Dryer runs but doesn’t heat: The dryer tumbles normally but clothes come out cold or damp. This is the most obvious sign of a heat sensor failure.
Inconsistent heating: Sometimes the dryer heats properly, other times it doesn’t. This intermittent behavior often indicates a failing thermistor.
Dryer overheats: Clothes come out extremely hot or the dryer shuts off mid-cycle due to excessive heat buildup. The sensor isn’t signaling the control board to turn off the heating element.
Error codes on display: Many modern dryers display specific error codes when the thermistor fails. Common codes include E1, E2, F1, F2, or codes specifically mentioning “temperature sensor” or “thermistor.”
Longer drying times: Clothes take much longer to dry than usual because the dryer can’t reach or maintain the proper temperature.
How to Test a Dryer Thermistor with a Multimeter
The most reliable way to confirm a bad heat sensor is testing it with a multimeter. Here’s the process:
Step 1: Unplug your dryer and locate the thermistor. It’s usually a small bullet-shaped component with two wires attached, mounted near the blower housing or heating element.
Step 2: Disconnect the wires from the sensor. Note the wire positions so you can reconnect them correctly later.
Step 3: Set your multimeter to measure resistance (ohms). Touch the probes to the two terminals on the thermistor.
Step 4: Compare your reading to the manufacturer’s specifications. At room temperature (around 70degF), most dryer thermistors should read between 10,000 and 12,000 ohms.
Step 5: If the reading is significantly outside this range or shows infinite resistance (open circuit), the thermistor is faulty and needs replacement.
Dryer Heat Sensor Repair Guide
Ready to replace your faulty thermistor? Follow this step-by-step dryer heat sensor repair guide. This process works for most major brands including Whirlpool, Kenmore, Maytag, Amana, GE, Samsung, LG, and Frigidaire.
Tools and Materials You’ll Need
Before starting, gather these supplies:
- Replacement thermistor specific to your dryer model
- Multimeter (for testing the old sensor)
- Nut driver or socket set (usually 1/4 inch)
- Putty knife (for some models)
- Needle-nose pliers
- Work light or flashlight
- Small container for screws
Safety First
Critical: Always unplug your dryer before beginning any repair work. For gas dryers, also turn off the gas supply valve. Never work on an appliance while it’s connected to power or gas.
Step-by-Step Replacement Process
Step 1: Unplug the dryer and shut off gas supply (if applicable). Move the dryer away from the wall to access the back panel. For gas dryers, also turn off the gas valve and disconnect the gas line (you may want to call a professional for this part if you’re uncomfortable working with gas lines).
Step 2: Locate the service panel. On most dryers, you’ll need to remove the rear access panel. Remove the screws securing the panel and set them aside in your container. Some models may have a lower front access panel instead.
Step 3: Find the heat sensor. The thermistor is typically located on the blower housing or near the heating element assembly. Look for a small component with two wires attached, often mounted with a single screw. It may be covered by a protective shield or ductwork.
Step 4: Remove the lint duct assembly (if necessary). On some models (especially Whirlpool, Kenmore, and Maytag), you’ll need to remove the lint duct housing to access the thermistor. This is usually held by several screws. Note the position of any gaskets or seals for proper reassembly.
Step 5: Disconnect the wires from the thermistor. Most thermistors use quick-connect wire terminals. Gently pull them off by hand. If they’re stubborn, use needle-nose pliers but be careful not to damage the wires. Take a photo or note which wire connects to each terminal.
Step 6: Remove the mounting screw. The thermistor is typically secured with a single screw. Remove it and carefully extract the old sensor from its mounting position. Note how it’s positioned for installing the new one.
Step 7: Install the new thermistor. Position the replacement sensor in the same location as the old one. Secure it with the mounting screw but don’t overtighten. Make sure any sensing probe or element is positioned properly in the airflow path.
Step 8: Reconnect the wires. Attach the wire terminals to the new thermistor. Refer to your photo or notes to ensure proper connection. Most thermistors aren’t polarized, so it typically doesn’t matter which wire goes to which terminal, but check your specific model’s documentation.
Step 9: Reassemble the dryer. Replace the lint duct assembly if you removed it, making sure all seals and gaskets are properly positioned. Reinstall the service panel and secure all screws.
Step 10: Restore power and test. Plug the dryer back in (and reconnect the gas line if applicable). Run a test cycle on a low heat setting first to verify proper operation. Check that the dryer heats correctly and doesn’t display any error codes.
Brand-Specific Notes
Whirlpool/Kenmore/Maytag: The thermistor is usually on the blower housing. You’ll likely need to remove the lint duct assembly first. These models are among the easiest to work on.
Samsung: The thermistor may be on the heating element housing rather than the blower. Samsung dryers often have more disassembly required.
LG: Many LG dryers have the thermistor mounted on the heating element canister. LG service panels are typically on the back.
GE/Hotpoint: GE dryers often place the thermistor on the front bulkhead. You may need to remove the lower front panel rather than the rear panel.
Repair vs Replace Analysis
Before investing in repairs, it’s smart to consider whether your dryer is worth fixing. Here’s my breakdown based on dryer age:
Under 5 years old: Definitely repair. The dryer has plenty of life left and a $20-50 thermistor replacement is very affordable compared to the cost of a new dryer ($400-1200).
5-8 years old: Generally worth repairing if the dryer has been reliable otherwise. These mid-life appliances can provide many more years of service with basic maintenance.
8-12 years old: Repair is reasonable if this is the first major issue. However, start saving for a replacement as other components may begin failing.
Over 12 years old: Consider replacement if you’re experiencing multiple issues. However, a simple thermistor repair ($20-50) might be worth it to buy you a couple more years before purchasing a new dryer.
The average cost to replace a dryer heat sensor yourself is $15-40 for the part. If you hire a professional, expect to pay $100-200 including labor. Since this is a relatively simple repair, I always recommend the DIY approach to save money.
Preventive Maintenance Tips
You can extend the life of your dryer heat sensor and prevent future failures with these simple maintenance habits:
Clean the lint filter before every load. Excess lint buildup restricts airflow and causes the dryer to overheat, which stresses the thermistor and other components.
Deep clean the vent system annually. Disconnect the vent hose and remove accumulated lint. A clogged vent is the leading cause of overheating and premature component failure.
Inspect the vent hose regularly. Replace plastic or foil vent hoses with rigid metal ducting, which resists crushing and collects less lint.
Don’t overload the dryer. Overloading restricts airflow and makes the dryer work harder, shortening the lifespan of all components including the heat sensor.
Keep the area around the dryer clean. Dust and lint can accumulate inside the cabinet and interfere with sensor operation. Vacuum around the dryer and inside the cabinet during annual maintenance.
Frequently Asked Questions
How to tell if a dryer sensor is bad?
Can I run my dryer without the moisture sensor?
Yes, you can run your dryer without the moisture sensor. The dryer will still heat and dry clothes normally, but it won’t automatically detect when clothes are dry. Instead, the dryer will run for the full timed cycle duration. This is a safe temporary solution while waiting for repairs, though you may notice longer cycle times and slightly higher energy usage as the dryer can’t optimize based on actual moisture levels.
How much does it cost to replace a heat sensor in a dryer?
A replacement dryer thermistor typically costs $15-40 for the part if you buy it online or at an appliance parts store. If you hire a professional technician for the repair, expect to pay $100-200 total including the part and labor charge. Since this is a relatively simple DIY repair that takes less than an hour, replacing it yourself can save significant money.
Is it worth fixing a 7 year old dryer?
A 7-year-old dryer is generally worth repairing, especially for a simple issue like a faulty heat sensor. Most dryers last 10-15 years with proper maintenance, so at 7 years old your appliance likely has several good years remaining. A thermistor replacement costs only $15-40 for the part, which is very reasonable compared to the $400-1200 cost of a new dryer. I would recommend the repair unless you’re experiencing multiple other issues.
What causes a dryer thermistor to go bad?
Dryer thermistors typically fail due to age and normal wear, exposure to excessive heat from restricted airflow, exposure to moisture from lint buildup or leaks, electrical surges or power fluctuations, and physical damage during maintenance or cleaning. The most common cause is overheating due to clogged vents, which is why regular vent cleaning is essential for preventing thermistor and other component failures.
Conclusion
This dryer heat sensor repair guide has covered everything you need to diagnose, test, and replace a faulty thermistor. With basic tools and less than an hour of your time, you can save hundreds of dollars compared to calling a technician or buying a new dryer.
Remember to always prioritize safety by unplugging the dryer before beginning any work. Test the old sensor with a multimeter to confirm it’s faulty, and use the correct replacement part for your specific model. Following the preventive maintenance tips will help prevent future sensor failures and extend your dryer’s lifespan.
Have you successfully replaced your dryer heat sensor? Or are you still experiencing heating issues after the repair? Let me know in the comments – I’d be happy to help troubleshoot further.

Leave a Comment