
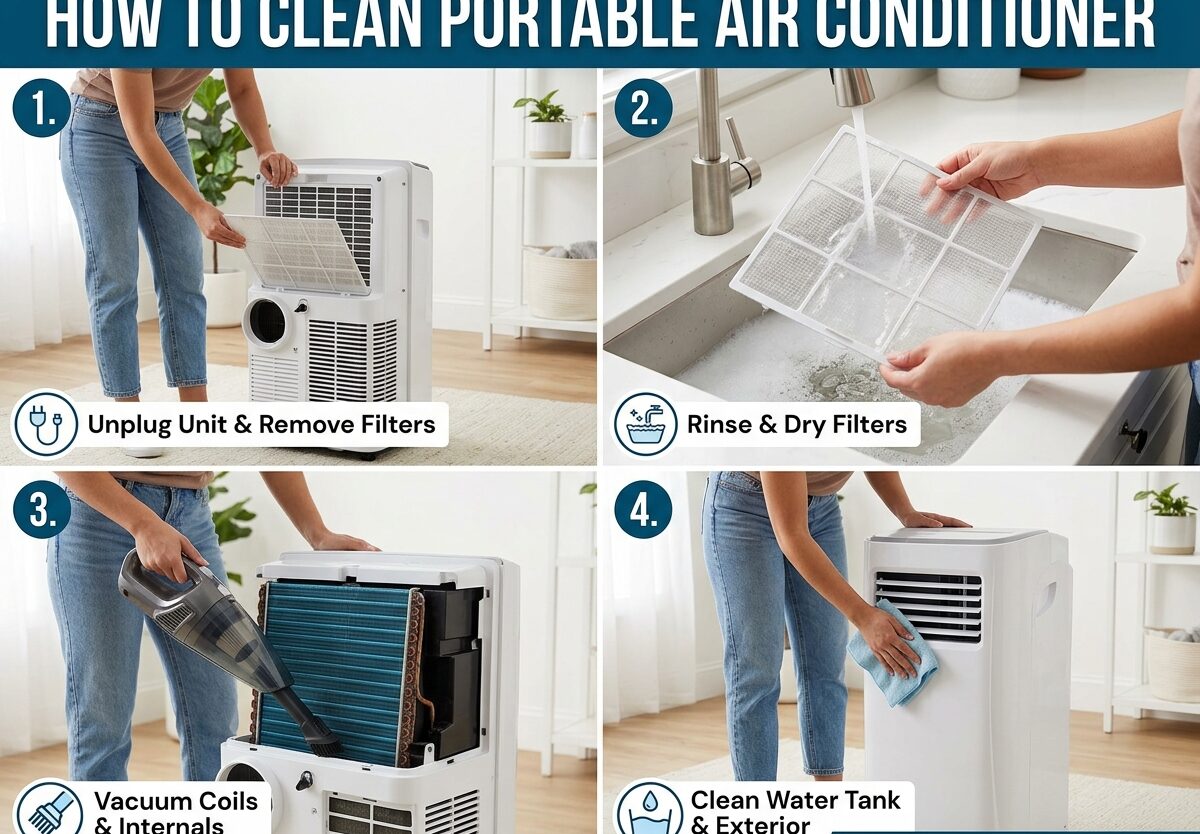
Learning how to clean portable air conditioner units properly is essential for maintaining cooling efficiency and preventing mold growth. A dirty portable AC works harder, consumes more energy, and can circulate allergens throughout your room. I’ve maintained portable air conditioners for over 10 years, and I’ll walk you through the complete cleaning process step by step.
Regular maintenance of your portable air conditioner ensures it runs efficiently when you need it most. Dust and debris accumulate quickly in air filters, coils can become clogged with dirt, and water tanks can develop mold if neglected. The good news is that cleaning your portable AC is straightforward and requires only basic household items.
How to Clean Portable Air Conditioner
Cleaning a portable air conditioner involves several key areas: the air filter, exterior surfaces, water tank, exhaust hose, and internal coils. The process takes about 30-60 minutes depending on how thorough you need to be. Before starting, always unplug the unit and move it to a well-ventilated area where you can make a bit of a mess.
Safety is the first priority. Never clean your portable AC while it’s plugged in or immediately after use. Let the unit cool for at least 30 minutes to avoid burns from hot components. Once cooled, you’re ready to begin the cleaning process.
Tools and Materials Needed
Gather these items before you start:
- Screwdriver set (for accessing panels)
- Vacuum cleaner with brush attachment
- Mild dish soap
- Soft cloths or sponges
- Warm water
- White vinegar (for mold removal)
- Coil cleaner spray (optional, for deep cleaning)
- Old towels or drop cloth (to protect floor)
Step 1: Prepare and Unplug
Start by turning off your portable air conditioner and unplugging it from the wall outlet. This is the most critical safety step. Never skip unplugging, even if you’re just doing a quick clean. Move the unit to an area where you can work comfortably, preferably near a drain or outside if you plan to drain the water tank.
Place old towels or a drop cloth under the unit to protect your floor from water drips and debris. If your AC was running recently, wait at least 30 minutes for all components to cool down completely. Hot coils can cause burns, and cold water on hot coils can damage the unit.
Step 2: Clean or Replace Air Filter
The air filter is the most important component to clean regularly. A clogged filter restricts airflow, reduces cooling efficiency, and can cause the unit to freeze up. Locate the filter compartment, usually on the back or side of the unit. Slide or unsnap the cover to access the filter.
Remove the filter and check its condition. If it’s reusable, wash it with warm water and mild dish soap. Gently scrub away accumulated dust and debris. Rinse thoroughly and let it air dry completely before reinstalling. Never put a wet filter back in your unit. If the filter is damaged or excessively dirty, replace it with a new one according to the manufacturer’s specifications.
Step 3: Clean the Exterior
Wipe down the exterior of your portable air conditioner with a damp cloth and mild soap solution. Pay special attention to air vents and intake grilles where dust tends to accumulate. Use a soft brush attachment on your vacuum to remove dust from vents and hard-to-reach areas.
Avoid using harsh chemicals, abrasive cleaners, or excessive water on the exterior. These can damage the finish and potentially harm internal components if water seeps inside. After cleaning, dry all surfaces thoroughly with a clean cloth to prevent water spots and potential electrical issues.
Step 4: Drain the Water Tank
Portable air conditioners remove moisture from the air, collecting it in a built-in tank or reservoir. This water can become stagnant and develop mold or unpleasant odors if not drained regularly. Locate the drain plug, typically at the bottom or back of the unit.
Place a shallow container or towels under the drain area. Remove the plug and let the water drain completely. For a more thorough cleaning, mix a solution of equal parts white vinegar and water, pour it into the tank, swish it around, then drain again. This helps eliminate mold and bacteria. Rinse with clean water if needed and dry the tank completely before replacing the drain plug.
Step 5: Clean the Coils (Deep Clean)
The evaporator and condenser coils are critical for cooling performance but can become clogged with dust and debris over time. Accessing these coils usually requires removing a panel with a screwdriver. Consult your owner’s manual for specific instructions on your model.
Once accessible, use a vacuum with a soft brush attachment to gently remove loose debris from the coils. Be careful not to bend or damage the delicate aluminum fins. For stubborn dirt, use a commercial coil cleaner spray following the product instructions. Some coil cleaners are self-rinsing, while others require careful wiping. Allow the coils to dry completely before reassembling the unit.
Step 6: Clean the Exhaust Hose
The exhaust hose vents hot air outside and can accumulate dust and moisture, creating a breeding ground for mold. Disconnect the hose from both the unit and the window kit. Take it outside if possible and shake out any loose debris.
Wipe the interior of the hose with a damp cloth or use a vacuum with a hose attachment. If you notice mold or mildew, clean with a vinegar solution (one part vinegar to three parts water) and rinse thoroughly. Let the hose dry completely before reconnecting. Ensure all connections are secure when reattaching to prevent air leaks.
How to Remove Mold from Portable Air Conditioner
Mold growth is a common issue with portable air conditioners, especially in humid climates. Signs of mold include musty odors, visible black or white spots, or allergic reactions when the unit is running. To remove mold, mix a solution of equal parts white vinegar and water.
Apply the vinegar solution to affected areas using a spray bottle or cloth. Let it sit for at least 15 minutes to kill mold spores. Scrub gently with a soft brush, then wipe clean with a damp cloth. For stubborn mold, you may need to repeat this process several times. Always rinse thoroughly and dry completely before running the unit again.
Prevent future mold growth by ensuring proper drainage, cleaning regularly, and running the unit’s fan mode after cooling to dry internal components. Consider using a dehumidifier in conjunction with your portable AC in especially humid environments.
Maintenance Schedule
Establishing a regular maintenance schedule keeps your portable air conditioner running efficiently:
- Air filter: Clean every 2 weeks during heavy use, monthly otherwise
- Exterior: Wipe down monthly
- Water tank: Drain weekly during humid months
- Deep clean: Perform a thorough cleaning at the start and end of cooling season
- Before storage: Clean all components and dry completely before storing for winter
Troubleshooting: AC Still Not Cooling After Cleaning
If your portable air conditioner still isn’t cooling properly after cleaning, check these common issues:
- Verify the thermostat is set to cooling mode and the temperature is lower than room temperature
- Check that all windows and doors are closed to prevent hot air from entering
- Ensure the exhaust hose is properly connected and not kinked or blocked
- Look for ice buildup on the coils, which indicates low refrigerant or airflow issues
- Check that the unit isn’t oversized for the space (too large can cause short cycling)
If these checks don’t resolve the issue, you may have a refrigerant leak, compressor problem, or electrical issue that requires professional service. Contact the manufacturer or a qualified HVAC technician for diagnosis and repair.
Frequently Asked Questions
Do portable air conditioners need cleaning?
Yes, portable air conditioners require regular cleaning to maintain efficiency and prevent mold growth. Dirty filters and coils reduce cooling performance and increase energy consumption. Clean the air filter every 2 weeks during use and perform a thorough cleaning at least twice per year.
What is the 3 minute rule for air conditioners?
The 3 minute rule suggests waiting 3 minutes after turning off your air conditioner before restarting it. This allows the pressure in the system to equalize, preventing compressor damage. Always wait at least 3 minutes if power is interrupted or you need to restart the unit.
Why is my portable AC not cooling even after cleaning?
If cleaning doesn’t restore cooling, check for ice buildup on coils, ensure exhaust hose isn’t blocked, verify thermostat settings, and confirm windows are sealed properly. The unit may have low refrigerant, a compressor issue, or be too large for the space, causing short cycling. Professional service may be needed.
How do you get mold out of a portable air conditioner?
Remove mold by mixing equal parts white vinegar and water, then applying to affected areas. Let sit for 15 minutes, scrub gently, and wipe clean. For stubborn mold, repeat several times. Clean all components including filters, water tank, and exhaust hose. Prevent future growth by maintaining proper drainage and running fan mode to dry components.
Conclusion
Learning how to clean portable air conditioner units is a valuable skill that extends the life of your appliance and ensures optimal performance. Regular maintenance prevents costly repairs, reduces energy bills, and improves air quality in your home. By following this guide and establishing a consistent cleaning schedule, your portable AC will provide reliable cooling for years to come.
Remember that prevention is easier than cure. Clean your air filter regularly, drain the water tank often, and perform deep cleaning at the start and end of each cooling season. Your portable air conditioner will reward you with efficient, quiet operation when you need it most.


Leave a Comment