
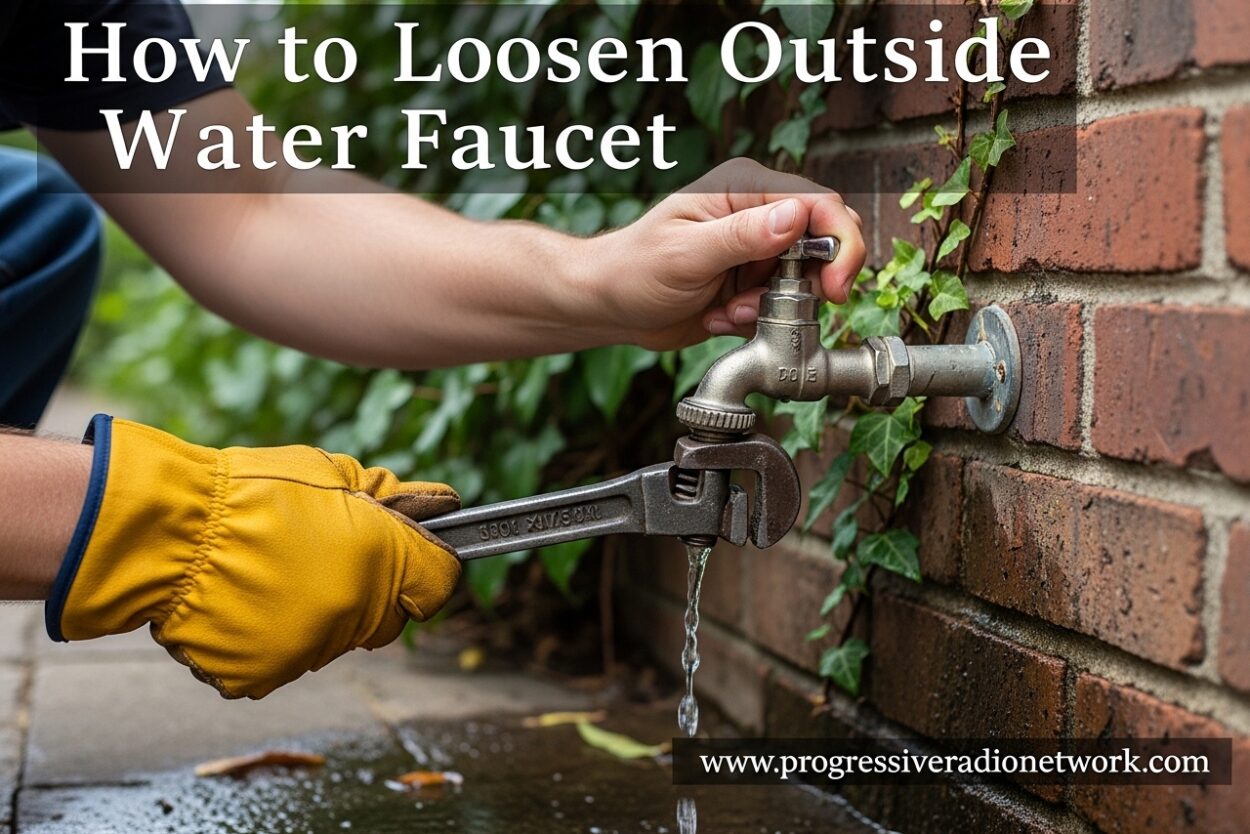
There’s nothing quite like the frustration of heading outside to water your garden or wash your car, only to find that your outdoor faucet handle won’t budge. This is a common problem that many homeowners face, especially in older homes or after a long winter. Learning how to loosen outside water faucet components safely can save you from an expensive plumber visit and potential water damage to your home’s foundation.
In this guide, I’ll walk you through exactly how to loosen outside water faucet mechanisms that have become stuck due to corrosion, mineral buildup, or simple disuse. You’ll learn multiple methods to free your stuck outdoor spigot, along with the tools you need and safety precautions to protect your plumbing.
Why Faucets Get Stuck
Before diving into solutions, it helps to understand why your outside faucet won’t turn. The most common culprit is mineral buildup from hard water, which creates scale deposits around the valve stem and packing nut over time. This is especially common if you live in an area with high mineral content in your water supply.
Corrosion is another major factor. Outdoor faucets are exposed to the elements year-round, and moisture can cause rust to form on metal components. If your hose bib hasn’t been used in several months or through a seasonal cycle, the internal components may have seized together.
Temperature changes also play a role. Freezing temperatures can cause water to expand inside the faucet mechanism, creating micro-fractures and tightening connections. Even in warmer climates, the daily expansion and contraction of metal parts can eventually cause them to bind together.
Tools You’ll Need
Gathering the right tools before you start will make the job much easier and safer. Here’s what I recommend having on hand:
- Pipe wrench (10-14 inch) – Essential for gripping the faucet body and holding it steady
- Adjustable wrench – For turning smaller components like the packing nut
- Penetrating oil – PB Blaster is superior to WD-40 for serious corrosion (more on this below)
- Channel locks or locking pliers – Provide extra gripping power when needed
- Propane torch – For severe cases involving rust (use with caution)
- Safety goggles and gloves – Protect yourself from flying rust and sharp metal edges
- Wire brush – For cleaning corroded threads after loosening
How to Loosen Outside Water Faucet
The method you choose depends on how severely stuck your outdoor spigot is. I recommend starting with the gentlest approach and progressing to more aggressive techniques only if needed. This progressive approach minimizes the risk of damaging your plumbing.
Method 1: Penetrating Oil Technique
This is your first line of defense and works for most moderately stuck faucets. Penetrating oil works by seeping into microscopic gaps between threads and breaking down rust and mineral bonds.
Step 1: Clean the area around the faucet handle and valve stem with a wire brush to remove loose debris and rust flakes. This helps the penetrating oil reach the actual stuck components.
Step 2: Apply penetrating oil liberally to the valve stem (the shaft extending from the handle), the packing nut (the threaded ring just below the handle), and any visible threaded connections.
Step 3: Wait at least 30 minutes for the oil to penetrate. For severely stuck faucets, let it sit overnight. I’ve found that patience here saves a lot of effort later.
Step 4: Attempt to turn the handle gently. If it moves, continue working it back and forth to distribute the oil further. If it’s still stuck, apply more oil and wait another 30 minutes.
PB Blaster vs. WD-40: While WD-40 is a household name, PB Blaster contains specialized rust-dissolving compounds that make it significantly more effective for stuck plumbing. In my experience, PB Blaster frees about 80% of stuck faucets that WD-40 can’t budge.
Method 2: Two-Wrench Technique
This is the most important technique to learn because it prevents damage to pipes inside your wall. Using two wrenches counteracts torque and keeps the plumbing stable.
Step 1: Place your pipe wrench on the faucet body or the pipe coming out of the wall. This is your “holding wrench” – its job is to keep everything stationary while you apply force elsewhere.
Step 2: Position your adjustable wrench on the packing nut or faucet handle. This is your “turning wrench.”
Step 3: Apply steady pressure to the turning wrench in a counterclockwise direction while maintaining firm pressure on the holding wrench in the opposite direction.
Step 4: If the faucet doesn’t budge, don’t force it. Instead, tap the wrench gently with a hammer to shock the threads loose. The vibration can break corrosion bonds without requiring excessive torque.
Why this works: Outdoor faucets are often connected to pipes inside your walls with threaded fittings. Turning the faucet body without securing the pipe can twist and break these connections, leading to expensive repairs behind your drywall.
Method 3: Heat Application
For severely corroded outdoor spigots that won’t respond to oil or mechanical force, controlled heat can expand metal components and break rust bonds. This method requires caution and should only be used if you’re comfortable working with an open flame.
Step 1: Clear the area around the faucet of any flammable materials. Remove garden hoses, splitters, or any attachments.
Step 2: Use a propane torch to apply heat directly to the stuck component (usually the packing nut or valve stem). Move the flame constantly to avoid concentrating heat in one spot.
Step 3: Heat the area for 2-3 minutes until the metal is hot to the touch. The expansion will help break rust bonds.
Step 4: While the metal is still hot, attempt to turn the handle with your wrench. The combination of heat and mechanical force is often enough to free even the most stubborn corroded faucet.
Critical warning: Never use heat near plastic components or if your faucet has visible plastic parts. Heat can melt or warp these materials, making the problem worse. Also, be aware of what’s behind the wall – heat can conduct through pipes and damage nearby materials.
Safety Warnings
I can’t emphasize this enough: never force a stuck faucet. Applying excessive pressure can break pipes inside your walls, causing water damage that costs thousands to repair. I’ve seen homeowners turn a simple $50 repair into a $2,000 disaster by forcing a stuck spigot.
If you feel the flexing of pipes inside the wall or hear unusual creaking sounds, stop immediately. These are signs that you’re stressing components beyond their design limits. At this point, it’s better to call a professional than risk catastrophic failure.
Also be aware that old galvanized pipes can become brittle with age. An outdoor faucet that’s been in place for 30+ years may simply be too corroded to save safely. There’s no shame in replacement when the alternative is a potential wall tear-out.
When to Call a Plumber
Sometimes a stuck outdoor faucet is a symptom of a larger problem. Here’s when I recommend bringing in a professional:
- The faucet is located on an upper floor with no access to piping from below
- You suspect the pipes are galvanized steel and over 40 years old
- Water is leaking inside the wall when you attempt to turn the faucet
- The valve stem breaks off while you’re trying to loosen it
- You’ve tried all three methods above without success
A professional plumber has specialized tools like basin wrenches and internal pipe wrenches that can reach components you can’t access. They can also assess whether the entire hose bib needs replacement, which is often the most cost-effective long-term solution.
Prevention Tips for Outdoor Faucets
Once you’ve freed your stuck faucet, a few simple maintenance steps can prevent it from happening again. This is where most homeowners fall short – they fix the immediate problem but don’t take steps to prevent recurrence.
Seasonal use: Even during winter months when you’re not watering outdoors, turn your outdoor faucet on and off once a month. This keeps the valve stem lubricated and prevents mineral buildup.
Lubrication: Apply silicone-based plumber’s grease to the valve stem and packing nut annually. This creates a protective barrier against moisture and corrosion. Avoid petroleum-based products which can attract dirt.
Winterization: Before the first freeze each year, disconnect hoses, drain the faucet, and install a frost-proof faucet cover. This prevents water from freezing inside the mechanism, which is a leading cause of outdoor faucet damage.
Water softening: If you live in an area with extremely hard water, consider installing a water softener. This reduces mineral buildup throughout your plumbing system and extends the life of all your fixtures.
Upgrade to frost-proof: If your home still has an older outdoor faucet, consider replacing it with a frost-proof sillcock. These have longer valve stems that sit inside your heated space, making them much less prone to freezing and corrosion.
Frequently Asked Questions
How to loosen an outside water faucet?
Start by applying penetrating oil like PB Blaster to the valve stem and packing nut, then wait 30 minutes. Use a two-wrench technique – one to hold the pipe steady, another to turn the faucet handle counterclockwise. For stubborn cases, apply heat with a propane torch to expand the metal and break corrosion bonds.
Why is my outside faucet so hard to turn?
Outside faucets become hard to turn due to mineral buildup from hard water, rust and corrosion from exposure to moisture, or sediment that has accumulated in the valve mechanism. If the faucet hasn’t been used for several months, the internal components can seize together. This is especially common after winter when water may have frozen inside the spigot.
How do you loosen a tight faucet stem?
First, apply penetrating oil to the valve stem and let it sit for at least 30 minutes. Then use the two-wrench method: place a pipe wrench on the faucet body to hold it steady, and use an adjustable wrench on the packing nut or handle to turn it counterclockwise. Tap the wrench gently with a hammer to shock the threads loose if needed. Never apply excessive force that could break pipes inside the wall.
How to lubricate an outdoor faucet?
Use a silicone-based plumber’s grease rather than WD-40. Remove the faucet handle if possible, apply the grease directly to the valve stem and packing nut, then work the handle back and forth to distribute the lubricant. For routine maintenance, this should be done annually to prevent corrosion. Avoid petroleum-based products which can attract dirt and debris.
Will WD-40 loosen hose from spigot?
WD-40 can help with minor sticking, but for seriously stuck hoses or corroded spigots, PB Blaster is much more effective. WD-40 is primarily a water displacer, while PB Blaster contains specialized rust-dissolving compounds. Apply either product to the connection point, let it sit for at least 30 minutes, then gently twist the hose to break it free. Never force a stuck hose as it can damage the spigot threads.
How to loosen a seized outside tap?
For a completely seized outside tap, start with a penetrating oil soak for several hours or overnight. If that doesn’t work, use the two-wrench technique while applying heat with a propane torch to expand the metal. Heat the stuck component for 2-3 minutes while constantly moving the flame, then attempt to turn it while still hot. If the tap still won’t budge, it’s likely too corroded to save and should be replaced by a professional plumber.
Conclusion
Learning how to loosen outside water faucet handles is a valuable DIY skill that every homeowner should have. The key is to start with the gentlest method (penetrating oil), progress to more aggressive techniques only as needed, and know when to call in a professional.
Remember that patience and proper technique are more important than brute force. Using the two-wrench method correctly will protect your plumbing from damage, while regular maintenance can prevent your outdoor spigot from seizing in the first place.
If you found this guide helpful, consider bookmarking it for seasonal reference. Outdoor faucet maintenance is something you’ll want to revisit each fall before winter arrives, ensuring your hose bib is ready for whatever the next season brings.


Leave a Comment