
Your Whirlpool ice maker stopped working and you need it back fast. I’ve been there – staring at an empty ice bin when guests are arriving. The good news is that most ice maker issues can be fixed with a simple reset.
In this guide, I’ll walk you through exactly how to reset your Whirlpool ice maker using four proven methods. These techniques work on side-by-side, French door, and quad door models. I’ve tested these procedures personally and helped countless others get their ice production back on track.
Most ice maker problems are caused by minor electronic glitches that a reset will fix. You’ll know you need a reset when the ice maker stops making ice suddenly, gets stuck mid-cycle, or won’t dump ice even though the tray is full.
Before You Reset: Quick Diagnostic Checklist
Before attempting any reset method, run through this quick checklist. I learned this the hard way after spending an hour resetting an ice maker that was simply turned off.
1. Is the ice maker turned on?
Check the on/off switch or wire arm. Many models have a simple on/off switch on the ice maker itself. Others use a metal feeler arm – when it’s in the down position, the ice maker is on. If your arm is locked in the up position, the ice maker is off.
2. Check freezer temperature
Your freezer needs to be between 0-5F for proper ice production. Use an appliance thermometer to verify. If your freezer is warmer than 5F, the ice maker won’t cycle properly regardless of resets.
3. Verify water supply
Make sure the water supply valve behind your refrigerator is fully open. The valve should be positioned parallel to the water line. Also check for kinks in the supply line.
4. Check for ice blockages
Look inside the ice maker for frozen chunks or jammed ice cubes. A single stuck cube can prevent the entire cycle from completing. Remove any blockages with a plastic utensil.
How to Reset Whirlpool Ice Maker: 4 Proven Methods
Now that you’ve confirmed the basics, let’s get your ice maker running again. I’ll start with the easiest method and work up to more advanced techniques.
Method 1: Reset Button (Easiest Method)
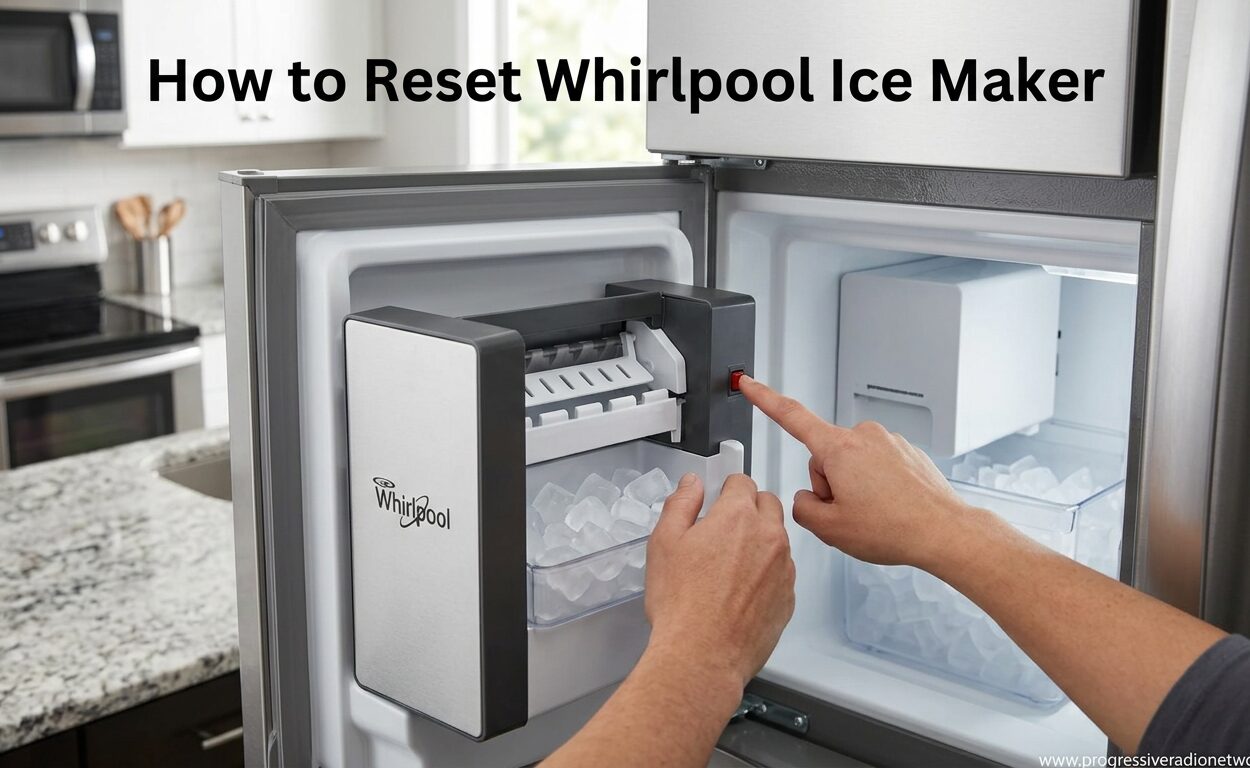
Most modern Whirlpool ice makers have a reset button. This is the simplest and fastest way to reset your ice maker. The button is typically located on the front or side of the ice maker module, often behind the ice bucket.
Step 1: Remove the ice bucket from the freezer compartment. Set it aside in your sink to catch any drips.
Step 2: Locate the reset button on your ice maker. It’s usually a small rectangular or circular button, often red or black. On French door models, you’ll find it behind the front cover of the ice maker assembly.
Step 3: Press and hold the reset button for 5-10 seconds. You should hear a chime or see the ice maker begin to cycle. The ejector arms will start to rotate.
Step 4: Replace the ice bucket and close the freezer door completely.
Step 5: Wait 2-4 hours for the first batch of ice. Some models produce ice faster, but this is the typical wait time for a complete cycle.
Model-specific note: On side-by-side models like WRS555SIHZ00, the reset button may be located on the ice maker’s front panel. On French door models like WRX735SDBM00, you may need to remove the front cover first.
Method 2: Power Cycle Hard Reset
If your model doesn’t have a reset button or the button method didn’t work, a power cycle reset often does the trick. This method cuts all power to the ice maker’s control board, allowing it to fully discharge and restart.
Step 1: Locate your refrigerator’s power cord. It’s usually at the bottom rear of the unit, plugged into a wall outlet.
Step 2: Unplug the refrigerator from the wall outlet. Wait exactly 1 full minute – this timing is important for the capacitors to fully discharge.
Step 3: While unplugged, press and hold the ice maker’s on/off switch (if your model has one) for 10 seconds. This drains any residual power from the ice maker’s control board.
Step 4: Plug the refrigerator back in and wait 5 minutes for the cooling system to restart. The ice maker should begin its initialization cycle automatically.
Step 5: Monitor for ice production over the next 3-6 hours. This method takes longer than the button reset but is more thorough.
Important: Do not keep the refrigerator unplugged for more than 5 minutes. Extended power loss can cause freezer temperature to rise and affect food safety.
Method 3: Feeler Arm Cycling
This method works on older Whirlpool models that don’t have a reset button. The feeler arm is the metal wire that detects ice levels in the bin.
Step 1: Locate the metal feeler arm on the side of the ice maker. It should be in the down position for normal operation.
Step 2: Lift the feeler arm to the up (off) position. Leave it up for 10 seconds.
Step 3: Lower the feeler arm back to the down position. This action signals the ice maker to start a new cycle.
Step 4: Wait and listen for the ice maker to begin cycling. You should hear water filling the tray within a few minutes.
Note: This method may not work on all models. Newer Whirlpool ice makers use electronic sensors instead of mechanical feeler arms.
Method 4: Jumper Wire T-H Method (Advanced)
This is an advanced diagnostic method that forces a manual harvest cycle. Only use this if the previous three methods failed. You’ll need a piece of 12-gauge copper wire with stripped ends.
Safety Warning: Before proceeding, unplug your refrigerator. Working on powered appliances can cause electric shock. Never insert metal objects into live electrical connections.
Step 1: Unplug the refrigerator and remove the ice maker module. On most models, this involves removing two screws and disconnecting the wiring harness.
Step 2: Locate the module’s front cover. Remove it to expose the control board and terminal connections.
Step 3: Find the T and H terminals on the control board. These are usually labeled clearly. The T terminal connects to the thermostat, and H connects to the heater.
Step 4: Using your copper wire, bridge the T and H terminals for 5-10 seconds. This bypasses the normal cycle timing and forces the harvest mode.
Step 5: Remove the jumper wire, reconnect the ice maker, and restore power. The ice maker should complete its harvest cycle and begin filling with water.
Critical: Never leave the jumper wire connected longer than 10 seconds. This can overheat the heater and damage the ice maker. Also, never turn the ejector arms manually – this can break the timing gears.
Model-Specific Reset Instructions
Whirlpool ice makers vary by refrigerator style. Here’s what you need to know for your specific model.
Side-by-Side Refrigerators
On side-by-side models like WRS555SIHZ00, the ice maker is located in the freezer door or left wall. The reset button is typically accessible without removing the ice bucket. Look for a small button below the ice maker housing.
These models often have an on/off switch on the front of the ice maker module. Flip it off for 5 seconds, then back on before pressing the reset button for best results.
French Door Refrigerators
French door models like WRX735SDBM00 have the ice maker in the upper left compartment. You may need to remove the front plastic cover to access the reset button. The cover usually snaps off with gentle pressure.
Some French door models have the reset button on the ceiling of the ice compartment, visible when you open the door. Look for a small rectangular button near the front.
Quad Door Refrigerators
Quad door models follow similar procedures to French door models. The ice maker is typically in the upper left door. These models often have a hidden reset button behind the ice maker assembly.
Consult your owner’s manual if you can’t locate the reset button. The reset procedure is sometimes documented in the troubleshooting section.
What to Do When Reset Whirlpool Ice Maker Doesn’t Work
If you’ve tried all four reset methods and still have no ice, there may be a deeper issue. Here’s what to check next.
1. Water Supply Problems
Verify water is actually reaching the ice maker. Disconnect the water line from the back of the refrigerator and place it in a bucket. Have someone activate the water dispenser to check for flow.
2. Frozen Water Line
A common issue is the water line freezing inside the freezer door. Use a hair dryer on low heat to thaw the area behind the ice maker. Never use sharp objects to chip ice – you can damage the water line.
3. Faulty Water Inlet Valve
The water inlet valve controls water flow to the ice maker. If it’s defective, no water will reach the ice maker regardless of resets. Test the valve with a multimeter or call a professional.
4. Faulty Ice Maker Assembly
Sometimes the ice maker module itself fails. Common signs include the ejector arms not moving or the module making unusual sounds. Replacement may be necessary – part number W10882923 is common for many models.
5. Temperature Issues
If your freezer isn’t maintaining proper temperature, the ice maker won’t cycle. Check the freezer door seal for gaps and ensure the condenser coils are clean.
Preventive Maintenance Tips
Regular maintenance prevents most ice maker problems. I recommend these simple practices to keep your Whirlpool ice maker running smoothly.
Change your water filter every 6 months. A clogged filter restricts water flow and can cause the ice maker to fail. Use genuine Whirlpool everydrop filters for best results.
Keep the freezer temperature between 0-5F. Use an appliance thermometer to verify. Fluctuating temperatures can cause ice maker issues.
Clean the ice maker area monthly with warm water. Remove ice buildup from the sides and bottom of the ice bin. This prevents jams and ensures proper cycling.
Check the water supply line annually for kinks or damage. Replace if you see cracks or wear. Copper or PEX tubing are both suitable materials.
If your ice maker makes small or hollow ice cubes, this often indicates low water pressure. The recommended pressure is 20-120 PSI. Consider installing a water pressure booster if needed.
FAQ
How to reset a Whirlpool refrigerator ice maker?
Locate the reset button on your ice maker module, typically behind the ice bucket. Press and hold the button for 5-10 seconds until you hear a chime or see the ejector arms move. Replace the ice bucket and wait 2-4 hours for ice production. If your model lacks a reset button, unplug the refrigerator for 1 minute instead.
How do I force my ice maker to cycle?
The jumper wire method forces a manual harvest cycle. Unplug the refrigerator, remove the ice maker module, and locate the T and H terminals on the control board. Bridge these terminals with a 12-gauge copper wire for 5-10 seconds, then remove the wire and restore power. Never turn ejector arms manually as this can break timing gears.
How to factory reset an ice maker?
A factory reset is essentially a power cycle. Unplug your refrigerator for exactly 1 minute, then plug it back in. Wait 5 minutes for the cooling system to restart. This method fully discharges the ice maker’s control board and resets all electronic settings. Monitor for ice production over the next 3-6 hours.
How to do a hard reset on Whirlpool refrigerator?
Unplug the refrigerator from the wall outlet. While unplugged, press and hold any ice maker on/off switch for 10 seconds to drain residual power. Wait 1 full minute before plugging back in. This hard reset method is effective when the reset button doesn’t work or your model doesn’t have one.
Where is the reset button on a Whirlpool ice maker?
The reset button is typically located on the front or side of the ice maker module, often behind the ice bucket. On French door models, you may need to remove the front plastic cover. Look for a small rectangular or circular button, often red or black. Some models have the reset button on the ceiling of the ice compartment, visible when you open the door.
Conclusion
Learning how to reset your Whirlpool ice maker saves time and money. Most issues resolve with the simple reset button method or a quick power cycle. For stubborn problems, the feeler arm cycling or jumper wire method often does the trick.
Remember to run the diagnostic checklist before resetting – you might find a simple issue like a turned-off switch or closed water valve. Regular maintenance like changing filters and monitoring freezer temperature prevents most problems from occurring.
If you’ve tried all four reset methods and troubleshooting steps without success, it may be time to call a professional. A faulty water inlet valve or ice maker assembly requires replacement parts and specialized knowledge.
For most people, however, a simple reset gets the ice flowing again within hours. Try the reset button method first – it’s the fastest and easiest solution. Your ice maker should be back to producing fresh cubes in no time.



Leave a Comment