
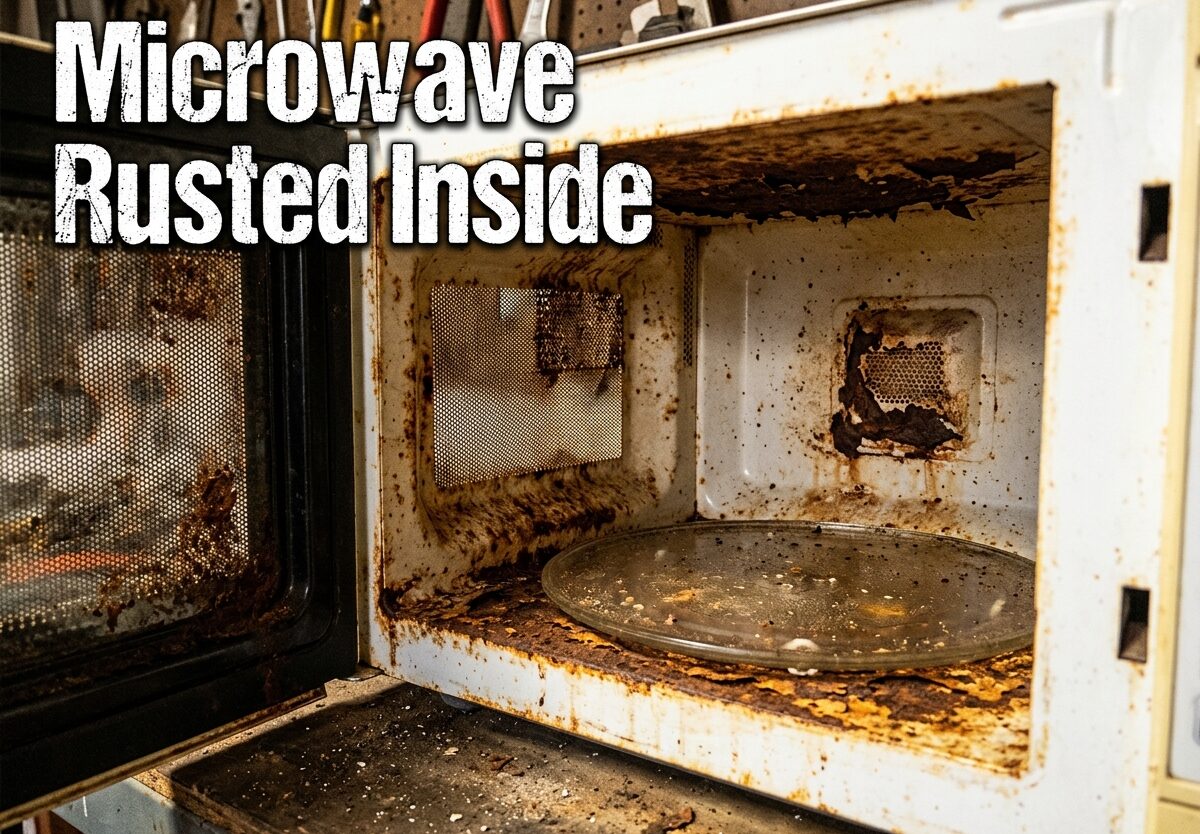
You open your microwave to heat up some leftovers, and there it is – that reddish-brown discoloration spreading across the interior. Your microwave has rust inside, and immediately you’re wondering: is this safe? Can I keep using it? Do I need to buy a new one? These are the exact questions this guide will answer, drawing on appliance repair expertise and real user experiences to give you a clear framework for assessing your rusted microwave.
What Causes a Microwave to Rust Inside
Rust inside your microwave doesn’t appear randomly – it develops through a predictable process of moisture exposure and coating deterioration. The interior of your microwave is coated with a protective enamel layer that shields the bare metal from moisture and food acids. When this coating gets damaged, the exposed metal oxidizes, creating rust.
The most common culprit is moisture accumulation from everyday use. Every time you heat food, steam releases into the microwave cavity. Combine this with food splatters – especially acidic foods like tomatoes or citrus – and you’ve got a recipe for coating breakdown. The moisture gets trapped against the interior surface, slowly eating away at the protective layer.
Environmental factors accelerate this process. If you live in a humid climate, your microwave faces constant moisture pressure. Poor ventilation around the unit makes it worse. Age also plays a role – microwaves over 5 years old often show coating wear simply from repeated heating and cooling cycles.
A surprising number of users report rust specifically under the turntable. This area traps moisture and food debris that goes unnoticed during cleaning, creating the perfect conditions for rust development in a hidden spot.
Is a Microwave Rusted Inside Dangerous?
Here’s the direct answer you’re looking for: a microwave with minor surface rust is generally safe to use temporarily, but rust that creates holes or exposes bare metal can pose three specific risks. The danger isn’t the rust itself – it’s what the rust represents.
The primary concern is radiation leakage. Your microwave’s interior coating isn’t just there for looks – it’s part of the Faraday cage that contains the microwave radiation. When rust compromises this shielding, especially near the door seal or magnetron, radiation can escape. However, Reddit users familiar with microwave physics point out that microwave radiation itself isn’t particularly dangerous to humans – it doesn’t cause cancer or sunburn like ionizing radiation.
Food contamination is a more immediate risk. As rust develops, it can flake off into your food. While rust itself (iron oxide) isn’t toxic in small amounts, nobody wants metal particles in their meals. More concerning is that rust often harbors bacteria in its rough surface, creating a hygiene issue beyond the metallic taste.
Electrical hazards represent the third danger. Rust can spread to electrical components, causing shorts, sparks, or even fires in extreme cases. If you notice any arcing or unusual sounds when operating your rusted microwave, stop using it immediately.
Rust Severity Scale: When to Worry vs When to Act
Not all rust is created equal. Understanding where your microwave falls on the rust severity scale helps you make an informed decision about repair versus replacement. Here’s a practical framework based on appliance repair guidelines and real user experiences.
Level 1: Minor Surface Rust – You see small rust spots or discoloration, but the metal feels solid when you press on it. No holes are visible. The rust hasn’t spread to the door frame, waveguide cover, or electrical components. This level is generally safe to use while you plan repairs.
Level 2: Moderate Rust Damage – The rust covers a larger area, and you can see pitting in the metal. The coating is clearly deteriorating around the rust spots. You might notice the rust spreading toward seams or edges. At this level, you should assess the location carefully – if it’s away from critical components, you may be able to repair it.
Level 3: Severe Rust – There are actual holes in the metal, or the rust has penetrated deeply enough that you can push through with light pressure. Rust is affecting the door seal, waveguide, or near the magnetron. The microwave shows other signs of wear – sparking, unusual noises, or inconsistent heating. This level requires replacement – the structural integrity is compromised.
How to Remove Rust from Microwave Interior
If your microwave falls into Level 1 or early Level 2, you can attempt rust removal yourself. Many users have successfully extended their microwave’s life by years with proper repair. Here’s a step-by-step guide based on proven methods shared in DIY communities.
Step 1: Safety First – Unplug your microwave completely. Let it sit for at least 10 minutes to discharge the capacitor – this contains potentially lethal voltage even when unplugged. Remove the turntable and waveguide cover if possible.
Step 2: Clean with Baking Soda Paste – Mix three parts baking soda with one part water to form a thick paste. Apply this to the rusted areas and let it sit for 15-20 minutes. The mild abrasive action helps loosen surface rust while the baking soda neutralizes acidic residues. Scrub gently with a non-abrasive sponge, then wipe clean with a damp cloth.
Step 3: Sand with Fine-Grit Sandpaper – Use 180-220 grit sandpaper to gently sand the rusted areas. Work in circular motions, applying light pressure. Your goal is to remove loose rust and create a smooth surface for the paint to adhere to. Wipe away all dust with a damp cloth and let the area dry completely.
Step 4: Apply Microwave-Safe Paint – This is the critical step. Use only appliance epoxy specifically rated for microwave interiors – standard spray paint will release toxic fumes when heated. Products like Q-LINE Microwave Cavity Paint or appliance-grade epoxy are designed for this purpose. Apply thin coats following the product directions, allowing each coat to dry fully.
Step 5: Cure and Test – After the final coat, let the paint cure for at least 24 hours. When you first use the microwave, place a microwave-safe container with water inside and run it on high for 2-3 minutes. This tests the repair and helps any remaining paint fumes dissipate safely. Watch for any unusual smells or sounds.
When Should You Replace a Rusted Microwave?
Replacement becomes necessary when repair isn’t practical or safe. Here are the specific criteria that indicate it’s time to shop for a new microwave rather than attempting repair.
If you find any holes in the metal interior – not just rust spots, but actual perforations – replacement is your only safe option. These holes compromise the microwave’s shielding and can’t be reliably repaired. The same applies if the rust has affected the door seal. The door is a critical safety component, and rust here means the microwave can no longer maintain its radiation containment.
Rust near the magnetron or electrical components is another red flag. These parts are expensive to replace, and rust here indicates systemic moisture problems that will likely recur. If your microwave is over 7-10 years old with extensive rust, you’re approaching the end of its service life anyway. Microwaves typically last 7-10 years with normal use, and a heavily rusted unit at this age isn’t worth the repair investment.
Consider the cost-benefit analysis. Microwave cavity paint costs $15-25, while a new basic microwave runs $80-150. If your repair would require multiple sessions and the rust keeps returning, that’s money better spent on a replacement. As one forum user noted after attempting multiple repairs on a severely rusted unit: “I should have just bought a new one two years ago.”
How to Prevent Rust Inside Your Microwave
Prevention is far easier than cure. The good news is that simple habits can dramatically extend your microwave’s rust-free life. Users who follow these practices report their microwaves staying rust-free for 8+ years even in humid climates.
The single most effective habit is wiping down your microwave immediately after use while it’s still warm. The warmth makes food residue easier to remove, and you’re preventing moisture from sitting on surfaces. Keep a microfiber cloth near your microwave specifically for this purpose – it takes 30 seconds and saves you hours of rust removal later.
Cover your food. Microwave splatter guards, paper towels, or microwave-safe lids prevent 90% of the food splatters that lead to rust. This is especially important for acidic foods like tomato sauce, citrus, or vinegar-based dishes – these eat through the coating faster than neutral foods.
Keep the ventilation clear. Most microwaves have vents that need to stay unobstructed. Don’t push your microwave flush against the wall – leave at least 2-3 inches of clearance. If you have a built-in unit, make sure the cabinet vents aren’t blocked. This airflow helps moisture escape rather than getting trapped inside.
Leave the door slightly ajar when not in use, especially in humid environments. This simple practice allows air circulation that prevents moisture buildup. It sounds small, but users in coastal areas swear by this method for preventing rust.
Avoid metal utensils and abrasive cleaners inside the microwave. Metal can scratch the protective coating, creating entry points for moisture. Steel wool scouring pads might remove food effectively, but they’re also removing your rust protection. Stick to soft sponges and mild cleaners.
Finally, inspect your microwave monthly as part of your cleaning routine. Catching rust early – when it’s just a small spot – makes removal trivial. Let it go for months, and you’re facing a much bigger repair job or replacement.
FAQs
Is it safe to use a microwave that has rusted inside?
A microwave with minor surface rust is generally safe for temporary use, but rust that creates holes or affects the door seal poses radiation leakage risks. Assess the severity – surface rust away from critical components is less concerning than deep rust with metal perforation.
Should you replace your microwave if it’s rusty?
Replace your microwave if rust has created holes in the interior, affected the door seal, spread near electrical components, or if the unit is over 7-10 years old with extensive rust. Minor surface rust can often be repaired with proper cleaning and microwave-safe paint.
Does a rusty microwave leak radiation?
Yes, if the rust has compromised the protective interior coating, especially near the door seal or magnetron. The interior coating is part of the microwave’s radiation shielding. Holes or deep rust can allow radiation to escape, though microwave radiation itself is less dangerous than ionizing radiation types.
Can you paint over rust inside a microwave?
Yes, but only with microwave-safe appliance epoxy specifically rated for microwave interiors. First remove loose rust with sandpaper, clean thoroughly, then apply thin coats of approved paint. Standard spray paint releases toxic fumes when heated and should never be used inside microwaves.
Is rust from microwave toxic?
Rust itself (iron oxide) isn’t highly toxic in small amounts, but it can harbor bacteria in its rough surface. The bigger concern is that rust indicates your microwave’s protective coating is compromised, potentially allowing radiation leakage or introducing metal particles and bacteria into your food.
Conclusion
Discovering your microwave has rusted inside isn’t automatically a disaster – it’s a signal to assess the situation and make an informed decision. Start by determining the rust severity: minor surface rust can often be repaired with proper cleaning and microwave-safe paint, while holes or rust affecting critical components mean it’s time for replacement. The key is understanding what the rust represents – compromised protective shielding – rather than panicking about the rust itself. Use the severity scale to assess your specific situation, follow the removal steps for minor rust, and don’t hesitate to replace when safety is compromised. Your microwave rusted inside doesn’t have to mean an immediate purchase, but it does demand your attention and a safety-first approach.



Leave a Comment