
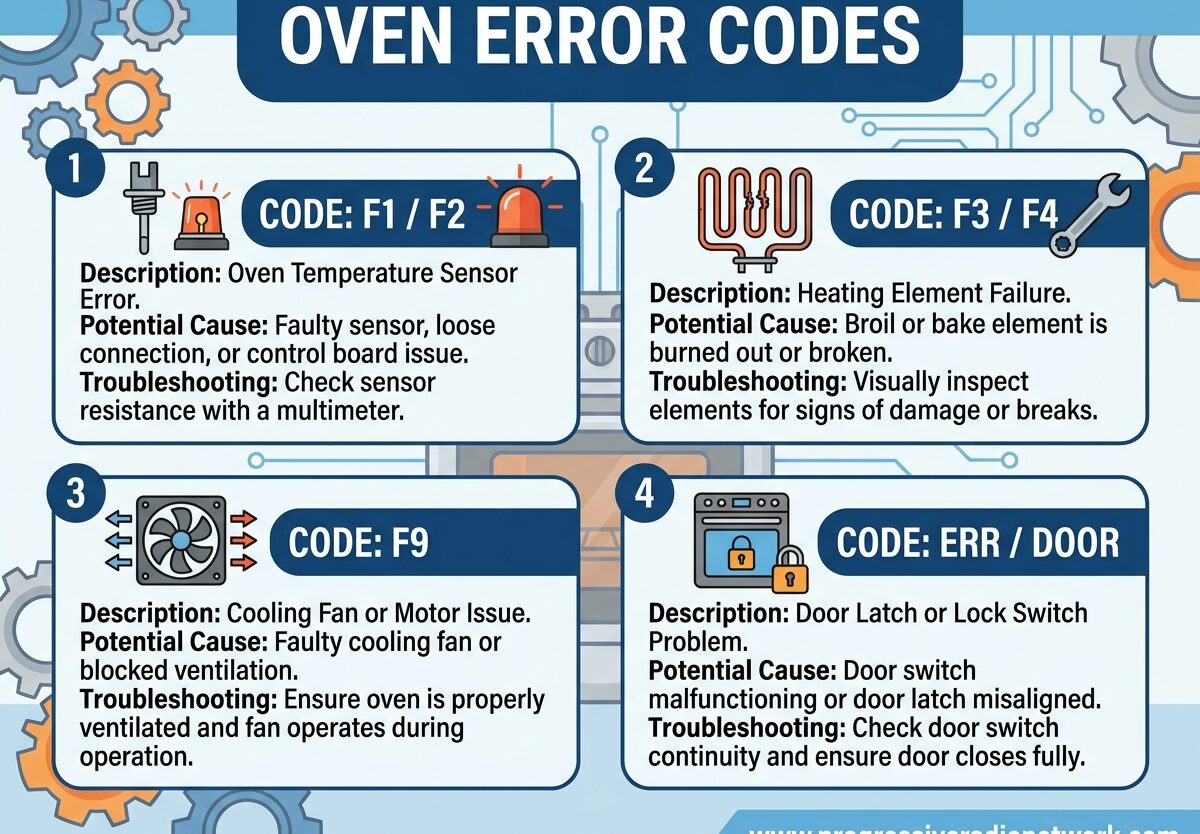
When your oven displays an unfamiliar code on its digital screen, it can feel like your appliance is speaking a different language. These oven error codes are actually diagnostic messages designed to help you identify specific problems with your appliance’s electronic control system, temperature sensors, door locks, or other critical components.
Understanding what these codes mean can save you hundreds of dollars in unnecessary service calls while helping you determine when a problem requires professional attention. Modern ovens use sophisticated electronic control boards that continuously monitor various sensors and systems, displaying specific codes when something malfunctions or falls outside normal operating parameters.
After troubleshooting ovens for over 15 years and helping countless homeowners decode these frustrating messages, I’ve compiled the most comprehensive guide to understanding and resolving oven error codes. Let’s break down exactly what your oven is trying to tell you.
Most Common Oven Error Codes Quick Reference
Here’s a fast reference guide to the error codes you’re most likely to encounter:
- F1 or F5 – Electronic control board or keypad failure
- F2 or F3 – Temperature sensor (RTD probe) malfunction
- F9 – Door lock mechanism problem
- PF or Power Failure – Power interruption detected
- E0 or E1 – Control board or signal error
- F0 – Switch error or stuck button
- F4 – Open or shorted temperature sensor
- Bad Line – Voltage or power supply problem
- LOC or Lock On – Control lock is activated
- DEMO – Demo mode is active (not an actual error)
What Are Oven Error Codes?
Oven error codes are alphanumeric diagnostic signals displayed on your oven’s control panel when the electronic control board detects a malfunction or abnormal reading from one of the appliance’s sensors or components. These codes are part of the oven’s self-diagnostic system designed to help technicians and homeowners identify problems quickly.
When a sensor sends readings outside the normal range, or when a component fails to respond properly, the control board logs a specific fault code and displays it on the screen. This system helps pinpoint whether the issue is with the temperature sensor, control board, door lock assembly, keypad, or another component.
Modern ovens use an Electronic Range Control (ERC) or Electronic Oven Control (EOC) board that monitors multiple circuits simultaneously. This board constantly checks for open circuits, short circuits, abnormal resistance values, and failed responses from various components throughout the oven.
Understanding these codes helps you make informed decisions about whether you can safely fix the problem yourself or if you need to call a professional appliance repair technician. Some codes indicate simple issues that can be resolved with a reset, while others signal component failures that require replacement.
F1 Error Code – Control Board and Keypad Problems
The F1 error code is one of the most common and frustrating issues you’ll encounter with modern ovens. This code typically indicates a problem with the electronic control board itself, a stuck or shorted keypad button, or a wiring issue between the keypad and control board.
When the control board detects that a button on the keypad is stuck in the pressed position, or if there’s a short circuit in the keypad membrane, it will display F1 and often beep continuously. This can happen due to moisture accumulation, food spills, or normal wear and tear on the keypad contacts over time.
Sometimes the F1 code appears intermittently at first, occurring randomly and then clearing on its own. This intermittent behavior often indicates the early stages of keypad failure or a developing connection problem that will worsen over time.
To troubleshoot an F1 error code:
- Disconnect power to the oven for 5 minutes by unplugging it or turning off the circuit breaker
- Restore power and see if the code returns
- If the code returns immediately, the control board or keypad likely needs replacement
- If the code appears during cooking, check for spills or moisture around the control panel
- Try pressing each button to identify if any feel stuck or unresponsive
Unfortunately, F1 codes often require professional repair or replacement of the electronic control board assembly, which can cost between $150-$400 depending on your oven model. However, sometimes simply cleaning around the keypad and ensuring the area is completely dry can resolve the issue if moisture was the trigger.
F3 Error Code – Temperature Sensor Failure
The F3 error code is one of the most repairable problems you’ll encounter because it usually points to a faulty oven temperature sensor, also known as an RTD (Resistance Temperature Detector) probe. This sensor monitors the internal temperature of your oven and sends readings to the control board.
When the control board receives resistance readings from the temperature sensor that fall outside the acceptable range (typically around 1,000-1,100 ohms at room temperature), it triggers the F3 code. This can happen due to normal sensor failure over time, exposure to extremely high temperatures, or physical damage to the probe.
The good news is that oven temperature sensors are relatively inexpensive parts, typically costing $15-$40, and are often accessible for DIY replacement. They’re usually located in the rear upper corner of the oven cavity and can be removed with just a screwdriver.
To test if your temperature sensor is causing the F3 code:
- Disconnect power to the oven
- Locate the temperature sensor probe in the oven cavity
- Disconnect the wires from the sensor terminals
- Use a multimeter to test resistance across the sensor terminals
- At room temperature (70°F), you should read approximately 1,080-1,095 ohms
- Readings significantly outside this range indicate a failed sensor
If your test confirms a faulty sensor, replacement is straightforward. Simply remove the mounting screws, pull the old sensor out, disconnect the wiring harness, and reverse the process with the new sensor. This DIY repair can save you over $200 in service call fees.
F9 Error Code – Door Lock Mechanism Issues
The F9 error code specifically relates to problems with your oven’s door lock assembly, which is most commonly engaged during the self-cleaning cycle. This code appears when the control board cannot properly engage or disengage the door lock mechanism, or when it detects an open circuit in the door lock wiring.
F9 codes frequently occur after a self-cleaning cycle when the door won’t unlock, or when the lock mechanism becomes stuck in the locked position. This can happen due to mechanical failure of the lock motor, overheating during the cleaning cycle, or electrical issues with the lock switch or wiring.
A particularly frustrating scenario is when the F9 code appears after a power interruption during self-cleaning, leaving your oven door locked with the oven still extremely hot. In these cases, you’ll need to wait for the oven to cool completely before attempting any manual release procedures.
To address F9 door lock errors:
- Allow the oven to cool completely if it was recently in use
- Try starting a new self-clean cycle, then cancel it after 60 seconds to reset the lock
- Locate the manual door lock release (usually accessed through the rear or top panel)
- Check the door lock wiring harness for loose connections or damage
- Test the door lock motor with a multimeter if accessible
Door lock assemblies typically cost $50-$150 and are moderately difficult to replace yourself. If you’re uncomfortable working with oven disassembly, this is a repair best left to professionals. However, always try the reset procedure first, as many F9 codes clear after a complete power cycle.
How to Reset Oven Error Codes
Resetting oven error codes is often the first troubleshooting step and can resolve temporary issues caused by power surges, electrical glitches, or minor sensor anomalies. The reset process allows your oven’s control board to clear stored error codes and recalibrate its systems.
Power Reset Method:
- Turn off the oven and cancel any active cooking cycles
- Unplug the oven from the electrical outlet or turn off the circuit breaker
- Wait at least 5 minutes to allow the control board to fully discharge
- Restore power by plugging the oven back in or turning on the breaker
- Wait 1-2 minutes for the control board to initialize
- Check if the error code has cleared
For ovens hardwired without an accessible plug, locate your electrical panel and find the dedicated circuit breaker for your oven. Flip it off, wait the full 5 minutes, then flip it back on. This complete power interruption often resets electronic glitches that caused the error code.
If the error code returns immediately after reset, this indicates a genuine hardware problem rather than a temporary glitch. Persistent codes that won’t clear after reset usually require component replacement or professional service.
Special Reset for Self-Clean Lock Issues:
When dealing with door lock errors after self-cleaning, try this reset sequence: Start a new self-clean cycle, let it run for exactly 60 seconds, then press Cancel/Off. This often resets the lock mechanism and allows the door to release once the oven has cooled.
Brand-Specific Oven Error Codes
While many error codes are universal across oven brands, some manufacturers use proprietary codes specific to their models. Understanding these brand-specific codes can help you diagnose problems more accurately and find the right repair solutions.
Whirlpool Oven Error Codes
Whirlpool ovens typically use F-codes for most errors and E-codes for certain control board issues. Common Whirlpool codes include F1 (keypad), F3 (temperature sensor), F6 (lock switch), F9 (door lock), E0 (control button), and PF (power failure).
Whirlpool also uses specific codes like F7 (stuck key), F8 (lock motor), and E1 (control signal error). Their ovens may display “LOC” when the control lock is activated, which isn’t an error but can confuse users unfamiliar with the feature.
Samsung Oven Error Codes
Samsung uses a different error code system with C-codes (communication errors), E-codes (sensor or component errors), and SE (system errors). Common Samsung codes include C-20, C-21 (communication), E-01 through E-24 (various sensor issues), dE or do (door errors), and SE (touch panel or system error).
Samsung ovens also display unique codes like C-30 (cooling fan error), C-31 (overheating), and C-A0 (demonstration mode). The good news is that most Samsung error codes can be cleared by simply turning off the oven at the breaker for 5 minutes.
GE and GE Profile Oven Error Codes
GE ovens use a comprehensive range of F-codes (F0 through FF) plus special codes like “Bad Line” (power supply issue), “Unlock Door” (door locked after cycle), “LOC” (control lock), “ERR” (generic error), “OFF” (power failure), and Sabbath mode indicators.
Specific GE codes include F1 ( ERC/keypad), F2 (temperature exceeded), F3/F4 (sensor open/short), F7 (lock function), and F9 (door lock). GE ovens may also display “Bad Line” when voltage drops below acceptable levels, often during power company issues.
Frigidaire Oven Error Codes
Frigidaire uses distinctive codes including F10 (runaway temperature – overheating detected), F30 (open RTD probe), F90 through F94 (door lock circuit issues), and PF (power failure). The F10 code is particularly serious as it indicates the oven has detected dangerously high temperatures.
Frigidaire also displays codes like F11 (control board failure), F13 (keypad error), F14 (bad EEPROM), and F15 (bad EDCOM). These codes generally indicate electronic control board problems requiring professional service or board replacement.
DIY vs Professional Repair – When to Call a Technician
Deciding whether to attempt DIY repairs or call a professional can save you both money and frustration. Some oven error codes indicate problems that are safely repairable by homeowners with basic tools, while others require specialized knowledge and pose safety risks if improperly addressed.
Safe for Most DIY Repairs:
- PF (Power Failure) codes – simply need reset
- F3/F4 Temperature Sensor – accessible, inexpensive part
- F9 Door Lock (after cooling) – try reset procedures first
- LOC or Control Lock – not an error, just disable the feature
- DEMO Mode – disable through control panel settings
Call a Professional For:
- F1, F5, F7 Control Board/Keypad errors – require electronic expertise
- F10 Thermal Runaway – serious safety concern
- F11-F15 Control Board Failures – complex electronic repairs
- Gas oven errors involving gas valves or ignition systems
- Any repair requiring oven disassembly beyond removing panels
- Errors persisting after attempted DIY repair
Professional oven repair typically costs $150-$300 including labor, with parts adding to that total. However, this professional service includes proper diagnosis, quality parts, and warranty on the repair. DIY repairs save money but require time, tools, and comfort working with electrical appliances.
Consider your oven’s age when deciding between repair and replacement. If your oven is over 10-12 years old and needs a major repair like a control board replacement ($200-$400), it may be more cost-effective to replace the entire unit, especially if other components show signs of wear.
Preventing Future Oven Error Codes
While many error codes result from component failures and normal wear, proper maintenance can prevent some issues and extend your oven’s lifespan. Regular care helps avoid moisture damage, electrical problems, and sensor failures that trigger error codes.
Maintenance Tips:
- Clean spills around the control panel immediately to prevent keypad damage
- Avoid using excessive water when cleaning inside the oven
- Use the self-clean function sparingly (the extreme heat stresses components)
- Check door gasket condition and replace if worn or damaged
- Ensure proper ventilation to prevent control board overheating
- Use surge protectors where possible to prevent electrical damage
Self-cleaning cycles are particularly hard on ovens. The extreme temperatures (often 800-900°F) can damage electronic components, warp door seals, and stress the control board. Consider using alternative cleaning methods like oven cleaners or steam cleaning features if your oven offers them.
Power quality also affects oven electronics. If you live in an area with frequent power surges or outages, consider installing a whole-home surge protector. These devices protect expensive appliances like ovens from voltage spikes that can damage sensitive electronic control boards.
Regular inspection of visible wiring during routine cleaning can catch problems early. Look for frayed wires, loose connections, or signs of overheating like discoloration around electrical components. Addressing these issues promptly can prevent more serious failures and error codes.
FAQs
How do I reset my oven error code?
Turn off the oven and unplug it or turn off the circuit breaker for 5 minutes. This allows the control board to fully discharge and clear stored error codes. After restoring power, wait 1-2 minutes for initialization. If the code returns immediately, you have a genuine hardware problem requiring repair rather than a temporary glitch.
What does the F1 code mean on my oven?
The F1 error code indicates a problem with your oven’s electronic control board or keypad. This typically occurs when a button is stuck, there’s a short circuit in the keypad membrane, or moisture has accumulated around the control panel. F1 codes often require replacement of the control board assembly, though sometimes drying out a wet keypad can resolve the issue.
Why is my oven showing an error after a power outage?
Power outages often trigger PF (Power Failure) codes or other error messages as the control board reinitializes. This is normal behavior. Try resetting by turning off the circuit breaker for 5 minutes, then restoring power. If the error persists after reset, the power surge may have damaged a component, requiring professional inspection.
Can I fix an F3 error code myself?
Yes, F3 error codes are among the most DIY-friendly oven repairs. The F3 code indicates a faulty temperature sensor (RTD probe), which costs only $15-$40 and is typically accessible in the oven cavity. You can test the sensor with a multimeter (should read 1,080-1,095 ohms at room temperature) and replace it yourself with basic tools, saving over $200 in service call fees.
How much does it cost to repair oven error codes?
DIY temperature sensor replacement costs $15-$40 for the part. Professional oven repair typically runs $150-$300 including labor. Control board replacements cost $200-$400 for parts plus labor. Door lock assemblies run $50-$150 for parts. If your oven is over 10-12 years old and needs a major repair, replacement may be more cost-effective than repair.
Why won’t my oven door unlock after self-cleaning?
This is typically caused by an F9 error code indicating a door lock mechanism problem. The door may remain locked if the lock motor failed, the lock switch malfunctioned, or a power interruption occurred during cleaning. Try starting a new self-clean cycle, cancel after 60 seconds, and allow complete cooling. If this doesn’t work, you may need to access the manual door lock release from the rear panel.
Conclusion: Understanding Your Oven’s Error Codes
Oven error codes don’t have to be a mystery. By understanding what these diagnostic messages mean, you can make informed decisions about troubleshooting and repair, potentially saving hundreds of dollars in unnecessary service calls. Whether you’re dealing with a simple power failure code that just needs a reset, or a more complex control board issue requiring professional attention, knowing the difference is valuable.
Remember that PF codes and many temporary glitches can be resolved with a simple 5-minute power reset. F3 temperature sensor errors are often DIY-friendly repairs with inexpensive parts. But F1 control board issues, F10 thermal runaway codes, and any problems involving gas components should be addressed by qualified professionals.
Regular maintenance, prompt attention to warning signs, and avoiding excessive self-cleaning cycles can help prevent many common error codes. When in doubt, start with the reset procedure and then assess whether the problem is something you can safely tackle yourself or if it’s time to call in a professional appliance repair technician.
This guide to oven error codes should help you diagnose and address most common problems you’ll encounter. Keep it bookmarked for the next time your oven displays an unfamiliar code, and you’ll be prepared to take the right action to get your appliance back up and running.



Leave a Comment